
Owner's Manual
Page 1
2010 Chevrolet Cobalt Owner Manual M In Brief ...1-1 Instrument Panel ...1-2 Initial Drive Information ...1-4 Vehicle Features ...1-14 Performance and Maintenance ...1-18 Seats and Restraint System ...2-1 Front Seats ...2-2 Rear Seats ...2-9 Safety... ...3-37 Storage Areas ...3-39 Sunroof ...3-39 Instrument Panel ...4-1 Instrument Panel Overview ...4-3 Climate Controls ...4-14 Warning Lights, Gages, and Indicators ...4-18 Driver Information Center (DIC) ...4-37 Audio System(s) ...4-52 Driving Your Vehicle ...5-1 Your Driving, the Road, and the Vehicle ...5-2 Towing ...5-30 Service and Appearance...
2010 Chevrolet Cobalt Owner Manual M In Brief ...1-1 Instrument Panel ...1-2 Initial Drive Information ...1-4 Vehicle Features ...1-14 Performance and Maintenance ...1-18 Seats and Restraint System ...2-1 Front Seats ...2-2 Rear Seats ...2-9 Safety... ...3-37 Storage Areas ...3-39 Sunroof ...3-39 Instrument Panel ...4-1 Instrument Panel Overview ...4-3 Climate Controls ...4-14 Warning Lights, Gages, and Indicators ...4-18 Driver Information Center (DIC) ...4-37 Audio System(s) ...4-52 Driving Your Vehicle ...5-1 Your Driving, the Road, and the Vehicle ...5-2 Towing ...5-30 Service and Appearance...

Owner's Manual
Page 2
2010 Chevrolet Cobalt Owner Manual M Maintenance Schedule ...7-1 Maintenance Schedule ...7-2 Customer Assistance Information ...8-1 Customer Assistance and Information ...8-2 Reporting Safety Defects ...8-15 Vehicle Data Recording and Privacy ...8-17 Index ...i-1
2010 Chevrolet Cobalt Owner Manual M Maintenance Schedule ...7-1 Maintenance Schedule ...7-2 Customer Assistance Information ...8-1 Customer Assistance and Information ...8-2 Reporting Safety Defects ...8-15 Vehicle Data Recording and Privacy ...8-17 Index ...i-1

Owner's Manual
Page 3
...-4123 Numéro de poste 6438 de langue française www.helminc.com Index To quickly locate information about the vehicle, use the index in Canada, substitute the name "General Motors of Canada Limited" for ...and the page number where it appears in this manual in the U.S.A. Litho in the vehicle for Chevrolet Motor Division wherever it can be on your specific vehicle either because they are options that you did... may not be obtained from : GENERAL MOTORS, GM, the GM Emblem, CHEVROLET, the CHEVROLET Emblem, and the name COBALT are registered trademarks of the manual. iii
...-4123 Numéro de poste 6438 de langue française www.helminc.com Index To quickly locate information about the vehicle, use the index in Canada, substitute the name "General Motors of Canada Limited" for ...and the page number where it appears in this manual in the U.S.A. Litho in the vehicle for Chevrolet Motor Division wherever it can be on your specific vehicle either because they are options that you did... may not be obtained from : GENERAL MOTORS, GM, the GM Emblem, CHEVROLET, the CHEVROLET Emblem, and the name COBALT are registered trademarks of the manual. iii
Owner's Manual
Page 4
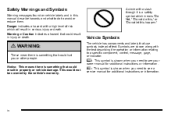
Symbols are shown along with the text describing the operation or information relating to avoid or reduce them. Safety Warnings and Symbols Warning... indicates a hazard with a slash through it is shown when you need to see a service manual for additional instructions or information. * : This symbol is a safety symbol which will result in serious injury or death. Notice: This means there is... shown when you need to see your owner manual for additional instructions or information. Warning or Caution indicates a hazard that could result in property or vehicle damage.
Symbols are shown along with the text describing the operation or information relating to avoid or reduce them. Safety Warnings and Symbols Warning... indicates a hazard with a slash through it is shown when you need to see a service manual for additional instructions or information. * : This symbol is a safety symbol which will result in serious injury or death. Notice: This means there is... shown when you need to see your owner manual for additional instructions or information. Warning or Caution indicates a hazard that could result in property or vehicle damage.

Owner's Manual
Page 5
For more information on the vehicle and what they mean. Vehicle Symbol Chart Here are some additional symbols that may be found on the symbol, refer to the ...
For more information on the vehicle and what they mean. Vehicle Symbol Chart Here are some additional symbols that may be found on the symbol, refer to the ...

Owner's Manual
Page 7
Section 1 Instrument Panel ...1-2 Initial Drive Information ...1-4 Remote Keyless Entry (RKE) System ...1-4 Remote Vehicle Start ...1-4 Door Locks ...1-5 Trunk Release ...1-6 Windows ...1-6 Seat Adjustment ...1-6 Head Restraint Adjustment ...1-9 Safety Belt ...1-9 Sensing System for Passenger Airbag ...1-...
Section 1 Instrument Panel ...1-2 Initial Drive Information ...1-4 Remote Keyless Entry (RKE) System ...1-4 Remote Vehicle Start ...1-4 Door Locks ...1-5 Trunk Release ...1-6 Windows ...1-6 Seat Adjustment ...1-6 Head Restraint Adjustment ...1-9 Safety Belt ...1-9 Sensing System for Passenger Airbag ...1-...

Owner's Manual
Page 9
... page 4‑6. Windshield Wipers on page 4‑5 and Windshield Washer on page 4‑4. K. Horn on page 4‑6 (If Equipped) . R. A. B. Cruise Control on page 4‑3. Driver Information Center (DIC) on page 4‑19. Instrument Panel Cluster on page 4‑37. E. Audio Steering Wheel Controls on page 4‑3. Hazard Warning Flashers on page...
... page 4‑6. Windshield Wipers on page 4‑5 and Windshield Washer on page 4‑4. K. Horn on page 4‑6 (If Equipped) . R. A. B. Cruise Control on page 4‑3. Driver Information Center (DIC) on page 4‑19. Instrument Panel Cluster on page 4‑37. E. Audio Steering Wheel Controls on page 4‑3. Hazard Warning Flashers on page...
Owner's Manual
Page 10
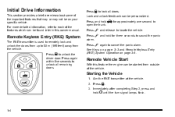
Initial Drive Information This section provides a brief overview about some of the vehicle. Press K to cancel the panic alarm. Press L again to unlock the driver door. Starting the ... after completing Step 2, press and hold open the trunk. V for three seconds to sound the panic alarm. Press Q to unlock all doors. For more detailed information, refer to 60 m (195 feet) away from up to each of the features which can be started from outside of the important features that may...
Initial Drive Information This section provides a brief overview about some of the vehicle. Press K to cancel the panic alarm. Press L again to unlock the driver door. Starting the ... after completing Step 2, press and hold open the trunk. V for three seconds to sound the panic alarm. Press Q to unlock all doors. For more detailed information, refer to 60 m (195 feet) away from up to each of the features which can be started from outside of the important features that may...
Owner's Manual
Page 11
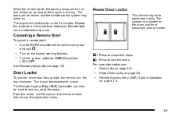
.... See Remote Vehicle Start on the hazard warning flashers. Repeat the steps for 10 minutes. Turn the ignition switch to lock the doors. For more information see: Door Locks To lock the driver door from outside the vehicle, turn on and remain on page 3‑4. When the vehicle starts, the parking...
.... See Remote Vehicle Start on the hazard warning flashers. Repeat the steps for 10 minutes. Turn the ignition switch to lock the doors. For more information see: Door Locks To lock the driver door from outside the vehicle, turn on and remain on page 3‑4. When the vehicle starts, the parking...

Owner's Manual
Page 15
Refer to the following sections for Children (LATCH) on page 2‑15. Lap-Shoulder Belt on how to Wear Safety Belts Properly on page 2‑41. Safety Belt 1-9 Lower Anchors and Tethers for important information on page 2‑24. How to use safety belts properly... Head Restraint Adjustment Do not drive until the head restraints for Everyone on page 2‑7. Safety Belts: They Are for all occupants are installed and adjusted properly. See Head Restraints on page 2‑10.
Refer to the following sections for Children (LATCH) on page 2‑15. Lap-Shoulder Belt on how to Wear Safety Belts Properly on page 2‑41. Safety Belt 1-9 Lower Anchors and Tethers for important information on page 2‑24. How to use safety belts properly... Head Restraint Adjustment Do not drive until the head restraints for Everyone on page 2‑7. Safety Belts: They Are for all occupants are installed and adjusted properly. See Head Restraints on page 2‑10.
Owner's Manual
Page 16
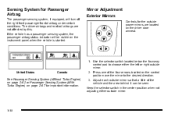
... pad to move the mirror to choose either outside mirror. The driver airbags and roof-rail airbags are located on page 2‑67 for important information. 1-10 United States Canada 2. Keep the selector switch in the center position when not adjusting either the left or right outside mirror. Sensing System for...
... pad to move the mirror to choose either outside mirror. The driver airbags and roof-rail airbags are located on page 2‑67 for important information. 1-10 United States Canada 2. Keep the selector switch in the center position when not adjusting either the left or right outside mirror. Sensing System for...
Owner's Manual
Page 18
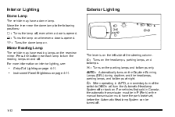
... Canada, the automatic transmission must have reading lamps on the parking lamps and taillamps only. AUTO : Automatically turns on page 4‑11. 1-12 For more information on page 4‑11. Entry/Exit Lighting on interior lighting, see: . . Interior Lighting Dome Lamp The vehicle may have the park brake set, before the...
... Canada, the automatic transmission must have reading lamps on the parking lamps and taillamps only. AUTO : Automatically turns on page 4‑11. 1-12 For more information on page 4‑11. Entry/Exit Lighting on interior lighting, see: . . Interior Lighting Dome Lamp The vehicle may have the park brake set, before the...
Owner's Manual
Page 19
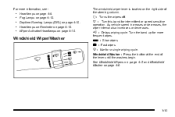
...;10. x : Delays wiping cycle. Windshield Washer : Press the button at the end of the steering column. 9 : Turns the wipers off. & : Turn this band for more information, see: ... Fog Lamps on page 4‑10. Wiper Activated Headlamps on page 4‑6. Turn the band up for intermittent or speed sensitive operation. See Windshield...
...;10. x : Delays wiping cycle. Windshield Washer : Press the button at the end of the steering column. 9 : Turns the wipers off. & : Turn this band for more information, see: ... Fog Lamps on page 4‑10. Wiper Activated Headlamps on page 4‑6. Turn the band up for intermittent or speed sensitive operation. See Windshield...
Owner's Manual
Page 21
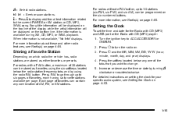
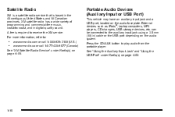
... current FM-RDS or XM station; For radios with CD (MP3) player: 1. Each page of favorites can be programmed on the bottom line, it the information is not available, "No Info" displays. Press H and the HR, MIN, MM, DD, YYYY (hour, minute, month, day, and year) displays. 4. f : Select radio stations. ...to 18 stations (six FM1, six FM2, and six AM), can contain any one of the display while the artist information will be stored as either favorites or presets. For more information about these and other radio features, see Radio(s) on setting the clock for the Radio with CD (MP3) and ...
... current FM-RDS or XM station; For radios with CD (MP3) player: 1. Each page of favorites can be programmed on the bottom line, it the information is not available, "No Info" displays. Press H and the HR, MIN, MM, DD, YYYY (hour, minute, month, day, and year) displays. 4. f : Select radio stations. ...to 18 stations (six FM1, six FM2, and six AM), can contain any one of the display while the artist information will be stored as either favorites or presets. For more information about these and other radio features, see Radio(s) on setting the clock for the Radio with CD (MP3) and ...
Owner's Manual
Page 22
... using a 3.5 mm (1/8 in) cable or the USB port depending on the audio faceplate. can be connected to play audio from the portable player. For more information, refer to: . .
... using a 3.5 mm (1/8 in) cable or the USB port depending on the audio faceplate. can be connected to play audio from the portable player. For more information, refer to: . .
Owner's Manual
Page 23
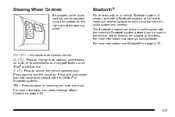
... to turn the sound on an iPod® or USB device. For more information, see Bluetooth® on the right side of the steering wheel. e + / e − : Increases or decreases volume. For more information visit www.gm.com/bluetooth. Not all phones will support all functions. The ...Bluetooth enabled cell phone must be adjusted using the vehicle's audio system and controls. For more information, see Audio Steering Wheel Controls on page 4‑84. 1-17 Press and hold longer than two seconds to interact with a Bluetooth enabled...
... to turn the sound on an iPod® or USB device. For more information, see Bluetooth® on the right side of the steering wheel. e + / e − : Increases or decreases volume. For more information visit www.gm.com/bluetooth. Not all phones will support all functions. The ...Bluetooth enabled cell phone must be adjusted using the vehicle's audio system and controls. For more information, see Audio Steering Wheel Controls on page 4‑84. 1-17 Press and hold longer than two seconds to interact with a Bluetooth enabled...

Owner's Manual
Page 24
.... d on page 4‑13 (If Equipped). Power Outlets Accessory power outlets can be used to resume or accelerate speed. For more information, see Cruise Control on page 4‑6. For more information, see Traction Control System (TCS) on page 5‑9. 1-18 See DIC Warnings and Messages on traction control. Press and release the...
.... d on page 4‑13 (If Equipped). Power Outlets Accessory power outlets can be used to resume or accelerate speed. For more information, see Cruise Control on page 4‑6. For more information, see Traction Control System (TCS) on page 5‑9. 1-18 See DIC Warnings and Messages on traction control. Press and release the...
Owner's Manual
Page 25
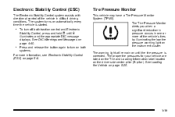
...Tire Pressure Monitor alerts you when a significant reduction in pressure occurs in difficult driving conditions. For more of the vehicle in one or more information, see Electronic Stability Control (ESC) on page 5‑6. 1-19 See DIC Warnings and Messages on the driver side center pillar (B pillar)....release the button again to turn off both systems. . The proper tire pressures for your vehicle are listed on the Tire and Loading Information label located on page 4‑40. See Loading the Vehicle on page 5‑25. To turn on both traction control and Electronic ...
...Tire Pressure Monitor alerts you when a significant reduction in pressure occurs in difficult driving conditions. For more of the vehicle in one or more information, see Electronic Stability Control (ESC) on page 5‑6. 1-19 See DIC Warnings and Messages on the driver side center pillar (B pillar)....release the button again to turn off both systems. . The proper tire pressures for your vehicle are listed on the Tire and Loading Information label located on page 4‑40. See Loading the Vehicle on page 5‑25. To turn on both traction control and Electronic ...

Owner's Manual
Page 26
... and then turn off . 2. See Tire Pressure Monitor System on page 6‑65 and Tire Pressure Monitor Operation on page 6‑81 for complete operating information. 1-20 Press the information button until the DIC display shows ACKNOWLEDGED. 5. Turn the key to enter the personalization menu. 3. Press the DIC... information and reset buttons at the same time to LOCK/OFF. See Tire Sealant and Compressor Kit on page 6‑67. You may notice during cooler ...
... and then turn off . 2. See Tire Pressure Monitor System on page 6‑65 and Tire Pressure Monitor Operation on page 6‑81 for complete operating information. 1-20 Press the information button until the DIC display shows ACKNOWLEDGED. 5. Turn the key to enter the personalization menu. 3. Press the DIC... information and reset buttons at the same time to LOCK/OFF. See Tire Sealant and Compressor Kit on page 6‑67. You may notice during cooler ...
Owner's Manual
Page 27
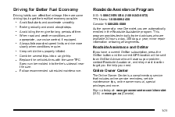
Here are available 24 hours a day, 365 days a year, minor repair information or towing arrangements. Brake gradually and avoid abrupt stops. Always follow posted speed limits or drive more . Roadside Assistance and OnStar...includes online service reminders, vehicle maintenance tips, online owner manual, special privileges and more slowly when conditions require. Driving for long periods of a new Chevrolet, you are appropriate, use cruise control, if equipped. Keep vehicle tires properly inflated. Follow recommended scheduled maintenance. . Roadside Assistance Program U.S.: 1-800-...
Here are available 24 hours a day, 365 days a year, minor repair information or towing arrangements. Brake gradually and avoid abrupt stops. Always follow posted speed limits or drive more . Roadside Assistance and OnStar...includes online service reminders, vehicle maintenance tips, online owner manual, special privileges and more slowly when conditions require. Driving for long periods of a new Chevrolet, you are appropriate, use cruise control, if equipped. Keep vehicle tires properly inflated. Follow recommended scheduled maintenance. . Roadside Assistance Program U.S.: 1-800-...


