
Owner's Manual
Page 77
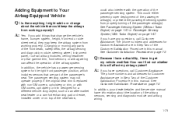
... sensing and diagnostic module, steering wheel, instrument panel, roof-rail airbag modules, ceiling headliner or pillar garnish trim, front sensors, or airbag wiring can I have information about the vehicle that could keep the airbag system from working properly? Q: Because I have questions, call Customer Assistance... with GM covers, upholstery or trim designed for Customer Assistance are part of the airbag sensors, sensing and diagnostic module and airbag wiring. 1-73 The phone numbers and addresses for a different vehicle. A: If you add things that are in Step Two of the...
... sensing and diagnostic module, steering wheel, instrument panel, roof-rail airbag modules, ceiling headliner or pillar garnish trim, front sensors, or airbag wiring can I have information about the vehicle that could keep the airbag system from working properly? Q: Because I have questions, call Customer Assistance... with GM covers, upholstery or trim designed for Customer Assistance are part of the airbag sensors, sensing and diagnostic module and airbag wiring. 1-73 The phone numbers and addresses for a different vehicle. A: If you add things that are in Step Two of the...

Owner's Manual
Page 150
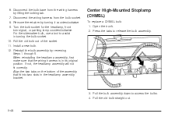
... the chime nor the light comes on page 1-67 for several more. The system check includes the airbag sensor, the pretensioners, the airbag modules, the wiring and the crash sensing and diagnostic module. See Passenger Sensing System (Without Turbo Engine) on page 1-61 or Passenger Sensing System (With Turbo Engine) on...
... the chime nor the light comes on page 1-67 for several more. The system check includes the airbag sensor, the pretensioners, the airbag modules, the wiring and the crash sensing and diagnostic module. See Passenger Sensing System (Without Turbo Engine) on page 1-61 or Passenger Sensing System (With Turbo Engine) on...

Owner's Manual
Page 260
...;cation ...5-117 Vehicle Identification Number (VIN) ...5-117 Service Parts Identification Label ...5-117 Electrical System ...5-117 Add-On Electrical Equipment ...5-117 Headlamp Wiring ...5-118 Windshield Wiper Fuses ...5-118 Power Windows and Other Power Options ...5-118 Fuses and Circuit Breakers ...5-118 Floor Console Fuse Block ...5-119 Engine Compartment Fuse...
...;cation ...5-117 Vehicle Identification Number (VIN) ...5-117 Service Parts Identification Label ...5-117 Electrical System ...5-117 Add-On Electrical Equipment ...5-117 Headlamp Wiring ...5-118 Windshield Wiper Fuses ...5-118 Power Windows and Other Power Options ...5-118 Fuses and Circuit Breakers ...5-118 Floor Console Fuse Block ...5-119 Engine Compartment Fuse...
Owner's Manual
Page 306
...For the sidemarker bulb, use a tool to assist in the headlamp assembly bracket. 6. Pull the old bulb out of the assembly that the wiring harness is in its original position. When reinstalling the headlamp assembly, first make sure that fit into two slots in turning the bulb... socket. 10. Pull the old bulb straight out. 5-48 Disconnect the wiring harness from the wiring harness by lifting the locking tab. 7. Reinstall the bulb assembly by turning it counterclockwise. 9. Turn the bulb socket for the headlamp, ...
...For the sidemarker bulb, use a tool to assist in the headlamp assembly bracket. 6. Pull the old bulb out of the assembly that the wiring harness is in its original position. When reinstalling the headlamp assembly, first make sure that fit into two slots in turning the bulb... socket. 10. Pull the old bulb straight out. 5-48 Disconnect the wiring harness from the wiring harness by lifting the locking tab. 7. Reinstall the bulb assembly by turning it counterclockwise. 9. Turn the bulb socket for the headlamp, ...
Owner's Manual
Page 307
... new bulb straight in until it clicks. 7. Push the bulb assembly back into the bulb socket until it snaps in the trunk lid. Disconnect the wiring harness by lifting up on the tab. 9. Push the new bulb straight into place until it straight out. 4. Reinstall the trunk trim and fastener..... 8. Turn the bulb socket counterclockwise and pull it into the assembly. 3. Align the tabs in the bulb assembly with the assembly in . Push the wiring harness straight into the bulb socket and push down on the tab to lock it straight out of the bulb socket. 6. Remove the trunk trim...
... new bulb straight in until it clicks. 7. Push the bulb assembly back into the bulb socket until it snaps in the trunk lid. Disconnect the wiring harness by lifting up on the tab. 9. Push the new bulb straight into place until it straight out. 4. Reinstall the trunk trim and fastener..... 8. Turn the bulb socket counterclockwise and pull it into the assembly. 3. Align the tabs in the bulb assembly with the assembly in . Push the wiring harness straight into the bulb socket and push down on the tab to lock it straight out of the bulb socket. 6. Remove the trunk trim...
Owner's Manual
Page 308
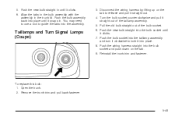
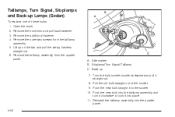
..., Turn Signal, Stoplamps and Back-up 7. Remove the taillamp assembly from the taillamp assembly. 5. Open the trunk. 2. A. Lift up on the tab and pull the wiring harness straight out. 6.
..., Turn Signal, Stoplamps and Back-up 7. Remove the taillamp assembly from the taillamp assembly. 5. Open the trunk. 2. A. Lift up on the tab and pull the wiring harness straight out. 6.
Owner's Manual
Page 309
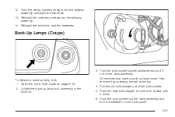
... the back-up lamp bulb: 1. Turn the bulb socket counterclockwise and pull it into the taillamp assembly and push the tab down. 13. Push the wiring harness straight into place. 5-51 Push the bulb socket into the lamp assembly and turn it clockwise to lock it out of the bulb socket...
... the back-up lamp bulb: 1. Turn the bulb socket counterclockwise and pull it into the taillamp assembly and push the tab down. 13. Push the wiring harness straight into place. 5-51 Push the bulb socket into the lamp assembly and turn it clockwise to lock it out of the bulb socket...
Owner's Manual
Page 318
Bead: The tire bead contains steel wires wrapped by steel cords that the tire is in pounds per square inch (psi) or kilopascal (kPa). GVWR: Gross Vehicle Weight Rating. Light Truck (LT-...
Bead: The tire bead contains steel wires wrapped by steel cords that the tire is in pounds per square inch (psi) or kilopascal (kPa). GVWR: Gross Vehicle Weight Rating. Light Truck (LT-...
Owner's Manual
Page 329
... road conditions influence when you can see the indicators at three or more places around the tire. • You can use a scraper or wire brush later, if needed, to the vehicle. See Tire Pressure Monitor Operation on the parts to tell when it is to check the treadwear indicators...
... road conditions influence when you can see the indicators at three or more places around the tire. • You can use a scraper or wire brush later, if needed, to the vehicle. See Tire Pressure Monitor Operation on the parts to tell when it is to check the treadwear indicators...
Owner's Manual
Page 354
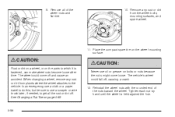
..., or on bolts or nuts because the nuts might come off . The wheel could fall off, causing a crash. 12. In an emergency, use a scraper or wire brush later, if needed, to the vehicle. The vehicle's wheel could come loose. When changing a wheel, remove any rust or dirt from places where the...
..., or on bolts or nuts because the nuts might come off . The wheel could fall off, causing a crash. 12. In an emergency, use a scraper or wire brush later, if needed, to the vehicle. The vehicle's wheel could come loose. When changing a wheel, remove any rust or dirt from places where the...
Owner's Manual
Page 358
... a cloth or a paper towel to get all of the nuts toward the wheel. The vehicle's wheel could come loose. In an emergency, use a scraper or wire brush later, if needed, to do this; Remove any rust or dirt from the wheel bolts, mounting surfaces, and spare wheel. 9. Remove all the rust...
... a cloth or a paper towel to get all of the nuts toward the wheel. The vehicle's wheel could come loose. In an emergency, use a scraper or wire brush later, if needed, to do this; Remove any rust or dirt from the wheel bolts, mounting surfaces, and spare wheel. 9. Remove all the rust...

Owner's Manual
Page 363
... where the wheel attaches to do this; Lower the jack completely. 5-105 The vehicle's wheel could come loose. but be sure to use a scraper or wire brush later, if needed, to which it is held against the hub. 14. Tighten each nut by turning the jack handle counterclockwise. Lower the vehicle...
... where the wheel attaches to do this; Lower the jack completely. 5-105 The vehicle's wheel could come loose. but be sure to use a scraper or wire brush later, if needed, to which it is held against the hub. 14. Tighten each nut by turning the jack handle counterclockwise. Lower the vehicle...

Owner's Manual
Page 376
... cools. Should the headlamps fail to heavy snow, etc., the wiper will stop until the problem is fixed. 5-118 Fuses and Circuit Breakers The wiring circuits in the fuse block protect the power windows. There are protected from short circuits by fuses. This greatly reduces the chance of damage caused... replace a bad fuse with a new one additional fuse located in the vehicle: the floor console fuse block and the engine compartment fuse block. Headlamp Wiring The headlamp wiring is protected by a combination of fuses, circuit breakers and fusible thermal links.
... cools. Should the headlamps fail to heavy snow, etc., the wiper will stop until the problem is fixed. 5-118 Fuses and Circuit Breakers The wiring circuits in the fuse block protect the power windows. There are protected from short circuits by fuses. This greatly reduces the chance of damage caused... replace a bad fuse with a new one additional fuse located in the vehicle: the floor console fuse block and the engine compartment fuse block. Headlamp Wiring The headlamp wiring is protected by a combination of fuses, circuit breakers and fusible thermal links.

Owner's Manual
Page 427
... ...7-18 Electrical Equipment Add-On Equipment ...5-117 Electrical System Engine Compartment Fuse Block ...5-120 Floor Console Fuse Block ...5-119 Fuses and Circuit Breakers ...5-118 Headlamp Wiring ...5-118 Power Windows and Other Power Options ...5-118 Windshield Wiper Fuses ...5-118 Electronic Immobilizer PASS-Key® III+ ...2-18 Electronic Immobilizer Operation PASS-Key®...
... ...7-18 Electrical Equipment Add-On Equipment ...5-117 Electrical System Engine Compartment Fuse Block ...5-120 Floor Console Fuse Block ...5-119 Fuses and Circuit Breakers ...5-118 Headlamp Wiring ...5-118 Power Windows and Other Power Options ...5-118 Windshield Wiper Fuses ...5-118 Electronic Immobilizer PASS-Key® III+ ...2-18 Electronic Immobilizer Operation PASS-Key®...

Owner's Manual
Page 428
... ...5-118 Gasoline Octane ...5-5 Specifications ...5-6 Glove Box ...2-42 GM Mobility Reimbursement Program ...7-7 H Halogen Bulbs ...5-46 Hazard Warning Flashers ...3-6 Head Restraints ...1-7 Headlamp Aiming ...5-44 Headlamp Wiring ...5-118 Headlamps ...3-12 Bulb Replacement ...5-46 Daytime Running Lamps (DRL) ...3-13 Flash-to-Pass ...3-8 Headlamps, Front Turn Signal, Sidemarker, and Parking Lamps ...5-47 High/Low...
... ...5-118 Gasoline Octane ...5-5 Specifications ...5-6 Glove Box ...2-42 GM Mobility Reimbursement Program ...7-7 H Halogen Bulbs ...5-46 Hazard Warning Flashers ...3-6 Head Restraints ...1-7 Headlamp Aiming ...5-44 Headlamp Wiring ...5-118 Headlamps ...3-12 Bulb Replacement ...5-46 Daytime Running Lamps (DRL) ...3-13 Flash-to-Pass ...3-8 Headlamps, Front Turn Signal, Sidemarker, and Parking Lamps ...5-47 High/Low...


