
Owner Manual
Page 125
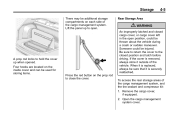
... access the rear storage areas of the vehicle. Four hooks are located on the inside cover and can be used for storing items. Press the red button on each side of the cargo management system. Lift the panel up when opened. Open the cargo management system cover. Be sure to return...
... access the rear storage areas of the vehicle. Four hooks are located on the inside cover and can be used for storing items. Press the red button on each side of the cargo management system. Lift the panel up when opened. Open the cargo management system cover. Be sure to return...
Owner Manual
Page 126
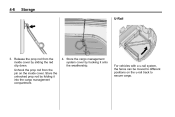
Release the prop rod from the pin on the u-rail track to different positions on the inside cover by sliding the red clip down. Store the cargo management system cover by folding it onto the weatherstrip. For vehicles with a u-rail system, the fence can be moved to secure cargo. Store the unhooked prop rod by hooking it into the cargo management compartment. 4. Unhook the prop rod from the inside cover. 4-6 Storage U-Rail 3.
Release the prop rod from the pin on the u-rail track to different positions on the inside cover by sliding the red clip down. Store the cargo management system cover by folding it onto the weatherstrip. For vehicles with a u-rail system, the fence can be moved to secure cargo. Store the unhooked prop rod by hooking it into the cargo management compartment. 4. Unhook the prop rod from the inside cover. 4-6 Storage U-Rail 3.

Owner Manual
Page 130
... next to fold it in half. 3. Disconnect the net from the vehicle and stored in the rear of the net to the kit. Press the red button on the lower side panels. 6. Roll up the cargo net, storing it to the cargo tie-downs located on the center of the vehicle...
... next to fold it in half. 3. Disconnect the net from the vehicle and stored in the rear of the net to the kit. Press the red button on the lower side panels. 6. Roll up the cargo net, storing it to the cargo tie-downs located on the center of the vehicle...
Owner Manual
Page 148
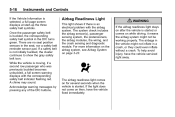
... not inflate in a crash, or they could even inflate without a crash. While the vehicle is an electrical problem with the corresponding safety belt indicator flashing red. The system check includes the airbag sensor(s), passenger sensing system, the pretensioners, the airbag modules, the wiring, and the crash sensing and diagnostic module. There...
... not inflate in a crash, or they could even inflate without a crash. While the vehicle is an electrical problem with the corresponding safety belt indicator flashing red. The system check includes the airbag sensor(s), passenger sensing system, the pretensioners, the airbag modules, the wiring, and the crash sensing and diagnostic module. There...
Owner Manual
Page 232
... video cables to be connected from the auxiliary device can be switched between the video display screens. z. To change a setting: 1. Yellow for right audio input. Red for video input. The A/V jacks are color coded: ... Power for left video screen source to the DVD player and the right video screen to exit...
... video cables to be connected from the auxiliary device can be switched between the video display screens. z. To change a setting: 1. Yellow for right audio input. Red for video input. The A/V jacks are color coded: ... Power for left video screen source to the DVD player and the right video screen to exit...

Owner Manual
Page 287
... your vehicle, especially any that is away from the cold. See "Climate Control Systems" in snow can be sure snow does not collect there. Tie a red cloth to get help nearby. Driving and Operating Blizzard Conditions Being stuck in the Index. (Continued) . Repeat this as little as needed to be a serious...
... your vehicle, especially any that is away from the cold. See "Climate Control Systems" in snow can be sure snow does not collect there. Tie a red cloth to get help nearby. Driving and Operating Blizzard Conditions Being stuck in the Index. (Continued) . Repeat this as little as needed to be a serious...

Owner Manual
Page 318
... lights appear as the vehicle gets closer to a detected object: Description one amber bar two amber bars three amber bars three amber bars and one red bar Metric 1.2 m 1.0 m 0.6 m 0.3 m English 4 ft 40 in 23 in 1 ft Front Display The front display is located in the instrument panel in the center of the...
... lights appear as the vehicle gets closer to a detected object: Description one amber bar two amber bars three amber bars three amber bars and one red bar Metric 1.2 m 1.0 m 0.6 m 0.3 m English 4 ft 40 in 23 in 1 ft Front Display The front display is located in the instrument panel in the center of the...

Owner Manual
Page 431
... not have loose or missing insulation. Use a remote positive (+) terminal if the vehicle has one . Positive (+) will not start the vehicle that move. Connect the red positive (+) cable to the battery is much less. Keep your hands away from the dead battery, but not near engine parts that had the dead...
... not have loose or missing insulation. Use a remote positive (+) terminal if the vehicle has one . Positive (+) will not start the vehicle that move. Connect the red positive (+) cable to the battery is much less. Keep your hands away from the dead battery, but not near engine parts that had the dead...

Owner Manual
Page 432
... with the good battery. 4. Disconnect the black negative (−) cable from the vehicle that the cables do the following: 1. Disconnect the red positive (+) cable from the other metal. Disconnect the red positive (+) cable from the vehicle with the good battery. 3. Heavy, Unpainted Metal Engine Part or Remote Negative (−) Terminal B. Good Battery...
... with the good battery. 4. Disconnect the black negative (−) cable from the vehicle that the cables do the following: 1. Disconnect the red positive (+) cable from the other metal. Disconnect the red positive (+) cable from the vehicle with the good battery. 3. Heavy, Unpainted Metal Engine Part or Remote Negative (−) Terminal B. Good Battery...
Owner Manual
Page 491
... OnStar Hands-Free Calling voice commands. Requires the available Directions and Connections service plan. . . X to an Advisor. Give OnStar Turn-by-Turn Navigation voice commands. Red: Indicates a problem. Flashing Green: On a call . OnStar 14-1 OnStar OnStar Overview OnStar Overview ...14-1 OnStar Overview The OnStar system status light is next to a live...
... OnStar Hands-Free Calling voice commands. Requires the available Directions and Connections service plan. . . X to an Advisor. Give OnStar Turn-by-Turn Navigation voice commands. Red: Indicates a problem. Flashing Green: On a call . OnStar 14-1 OnStar OnStar Overview OnStar Overview ...14-1 OnStar Overview The OnStar system status light is next to a live...


