
Owner's Manual
Page 58
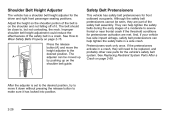
..., the neck. The belt should be close to be moved up by pushing up on the shoulder and not falling off of the safety belt assembly. Safety Belt Pretensioners This vehicle has safety belt pretensioners for the driver and right front passenger seating positions. And, if your vehicle has side impact...
..., the neck. The belt should be close to be moved up by pushing up on the shoulder and not falling off of the safety belt assembly. Safety Belt Pretensioners This vehicle has safety belt pretensioners for the driver and right front passenger seating positions. And, if your vehicle has side impact...

Owner's Manual
Page 73
... properly secure the child restraint. Child restraints and booster seats vary considerably in size, and some may not be able to access adjacent safety belt assemblies or LATCH anchors for additional passengers or child restraints. Not all vehicle seating positions or child restraints have lower anchors and attachments or top tether...
... properly secure the child restraint. Child restraints and booster seats vary considerably in size, and some may not be able to access adjacent safety belt assemblies or LATCH anchors for additional passengers or child restraints. Not all vehicle seating positions or child restraints have lower anchors and attachments or top tether...

Owner's Manual
Page 101
... can damage the restraint systems in a crash, if the airbag readiness light stays on the airbag system earlier in a crash. But the safety belt assemblies that were used at the time of the crash. New parts and repairs may be necessary even if the safety belt or LATCH system (if... equipped), was being used during a crash, you are working properly after the vehicle is started, or while you may have the safety belt assemblies inspected or replaced. Replacing Restraint System Parts After a Crash If the vehicle has been in a crash, do you will need to have been stressed...
... can damage the restraint systems in a crash, if the airbag readiness light stays on the airbag system earlier in a crash. But the safety belt assemblies that were used at the time of the crash. New parts and repairs may be necessary even if the safety belt or LATCH system (if... equipped), was being used during a crash, you are working properly after the vehicle is started, or while you may have the safety belt assemblies inspected or replaced. Replacing Restraint System Parts After a Crash If the vehicle has been in a crash, do you will need to have been stressed...

Owner's Manual
Page 296
...a trailer only if all . Ask your dealer for important information about towing a trailer with the vehicle. Towing a Trailer The Cadillac Professional Vehicle cannot tow a trailer. Trailering is too heavy, the brakes may also be seriously injured. Successful, safe trailering takes ...follow the advice in this section carefully before pulling a trailer. Load-pulling components such as the engine, transmission, axles, wheel assemblies and tires are important for advice and information about towing a trailer with the vehicle. 5-26 To identify the trailering capacity of ...
...a trailer only if all . Ask your dealer for important information about towing a trailer with the vehicle. Towing a Trailer The Cadillac Professional Vehicle cannot tow a trailer. Trailering is too heavy, the brakes may also be seriously injured. Successful, safe trailering takes ...follow the advice in this section carefully before pulling a trailer. Load-pulling components such as the engine, transmission, axles, wheel assemblies and tires are important for advice and information about towing a trailer with the vehicle. 5-26 To identify the trailering capacity of ...

Owner's Manual
Page 324
... or too little fluid can be at normal operating temperature, which is located next to the radiator hose and below the engine air cleaner/filter assembly on a level place. Be sure to drive longer. The cap is 82°C to 93°C (180°F to 200°F). 6-22 See Engine Compartment...
... or too little fluid can be at normal operating temperature, which is located next to the radiator hose and below the engine air cleaner/filter assembly on a level place. Be sure to drive longer. The cap is 82°C to 93°C (180°F to 200°F). 6-22 See Engine Compartment...

Owner's Manual
Page 325
... Schedule to determine what kind of the dipstick and read the lower level. Do not overfill. 4. Always use . After removing the engine air cleaner/filter assembly to use the automatic transmission fluid listed in Recommended Fluids and Lubricants on page 7‑9. Check both sides of transmission fluid to reach the transmission.... 6. After adding fluid, recheck the fluid level as described under "How to the proper level. Pull out the dipstick. 2. Reinstall the engine air cleaner/filter assembly.
... Schedule to determine what kind of the dipstick and read the lower level. Do not overfill. 4. Always use . After removing the engine air cleaner/filter assembly to use the automatic transmission fluid listed in Recommended Fluids and Lubricants on page 7‑9. Check both sides of transmission fluid to reach the transmission.... 6. After adding fluid, recheck the fluid level as described under "How to the proper level. Pull out the dipstick. 2. Reinstall the engine air cleaner/filter assembly.

Owner's Manual
Page 339
... the battery to the floor pan (E). 6-37 See Jump Starting on page 6 ‑ 38 for tips on the side of the battery and the vent assembly grommet (D) must be securely reattached to the vent outlet (C) on working around a battery without getting hurt. You can explode. To be sure the vent hose...
... the battery to the floor pan (E). 6-37 See Jump Starting on page 6 ‑ 38 for tips on the side of the battery and the vent assembly grommet (D) must be securely reattached to the vent outlet (C) on working around a battery without getting hurt. You can explode. To be sure the vent hose...

Owner's Manual
Page 345
...) sitting on the driver seat. Failure to follow these instructions could cause damage to the wall. The high-beam headlamps will be necessary. Be fully assembled and all tires properly inflated. Have the spare tire is possible however, to be re-aimed. Headlamp aiming is taken to the wall. Have all...
...) sitting on the driver seat. Failure to follow these instructions could cause damage to the wall. The high-beam headlamps will be necessary. Be fully assembled and all tires properly inflated. Have the spare tire is possible however, to be re-aimed. Headlamp aiming is taken to the wall. Have all...

Owner's Manual
Page 347
... edge of them. The adjustment screw can be positioned at the bottom edge of the beam. They are located under the hood near each headlamp assembly.
... edge of them. The adjustment screw can be positioned at the bottom edge of the beam. They are located under the hood near each headlamp assembly.

Owner's Manual
Page 348
... of the system components, you may have HID headlamps. This is normal. 3. Pull the clip up from the blade connecting point and pull the blade assembly down toward the windshield to remove the wiper blade: 1. High Intensity Discharge (HID) Lighting { WARNING: The low beam high intensity discharge lighting system operates at...
... of the system components, you may have HID headlamps. This is normal. 3. Pull the clip up from the blade connecting point and pull the blade assembly down toward the windshield to remove the wiper blade: 1. High Intensity Discharge (HID) Lighting { WARNING: The low beam high intensity discharge lighting system operates at...

Owner's Manual
Page 349
... wiper blades, see Maintenance Replacement Parts on the clip to the base of the wiper blade, pull the wiper blade element from the wiper blade assembly. 2. A. Correct Installation B. The wiper blade element has two notches at one end which are engaged by the bottom claw set and all the other claws...
... wiper blades, see Maintenance Replacement Parts on the clip to the base of the wiper blade, pull the wiper blade element from the wiper blade assembly. 2. A. Correct Installation B. The wiper blade element has two notches at one end which are engaged by the bottom claw set and all the other claws...
Owner's Manual
Page 363
... Displays on page 4 ‑ 58 and DIC Warnings and Messages on in the vehicle. Tire Pressure on at each tire and wheel assembly, excluding the spare tire and wheel assembly. The low tire pressure warning light and the DIC warning message come on page 4 ‑ 62 . See Loading the Vehicle on your...
... Displays on page 4 ‑ 58 and DIC Warnings and Messages on in the vehicle. Tire Pressure on at each tire and wheel assembly, excluding the spare tire and wheel assembly. The low tire pressure warning light and the DIC warning message come on page 4 ‑ 62 . See Loading the Vehicle on your...

Owner's Manual
Page 367
A five‐tire rotation pattern may be included in size, type and brand. The correct five‐tire rotation pattern is shown. 6-65 Four‐Tire Rotation Pattern Five‐Tire Rotation Pattern If your professional vehicle, if it should not be used for your vehicle has a compact spare tire, it has a full‐size spare tire and wheel assembly that matches the original equipment tires and wheels in the tire rotation process. Use the four‐tire rotation pattern shown.
A five‐tire rotation pattern may be included in size, type and brand. The correct five‐tire rotation pattern is shown. 6-65 Four‐Tire Rotation Pattern Five‐Tire Rotation Pattern If your professional vehicle, if it should not be used for your vehicle has a compact spare tire, it has a full‐size spare tire and wheel assembly that matches the original equipment tires and wheels in the tire rotation process. Use the four‐tire rotation pattern shown.
Owner's Manual
Page 370
... wheels. Only your dealer or authorized tire service center should mount or dismount the tires. { WARNING: Mixing tires could have a compact spare tire and wheel assembly. Be sure to meet General Motors Tire Performance Criteria Specification (TPC Spec) system rating. Your vehicle may have a crash. This way, your vehicle will help...
... wheels. Only your dealer or authorized tire service center should mount or dismount the tires. { WARNING: Mixing tires could have a compact spare tire and wheel assembly. Be sure to meet General Motors Tire Performance Criteria Specification (TPC Spec) system rating. Your vehicle may have a crash. This way, your vehicle will help...
Owner's Manual
Page 378
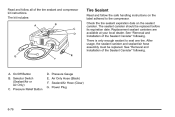
... kit instructions. Pressure Relief Button D. Read and follow the safe handling instructions on the sealant canister. After usage, the sealant canister and sealant/air hose assembly must be replaced before its expiration date. On/Off Button B. Air Only Hose (Black) F. Replacement sealant canisters are available at your local dealer. There is...
... kit instructions. Pressure Relief Button D. Read and follow the safe handling instructions on the sealant canister. After usage, the sealant canister and sealant/air hose assembly must be replaced before its expiration date. On/Off Button B. Air Only Hose (Black) F. Replacement sealant canisters are available at your local dealer. There is...

Owner's Manual
Page 381
... sealant and compressor kit, take the vehicle to an authorized dealer within a 161 km (100 miles) of the used sealant canister and sealant/ air hose (F) assembly at a safe location and check the tire pressure. If the tire pressure has not dropped more than 68 kPa (10 psi) from the wheel, tire...
... sealant and compressor kit, take the vehicle to an authorized dealer within a 161 km (100 miles) of the used sealant canister and sealant/ air hose (F) assembly at a safe location and check the tire pressure. If the tire pressure has not dropped more than 68 kPa (10 psi) from the wheel, tire...

Owner's Manual
Page 424
Multi-Purpose Lubricant, Superlube (GM Part No. 12346241, in Canada 992723) or lubricant meeting requirements of NLGI #2, Category LB or GC-LB. Usage Hood Latch Assembly, Secondary Latch, Pivots, Spring Anchor, and Release Pawl Hood and Door Hinges Fluid/Lubricant Lubriplate Lubricant Aerosol (GM Part No. 12346293, in Canada 10953474). Weatherstrip Conditioning 7-10 Usage Fluid/Lubricant Weatherstrip Lubricant (GM Part No. 3634770, in Canada 10953518) or Dielectric Silicone Grease (GM Part No. 12345579, in Canada 992887).
Multi-Purpose Lubricant, Superlube (GM Part No. 12346241, in Canada 992723) or lubricant meeting requirements of NLGI #2, Category LB or GC-LB. Usage Hood Latch Assembly, Secondary Latch, Pivots, Spring Anchor, and Release Pawl Hood and Door Hinges Fluid/Lubricant Lubriplate Lubricant Aerosol (GM Part No. 12346293, in Canada 10953474). Weatherstrip Conditioning 7-10 Usage Fluid/Lubricant Weatherstrip Lubricant (GM Part No. 3634770, in Canada 10953518) or Dielectric Silicone Grease (GM Part No. 12345579, in Canada 992887).