
Owner's Manual
Page 1
2009 Cadillac DTS Owner Manual Seats and Restraint System ...1-1 Head Restraints ...1-2 Front Seats ...1-3 Rear Seats ...1-10 Safety Belts ...1-12 Child Restraints ...1-33 Airbag System ...1-55 ......2-24 Mirrors ...2-38 Object Detection Systems ...2-42 OnStar® System ...2-51 Universal Home Remote System ...2-55 Storage Areas ...2-62 Sunroof ...2-64 Instrument Panel ...3-1 Instrument Panel Overview ...3-4 Climate Controls ...3-40 Warning Lights, Gages, and Indicators ...3-50 M Driver Information Center (DIC) ...3-67 Audio System(s) ...3-95 Driving Your Vehicle ...4-1 Your Driving, ...
2009 Cadillac DTS Owner Manual Seats and Restraint System ...1-1 Head Restraints ...1-2 Front Seats ...1-3 Rear Seats ...1-10 Safety Belts ...1-12 Child Restraints ...1-33 Airbag System ...1-55 ......2-24 Mirrors ...2-38 Object Detection Systems ...2-42 OnStar® System ...2-51 Universal Home Remote System ...2-55 Storage Areas ...2-62 Sunroof ...2-64 Instrument Panel ...3-1 Instrument Panel Overview ...3-4 Climate Controls ...3-40 Warning Lights, Gages, and Indicators ...3-50 M Driver Information Center (DIC) ...3-67 Audio System(s) ...3-95 Driving Your Vehicle ...4-1 Your Driving, ...
Owner's Manual
Page 141
... Speedometer and Odometer ...3-52 Tachometer ...3-52 Safety Belt Reminders ...3-53 Airbag Readiness Light ...3-54 Passenger Airbag Status Indicator ...3-55 Charging System Light ...3-56 Instrument Panel Overview ...3-4 Hazard Warning Flashers ...3-6 Horn ...3-6 Tilt Wheel ...3-6 Power Tilt Wheel and Telescopic Steering Column ...3-7 Heated Steering Wheel ...3-7 Turn Signal/Multifunction Lever ...3-8 Turn and Lane-Change Signals...
... Speedometer and Odometer ...3-52 Tachometer ...3-52 Safety Belt Reminders ...3-53 Airbag Readiness Light ...3-54 Passenger Airbag Status Indicator ...3-55 Charging System Light ...3-56 Instrument Panel Overview ...3-4 Hazard Warning Flashers ...3-6 Horn ...3-6 Tilt Wheel ...3-6 Power Tilt Wheel and Telescopic Steering Column ...3-7 Heated Steering Wheel ...3-7 Turn Signal/Multifunction Lever ...3-8 Turn and Lane-Change Signals...

Owner's Manual
Page 305
... ...5-5 California Fuel ...5-5 Additives ...5-6 Fuels in Foreign Countries ...5-7 Filling the Tank ...5-7 Filling a Portable Fuel Container ...5-9 Checking Things Under the Hood ...5-10 Hood Release ...5-11 Engine Compartment Overview ...5-12 Engine Oil ...5-13 Engine Oil Life System ...5-16 Engine Air Cleaner/Filter ...5-17 Automatic Transmission Fluid ...5-19 Cooling System ...5-22 Engine Coolant ...5-23 Coolant...
... ...5-5 California Fuel ...5-5 Additives ...5-6 Fuels in Foreign Countries ...5-7 Filling the Tank ...5-7 Filling a Portable Fuel Container ...5-9 Checking Things Under the Hood ...5-10 Hood Release ...5-11 Engine Compartment Overview ...5-12 Engine Oil ...5-13 Engine Oil Life System ...5-16 Engine Air Cleaner/Filter ...5-17 Automatic Transmission Fluid ...5-19 Cooling System ...5-22 Engine Coolant ...5-23 Coolant...
Owner's Manual
Page 316
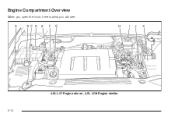
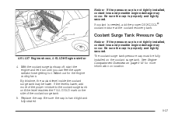
Engine Compartment Overview When you open the hood, here is what you will see: 4.6L L37 Engine shown, 4.6L LD8 Engine similar 5-12
Engine Compartment Overview When you open the hood, here is what you will see: 4.6L L37 Engine shown, 4.6L LD8 Engine similar 5-12
Owner's Manual
Page 317
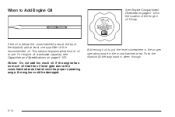
... a good idea to drain back into the oil pan. In order to Add Engine Oil" under Windshield Washer Fluid on page 5-17. See Engine Compartment Overview on page 5-12 for the location of View). If this is a yellow loop. Remove it back in all the way.
... a good idea to drain back into the oil pan. In order to Add Engine Oil" under Windshield Washer Fluid on page 5-17. See Engine Compartment Overview on page 5-12 for the location of View). If this is a yellow loop. Remove it back in all the way.
Owner's Manual
Page 318
... least one quart/liter of oil to use. If the engine has so much oil. Add enough oil to Add Engine Oil See Engine Compartment Overview on page 5-103. For engine oil crankcase capacity, see Capacities and Specifications on page 5-12 for the location of the engine oil fi...
... least one quart/liter of oil to use. If the engine has so much oil. Add enough oil to Add Engine Oil See Engine Compartment Overview on page 5-103. For engine oil crankcase capacity, see Capacities and Specifications on page 5-12 for the location of the engine oil fi...
Owner's Manual
Page 321
... Maintenance on , reset the system. Do not let used engine oil. See the manufacturer's warnings about the use . Engine Air Cleaner/Filter See Engine Compartment Overview on the Driver Information Center (DIC) until 100% is started, the engine oil life system has not reset. If a situation occurs where the oil is...
... Maintenance on , reset the system. Do not let used engine oil. See the manufacturer's warnings about the use . Engine Air Cleaner/Filter See Engine Compartment Overview on the Driver Information Center (DIC) until 100% is started, the engine oil life system has not reset. If a situation occurs where the oil is...
Owner's Manual
Page 324
... fluid level is located next to five minutes. With the parking brake applied, place the shift lever in each range. See Engine Compartment Overview on page 5-12 for more information on the brake pedal, move the shift lever through each gear range, pausing for three to the radiator hose...
... fluid level is located next to five minutes. With the parking brake applied, place the shift lever in each range. See Engine Compartment Overview on page 5-12 for more information on the brake pedal, move the shift lever through each gear range, pausing for three to the radiator hose...
Owner's Manual
Page 331
... surge tank. Watch out for more of the coolant surge tank. 5. If the level is properly and tightly secured. Replace the cap. See Engine Compartment Overview on page 5-12 for the engine cooling fans. With the coolant surge tank cap off, start the engine and let it run until the level...
... surge tank. Watch out for more of the coolant surge tank. 5. If the level is properly and tightly secured. Replace the cap. See Engine Compartment Overview on page 5-12 for the engine cooling fans. With the coolant surge tank cap off, start the engine and let it run until the level...
Owner's Manual
Page 335
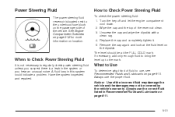
... the vehicle and the damages may not be at the fluid level on location. Replace the cap and completely tighten it. 5. See Engine Compartment Overview on page 5-12 for more information on the dipstick. Remove the cap again and look at the FULL COLD mark. Power Steering Fluid The power...
... the vehicle and the damages may not be at the fluid level on location. Replace the cap and completely tighten it. 5. See Engine Compartment Overview on page 5-12 for more information on the dipstick. Remove the cap again and look at the FULL COLD mark. Power Steering Fluid The power...
Owner's Manual
Page 336
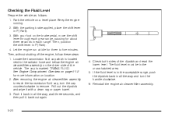
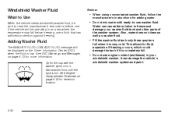
... fluid, follow the manufacturer's instructions for fluid expansion if freezing occurs, which could damage the tank if it is low. See Engine Compartment Overview on page 3-73 for reservoir location. • Fill the washer fluid tank only three-quarters full when it is full. Open the cap with...
... fluid, follow the manufacturer's instructions for fluid expansion if freezing occurs, which could damage the tank if it is low. See Engine Compartment Overview on page 3-73 for reservoir location. • Fill the washer fluid tank only three-quarters full when it is full. Open the cap with...

Owner's Manual
Page 337
... of normal brake lining wear. If the ignition is low, the SERVICE BRAKE SYSTEM message displays in the Driver Information Center (DIC). See Engine Compartment Overview on and the brake fluid is on page 5-12 for reservoir location and access. Add or remove brake fluid, as necessary, only when...
... of normal brake lining wear. If the ignition is low, the SERVICE BRAKE SYSTEM message displays in the Driver Information Center (DIC). See Engine Compartment Overview on and the brake fluid is on page 5-12 for reservoir location and access. Add or remove brake fluid, as necessary, only when...

Owner's Manual
Page 343
... radio and other vehicle. Always turn off the radio and all lamps that are not needed. The repairs would not be damaged. See Engine Compartment Overview on page 5-12 for more information on the location of the vehicle. The remote negative (−) terminal is located on both batteries. Open the hoods...
... radio and other vehicle. Always turn off the radio and all lamps that are not needed. The repairs would not be damaged. See Engine Compartment Overview on page 5-12 for more information on the location of the vehicle. The remote negative (−) terminal is located on both batteries. Open the hoods...
Owner's Manual
Page 451
... 5-95 5-95 5-95 5-98 5-95 5-95 2-22 Electronic Immobilizer Operation PASS-Key® III+ ...Engine Air Cleaner/Filter ...Check and Service Engine Soon Lamp ...Compartment Overview ...Coolant ...Coolant Heater ...Coolant Temperature Gage ...Coolant Temperature Warning Light ...Cooling System ...Drive Belt Routing ...Exhaust ...Oil ...Oil Life System ...Overheated Protection Operating Mode ...Overheating...
... 5-95 5-95 5-95 5-98 5-95 5-95 2-22 Electronic Immobilizer Operation PASS-Key® III+ ...Engine Air Cleaner/Filter ...Check and Service Engine Soon Lamp ...Compartment Overview ...Coolant ...Coolant Heater ...Coolant Temperature Gage ...Coolant Temperature Warning Light ...Cooling System ...Drive Belt Routing ...Exhaust ...Oil ...Oil Life System ...Overheated Protection Operating Mode ...Overheating...

Owner's Manual
Page 453
... Positions ...2-25 Inadvertent Power Battery Saver ...3-37 Infants and Young Children, Restraints ...1-36 Inflation - Tire Pressure ...5-57 Instrument Panel Brightness ...3-34 Cluster ...3-51 Overview ...3-4 Introduction ...6-2 J Jump Starting ...5-38 7
... Positions ...2-25 Inadvertent Power Battery Saver ...3-37 Infants and Young Children, Restraints ...1-36 Inflation - Tire Pressure ...5-57 Instrument Panel Brightness ...3-34 Cluster ...3-51 Overview ...3-4 Introduction ...6-2 J Jump Starting ...5-38 7