Owner's Manual
Page 3
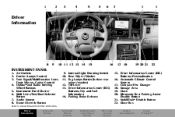
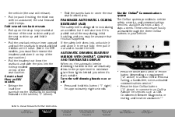
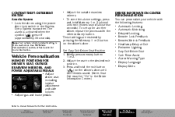
.../Multifunction Lever, Front Wipers, Cruise Control 4. Tilt Lever 13. Automatic Climate Control System 17. Fog Lamps Button (below rear wiper / washer) 12. Personalization 16. Internal Light Dimming Switch 10. Driver Information Center (DIC) Buttons; Trip and Fuel Information 14. Storage Area 19. Air Outlets 2. OnStar® and Radio Steering Wheel Buttons...
.../Multifunction Lever, Front Wipers, Cruise Control 4. Tilt Lever 13. Automatic Climate Control System 17. Fog Lamps Button (below rear wiper / washer) 12. Personalization 16. Internal Light Dimming Switch 10. Driver Information Center (DIC) Buttons; Trip and Fuel Information 14. Storage Area 19. Air Outlets 2. OnStar® and Radio Steering Wheel Buttons...
Owner's Manual
Page 4
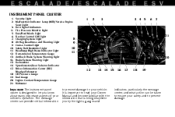
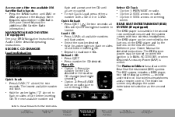
... and indicators, particularly the message center, and what action can provide critical information to prevent damage to prevent damage. Turn Signal Indicators 4. Charging System Light 8. Cruise Control Light 10. Tachometer 16. Speedometer/Gear Selector Indicator 17. The message center can be taken to ensure your safety and to your vehicle's operation. Safety...
... and indicators, particularly the message center, and what action can provide critical information to prevent damage to prevent damage. Turn Signal Indicators 4. Charging System Light 8. Cruise Control Light 10. Tachometer 16. Speedometer/Gear Selector Indicator 17. The message center can be taken to ensure your safety and to your vehicle's operation. Safety...
Owner's Manual
Page 5
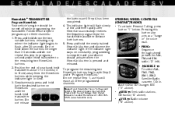
...one for both the seatback and seat cushion • Press and release the horizontal button ("1" above ). Refer to Owner Manual for low. A light in the button will only operate either in the heat or cool mode; Select a heat setting for low. The seats will also glow to... available. To operate the climate controlled seats, do the following: • Press the red heat button or the blue cool button ("1" above ) until the indicator light shows the desired setting. • Seatback Only: This can choose to heat or cool your seat. Press this feature. 1 1 2 2 1 1 3 3 This ...
...one for both the seatback and seat cushion • Press and release the horizontal button ("1" above ). Refer to Owner Manual for low. A light in the button will only operate either in the heat or cool mode; Select a heat setting for low. The seats will also glow to... available. To operate the climate controlled seats, do the following: • Press the red heat button or the blue cool button ("1" above ) until the indicator light shows the desired setting. • Seatback Only: This can choose to heat or cool your seat. Press this feature. 1 1 2 2 1 1 3 3 This ...
Owner's Manual
Page 7
... Diagnostics or routing and location assistance.** Refer to retract fully; then pull it on top of the seat cushion.) • Pull the headrest out from lights behind you when it's dark outside. These services are easily accessed through the three OnStar buttons in -vehicle safety, security, and communications services, available 24...
... Diagnostics or routing and location assistance.** Refer to retract fully; then pull it on top of the seat cushion.) • Pull the headrest out from lights behind you when it's dark outside. These services are easily accessed through the three OnStar buttons in -vehicle safety, security, and communications services, available 24...
Owner's Manual
Page 11
Quick Unload: • Press EJECT ( ) for detailed instructions. all CDs will flash. • Wait for amber lights ("2" above ) for two seconds. Play a CD • Option 1: Press the number for the CD desired in the six-disc CD changer (wait eight seconds). ... Note: Requires subscription to flash on the display. The next available number will flash amber. • Select the number desired. • Wait for amber lights to XM Radio. (See your Owner Manual for additional XM Satellite Radio information.) NAVIGATION RADIO SYSTEM (if equipped) See your Owner Manual for two seconds...
Quick Unload: • Press EJECT ( ) for detailed instructions. all CDs will flash. • Wait for amber lights ("2" above ) for two seconds. Play a CD • Option 1: Press the number for the CD desired in the six-disc CD changer (wait eight seconds). ... Note: Requires subscription to flash on the display. The next available number will flash amber. • Select the number desired. • Wait for amber lights to XM Radio. (See your Owner Manual for additional XM Satellite Radio information.) NAVIGATION RADIO SYSTEM (if equipped) See your Owner Manual for two seconds...
Owner's Manual
Page 12
...; CD tracks ("4" above). • VOL : Radio volume ("5" above ). Press and hold down the two outside buttons, releasing only when the indicator light begins to three channels: 1. Do not release the buttons until Step 4 has been completed. 4. Release both the desired button on constantly, programming is ... Follow these steps to program up to flash, after HomeLink successfully receives the frequency signal from the HomeLink buttons while keeping the indicator light in " for voice mail. • PROG: Sequence 2 through stored presets for longer than 30 seconds and do not repeat this ...
...; CD tracks ("4" above). • VOL : Radio volume ("5" above ). Press and hold down the two outside buttons, releasing only when the indicator light begins to three channels: 1. Do not release the buttons until Step 4 has been completed. 4. Release both the desired button on constantly, programming is ... Follow these steps to program up to flash, after HomeLink successfully receives the frequency signal from the HomeLink buttons while keeping the indicator light in " for voice mail. • PROG: Sequence 2 through stored presets for longer than 30 seconds and do not repeat this ...
Owner's Manual
Page 13
...resume/accelerate switch (+) to get to a higher speed. Manually activate the headlamps, all exterior tail/marker lamps and the instrument panel/radio lights • Turn the exterior lamps knob to cruise at the end of the multifunction lever on the accelerator pedal. Attain the speed you...; Turn the exterior lamps knob (located to the left side of the steering column. 4. Manually illuminate the parking lamps, taillamps, instrument panel/radio lights, license plate lamps • Turn the exterior lamps knob to Owner Manual for further information. Press in the Set button ( ) at . ...
...resume/accelerate switch (+) to get to a higher speed. Manually activate the headlamps, all exterior tail/marker lamps and the instrument panel/radio lights • Turn the exterior lamps knob to cruise at the end of the multifunction lever on the accelerator pedal. Attain the speed you...; Turn the exterior lamps knob (located to the left side of the steering column. 4. Manually illuminate the parking lamps, taillamps, instrument panel/radio lights, license plate lamps • Turn the exterior lamps knob to Owner Manual for further information. Press in the Set button ( ) at . ...
Owner's Manual
Page 15
... features: • Automatic Locking • Automatic Unlocking • Delayed Locking • Remote Lock Feedback • Remote/Unlock Feedback • Headlamp Delay at Exit • Perimeter Lighting • Easy Exit Driver Seat • Curb View Assist • Alarm Warning Type • Display Language • Display Units Vehicle Personalization MEMORY POSITIONS FOR DRIVER...
... features: • Automatic Locking • Automatic Unlocking • Delayed Locking • Remote Lock Feedback • Remote/Unlock Feedback • Headlamp Delay at Exit • Perimeter Lighting • Easy Exit Driver Seat • Curb View Assist • Alarm Warning Type • Display Language • Display Units Vehicle Personalization MEMORY POSITIONS FOR DRIVER...
Owner's Manual
Page 16
...8226; Lock Feedback: Off Unlock Feedback (The feedback received when unlocking the vehicle with the Remote Keyless Entry transmitter.) • Perimeter Lights: On • Perimeter Lights: Off Easy Exit Seat (The driver's seat moves to the exit position when the key is removed from the factory. 3. ...Delay: 20 Sec Headlamp Headlamp Headlamp Headlamp Headlamp Delay: Delay: Delay: Delay: Delay: E S V 40 Sec 1 Min 2 Min 3 Min Off Perimeter Lights (The headlamps and back-up lamps will stay on after the vehicle is the default setting from the ignition.) • Easy Exit Seat: Off •...
...8226; Lock Feedback: Off Unlock Feedback (The feedback received when unlocking the vehicle with the Remote Keyless Entry transmitter.) • Perimeter Lights: On • Perimeter Lights: Off Easy Exit Seat (The driver's seat moves to the exit position when the key is removed from the factory. 3. ...Delay: 20 Sec Headlamp Headlamp Headlamp Headlamp Headlamp Delay: Delay: Delay: Delay: Delay: E S V 40 Sec 1 Min 2 Min 3 Min Off Perimeter Lights (The headlamps and back-up lamps will stay on after the vehicle is the default setting from the ignition.) • Easy Exit Seat: Off •...


