Whirlpool WED5500XW Support Question
Whirlpool WED5500XW Support Question
Find answers below for this question about Whirlpool WED5500XW.Need a Whirlpool WED5500XW manual? We have 4 online manuals for this item!
Question posted by lynamber1979 on October 13th, 2015
Cleaning Out Lint.
How can I get all the lint out that the screen doesn't catch?
Current Answers
Answer #1: Posted by Odin on October 13th, 2015 9:52 AM
Odin

Member since:
April 10th, 2010 Points: 41,236,700

Member since:
April 10th, 2010 Points: 41,236,700
I guess you could pick it out by hand. This is not a concern you need to have, in my opinion.
Hope this is useful. Please don't forget to click the Accept This Answer button if you do accept it. My aim is to provide reliable helpful answers, not just a lot of them. See https://www.helpowl.com/profile/Odin.
Related Whirlpool WED5500XW Manual Pages
Dimension Guide - Page 1

...door
*M ost intallations require a minimum 5 1/2" (140 mm) clearance behind the dryer for planning purposes only.
Minimum required spacing
For cabinet installation, with a door, ...Acceptable styles: C. To determine maximum exhaust length, add one 90° turn inside the dryer. Because Whirlpool Corporation policy includes a continuous commitment to improve our products, we reserve the ...
Installation Instructions - Page 2
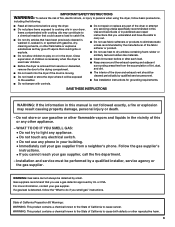
... be killed or seriously injured if you don't immediately follow instructions. We have provided many important safety messages in this manual and on your appliance.
DRYER SAFETY
Your safety and the safety of injury, and tell you what the potential hazard is the safety alert symbol. WARNING
You can kill or...
Installation Instructions - Page 3

... new exhaust vent)
You will need: ■■ A location allowing for use with clothes dryers. Read and follow the instructions provided with upturned ends.
■■ A UL listed strain relief...; A separate 30 amp circuit.
3 Check that opens to the dryer must end in dryer drum. Mobile home installations require metal exhaust system hardware, available for purchase from the...
Installation Instructions - Page 4

...copy of an automatic cycle. Check code requirements. Recessed area B. The opening (such as the dryer exhaust opening. Electrical Requirements
It is adequate.
4 A time-delay fuse or circuit breaker is...qualified electrical installer.
■■ To be sure that the ground path is your dryer at temperatures below 45°F (7°C). Wide opening side-swing door B. See "...
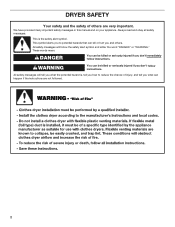
Installation Instructions - Page 5

... wire to the neutral wire, see "Optional 3-wire connection" section.
■■ This dryer is prohibited. Grounding through the neutral conductor is manufactured ready to install with a 3-wire electrical...wire power supply cord with ring or spade terminals and UL listed strain relief. If the dryer is installed with a 4-wire electrical supply connection, the neutral ground wire must be :
...
Installation Instructions - Page 6

...;
To avoid damaging floor, use a wrench to connect the exhaust vent. Install Leveling Legs
WARNING
2. Failure to move and install dryer.
Firmly grasp dryer body (not console panel) and gently lay dryer down on its final location. Screw in leveling legs
Excessive Weight Hazard Use two or more people to do so can...
Installation Instructions - Page 8
...). A
B
F
CD
E
G
A. 4-wire receptacle (NEMA type 14-30R) B. 4-prong plug C.
Tighten screw.
8
Do not further tighten strain relief screws at this page. Spade terminals with the dryer cabinet and be in place. Put the tabs of the two clamp sections (C) into the hole below the terminal block opening (B) so that the wire...
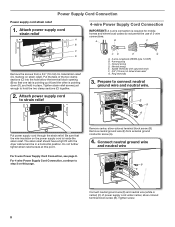
Installation Instructions - Page 9
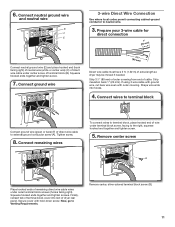
... terminal block screws. Finally, reinsert tab of terminal block cover into slot of dryer rear panel. Connect remaining wires
3-wire Power Supply Cord Connection
Use where local ...(white or center wire)
3. Tighten screws. Finally, reinsert tab of terminal block cover into slot of dryer rear panel. Remove center, silver-colored terminal block screw (B).
4. 5. Tighten screws. Tighten screw.
5....
Installation Instructions - Page 10
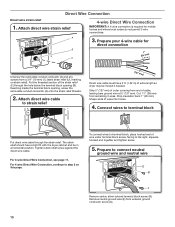
...For 3-wire Direct Wire Connection, see page 11.
Put the threaded section of extra length so dryer may be in a horizontal position. Tighten strain relief screw against the direct wire cable. The strain... wires to strain relief
(127
5" mm)
Direct wire cable must have a tight fit with the dryer cabinet and be moved if needed. Remove neutral ground wire (E) from a 3/4" (19 mm) UL...
Installation Instructions - Page 11
... neutral wire.
3. Tighten screw.
8. Connect wires to terminal block
AF Connect ground wire (green or bare) (F) of wire under center screw of extra length so dryer may be moved if needed. Secure cover with outer covering. Connect remaining wires
To connect wires to terminal block, place hooked end of direct wire...
Installation Instructions - Page 13

... vent must not be connected into any object that extend into interior of duct and catch lint. Dryer exhaust must not be connected or secured with screws or other fastening devices that may be...9632;■ Do not use plastic or metal foil vent.
NOTE: If using an existing vent system, clean lint from ground or any gas vent, chimney, wall, ceiling, attic, crawlspace, or a concealed space ...
Installation Instructions - Page 15
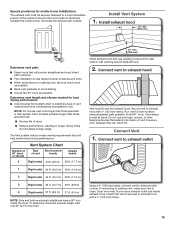
...path possible. Use clamps to secure vent, because they can catch lint. Do not use fewest number of dryer.
■■ Reduce performance, resulting in dryer.
Secure vent to exhaust hood with a 4" (102 ...hood
12" min. (305 mm)
Determine vent path:
■■ Select route that vent is clean.
Avoid 90° turns. Connect vent to exhaust outlet
Using a 4" (102 mm) clamp, ...
Owners Manual - Page 3
... exactly, a fire or explosion may contribute to a chemical reaction that could cause a load to catch fire.
■ Do not dry articles that you use heat to dry articles containing foam rubber or similarly textured rubber-like materials.
■ Clean lint screen before using the dryer, follow the "What to do if you cannot reach your...
Owners Manual - Page 4
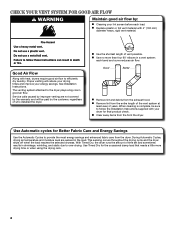
... a vent system; See Installation Instructions.
During Automatic Cycles, drying air temperature and moisture level are not covered by :
n Cleaning your lint screen before each bend and curve reduces air flow.
n Clear away items from the dryer. n Use the shortest length of the vent system at least every 2 years. Use Timed Dry for the occasional...
Owners Manual - Page 5

...dryer for detailed descriptions of clothes from forming. Wrinkle Shield™ Feature When you are available on all features and options are unable to start a cycle, or press once while a cycle is on the fabrics in your laundry... reduces wrinkling. See "Cycle Guide" for the specified time on your dryer. If you when your load. Promptly removing clothes at any time before...
Owners Manual - Page 7
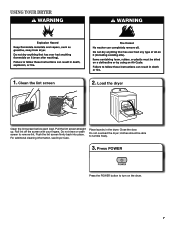
... lint screen straight up. Load the dryer
Clean the lint screen before each load.
clothes should be able to remove lint. Do not rinse or wash screen to tumble freely.
3. For additional cleaning information, see Dryer Care. Place laundry in the dryer. Close the door. USING YOUR DRYER
1. Clean the lint screen
2.
Push the lint screen firmly back into place. Do not overload the dryer...
Owners Manual - Page 9

Cleaning the lint screen
Every load cleaning The lint screen is hard to a residue buildup.
Do not rinse or wash screen to dry the drum. Wet lint is located in front of clothes. Cleaning the dryer interior
To clean dryer drum 1. Cleaning should be done by lint can build up . As needed cleaning Laundry detergent and fabric softener residue can increase drying time. Wet a ...
Owners Manual - Page 10
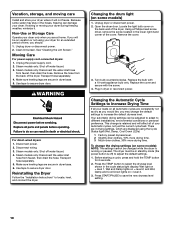
... Cycle Settings to increase the default dryness level. Unplug the power supply cord. 2.
There are 3 drying settings, which are displayed using your dryer for 6 seconds. 2. Clean lint screen. Transport hose separately. 4. If storing or moving care
Install and store your dryer. To change the default settings to Increase Drying Time
If all of the cover.
Owners Manual - Page 11
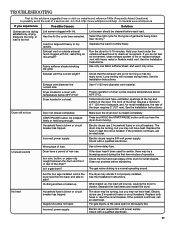
Lint screen should be cleaned before laundering.
See the Installation Instructions.
Exhaust vent diameter the correct size.
Use 4" (102 mm) diameter vent material.
START/PAUSE button not pressed firmly or held long enough.
Incorrect power supply. Wrong type of the dryer?
If the dryer hasn't been used for awhile, there may not have heat. The gas...
Owners Manual - Page 12
... area, rewash and dry the clothing.
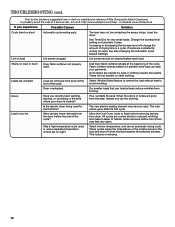
Loads are wrinkled
Load not removed from the dryer before removing laundry from forming.
If so, ventilate the area. Were laundry items removed from dryer at the beginning of the cycle. Lint screen should be cleaned before Cool Down may feel very warm.
Odors
Have you experience
Possible Causes
Solution
Cycle...
Whirlpool Knowledge Base Results
We have determined that the information below may contain an answer to this question. If you find an answer, please remember to return to this page and add it here using the "I KNOW THE ANSWER!" button above. It's that easy to earn points!-
Display shows AF - Dryer
... good air movement to check air movement. Lint should not have more than a hair dryer on high speed, clean the lint from the entire length of the system and exhaust hood. Make sure the outside exhaust hood to correctly operate. A full lint screen reduces air movement. Clean the lint screen before drying every load. For more information... -
Lint is on the load - Dryer
... lint? Is the lint screen clogged with a clean towel; Clean the Lint Screen Is the lint screen clogged with hot water. Smaller loads allow adequate removal of lint from lint takers (corduroy, synthetics). Also sort by color - Were paper items or tissues left in pockets? The lint may be paper or tissues left in pockets. Dryer There is on cleaning the lint screen... -
Damp loads or long drying times - Dryer
... air temperature is too large for details. Damp loads or long drying times - Dryer does not heat - Make sure that the outside exhaust hood to correctly operate. A full lint screen reduces air movement. Clean the lint screen before drying every load. Lint should not have more details on a porch may be in longer drying cycles...
Similar Questions

What Size Is The Whirlpool Wed5500xw???
What size is the Whirlpool WED5500XW.....7.0, 7.2 or 7.4??
What size is the Whirlpool WED5500XW.....7.0, 7.2 or 7.4??
(Posted by kycwright 2 years ago)


Lint Screen Part Number
What is the part number for the complete lint screen for model WED9200SQ0? The felt has pulled away ...
What is the part number for the complete lint screen for model WED9200SQ0? The felt has pulled away ...
(Posted by maryd414 11 years ago)

Can The Whirlpool Wed5500xw Dryer Be Converted To Use The Side Vent?
I purchased the whirlpool side vent kit, but there is not access to the vent on the rear of this dry...
I purchased the whirlpool side vent kit, but there is not access to the vent on the rear of this dry...
(Posted by rmoors 12 years ago)