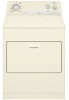
Whirlpool WED5500ST Support Question
Whirlpool WED5500ST Support Question
Find answers below for this question about Whirlpool WED5500ST.Need a Whirlpool WED5500ST manual? We have 4 online manuals for this item!
Current Answers
Answer #1: Posted by freginold on May 19th, 2015 4:38 AM
freginold

Member since:
December 20th, 2011 Points: 23,253,885

Member since:
December 20th, 2011 Points: 23,253,885
Hi, the service manual will have disassembly instructions, but there doesn't appear to be a copy for this exact model available online. However, the parts list shows an overview of how everything goes together. It looks like if you take the rear cover off, you can get to the motor by removing a bracket or two and the belt. You can download the parts list here:
http://www.whirlpool.com/digitalassets/MLPDF/Repair%20Part%20List%20-%208181353.pdf
http://www.whirlpool.com/digitalassets/MLPDF/Repair%20Part%20List%20-%208181353.pdf
Related Whirlpool WED5500ST Manual Pages
User Instructions - Page 1

...
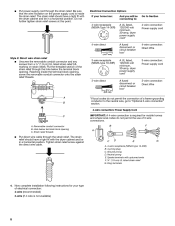
W10150610A Part Number Accessory
20-48KITRC 4 ft (1.2 m) gas line dryer connector installation kit
PT220L
4 ft (1.2 m) dryer cord, 3-wire, 30 amp
PT400L
4 ft (1.2 m) dryer cord, 4-wire, 30 amp
PT600L
6 ft (1.8 m) dryer cord, 4-wire, 30 amp
8212614
Dryer vent lint brush
31682
All-purpose appliance cleaner
1903WH
Laundry supply storage cart
3404351
Drying rack - fits 29" (73.7 cm...
User Instructions - Page 2

...; Keep area around the exhaust opening and adjacent
surrounding areas free from service or discarded, remove the door to dry articles containing foam rubber or similarly textured rubber-like materials.
■ Clean lint screen before using the dryer, follow the safety alert symbol and either the word "DANGER" or "WARNING." All safety...
User Instructions - Page 3

... and vented, it will be properly installed and vented to flow. WARNING: For your dryer in a new location.
Use the minimum recommended installation clearances found in the vicinity of... routing the vent. Follow the gas supplier's
instructions.
• If you cannot reach your dryer is important for proper length requirements of all joints.
Use clamps to light any appliance. •...
User Instructions - Page 4

... have all of the load is selectable. Place drying rack in the cycle selections.
5. (OPTIONAL) Your dryer may have a drying rack, you are unable to follow these instructions can completely remove oil. Failure to remove a load from dryer.
Do not dry anything flammable on a clothesline or by using the Auto Moisture Sensing Cycle, the...
User Instructions - Page 5

... the following table.
4. NOTE: Garments that contain unstable dyes, such as gasoline, away from items that would obstruct the flow of the dryer door opening. Removing Accumulated Lint
From Inside the Dryer Cabinet
Lint should be removed every 2 years, or more often, depending on rack)
Drying
Stuffed toys/pillows (cotton Timed
Low
60 min.
User Instructions - Page 6
... supply cord. 2. Use masking tape to secure dryer door. Use masking tape to secure dryer door. Close shutoff valve in the lower righthand corner of the cover. Open the dryer door. Remove the cover.
Move the dial past OFF. Moving care - Electric Dryers
For power supply cord-connected dryers: 1.
Use masking tape to do so can...
User Instructions - Page 7

...The load may vibrate if not properly installed. Stains on load or drum
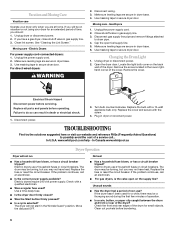
■ Was dryer fabric softener properly used? Long venting will not transfer to Automatic Drying? WARNING
Explosion Hazard ...Keep flammable materials and vapors, such as gasoline, away from dryer.
Add dryer fabric softener sheets at the top and bottom of lint or replace exhaust vent ...
User Instructions - Page 8

... or Whirlpool Canada LP (hereafter "Whirlpool") will be repaired in U.S.A. The removal and reinstallation of your dryer is used for other than normal, single-family household use of the Use ...50 United States and Canada, this document.
Loads are wrinkled
■ Was the load removed from unauthorized modifications made with the same precision used for the first time? Service calls ...
Installation Instructions - Page 1
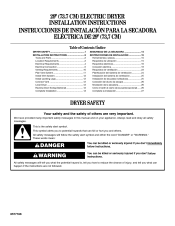
... Plan Vent System ...11 Install Vent System...12 Install Leveling Legs...12 Connect Vent ...12 Level Dryer ...12 Reverse Door Swing (Optional)...12 Complete Installation ...13 SEGURIDAD DE LA SECADORA ...14 INSTRUCCIONES...243;mo invertir el cierre de la puerta (opcional)...26 Complete la instalación...27
DRYER SAFETY
Your safety and the safety of injury, and tell you don't immediately follow...
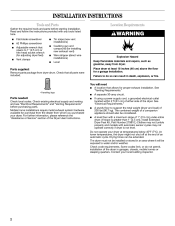
Installation Instructions - Page 2
...considered.
For further information, please reference the "Assistance or Service" section of the dryer in garages, closets, mobile homes or sleeping quarters. See "Venting Requirements." Check ... s
Parts supplied:
Remove parts package from whom you purchased your dryer. A separate 30-amp circuit. s
s
Do not operate your local building inspector.
2 The dryer must not be installed...
Installation Instructions - Page 4

... be identified by a qualified electrician. Check with a 3-wire electrical supply connection. If the dryer is installed with the circuit conductors and connected to the neutral wire, see "Optional 3-wire connection... All current-carrying wires must match power supply (4-wire or 3-wire) and be removed from the neutral conductor. If local codes do not use an extension cord.
s
...
Installation Instructions - Page 6
...relief. Ground prong D. Ring terminals
4. The strain relief should have a tight fit with the dryer cabinet and be in a horizontal position. Tighten strain relief screw against the direct wire cable....the strain relief. Removable conduit connector B. Neutral prong E. Spade terminals with the dryer cabinet and be connecting to: A UL listed, 120/240-volt minimum, 30-amp, dryer power supply cord...
Installation Instructions - Page 7
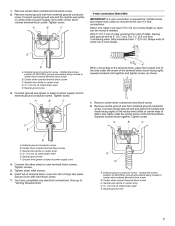
...slot of extra length so dryer can be moved if needed.
Remove center silver-colored terminal block screw. 2. You have 5 ft (1.52 m) of dryer rear panel. Tighten screw.... strain relief E. Dotted line shows position of direct wire cable under center, silvercolored terminal block screw. Remove neutral ground wire from end of terminal block cover into a hook shape. A
B
C
F E...
Installation Instructions - Page 8
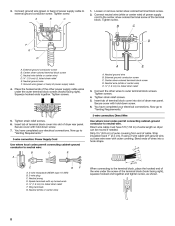
Loosen or remove center silver-colored terminal block screw. 2. Connect neutral wire (white or center wire) of power supply ...hooked end together and tighten screw, as shown.
8
Center silver-colored terminal block screw C. Place the hooked ends of extra length so dryer can be moved if needed. Squeeze hooked ends together. You have 5 ft (1.52 m) of the other wires to neutral wire. ...
Installation Instructions - Page 9

...center wire) E. ¾" (1.9 cm) UL listed strain relief F. Tighten strain relief screw. 5. Remove center silver-colored terminal block screw. 2. External ground conductor screw B. Center silver-colored terminal block screw...slot of dryer rear panel. Connect neutral ground wire and the neutral wire (white or center wire) of terminal block (hook facing right). Loosen or remove center silver...
Installation Instructions - Page 10
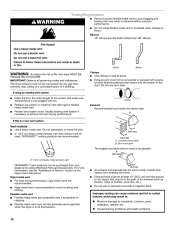
... performance. If this dryer MUST BE
EXHAUSTED OUTDOORS. Do not use an exhaust hood with rigid or flexible heavy metal vent.
Do not install flexible metal vent in its final position. IMPORTANT: Observe all joints. B
A
4" (10.2 cm) 4" (10.2 cm)
Vent material
s s
Use a heavy metal vent.
Venting Requirements
s
WARNING
s
Remove excess flexible metal...
Installation Instructions - Page 12
... door until top screws in the flexible gas line. 4. Place towel (A) on left -side opening around exhaust hood. 2. Remove bottom screws from cabinet side of the dryer (not the top or console panel). Level Dryer
Check the levelness of hinges (C).
Loosen (do so can change your door swing from cabinet. 4. Secure vent to...
Installation Instructions - Page 13
... or right within slot to protect surface. 2. Check that both circuit breakers have all packaging materials. 4. If the dryer will go back through the steps to dryer door so that you do not remove) top screws from inner door. Household fuse is first used.
Position door so large end of /recycle all of...
Parts Diagram - Page 2
...Motor Assembly
60 Hz.
63 660658 Clamp, Motor
64 3404162 Clamp, Motor
(W/Shield)
67 3390731 Seal, Door
68 697776 Screw, 10−32 x 5/8
(External Ground)
2
8181353 DESCRIPTION
16 3392100 Foot, Dryer... Guide
8528190 Wiring Diagram
Following May Be Purchased
DO−IT−YOURSELF REPAIR MANUALS
677818 Dryer
2 343641 Screw, 10−16 x 1/2 3 693995 Screw, Hex
Washer Head 4 ...
Parts Diagram - Page 4
... (R.H.)
18
94614 Terminal
8271359 White
21 3979617 Timer, 60 Hz.
8271362 Biscuit
23 3394427 Clip, Harness
9 3395683 Housing, Connector 29 8533971 Screw, 8−18 x 5/16
(Motor)
10
Screen, Lint
8557857 White
8557858 Biscuit
Illus. No. DESCRIPTION
Illus. Part No. Part No. TOP AND CONSOLE PARTS
For Model: WED5500SQ0, WED5500ST0 (White) (Biscuit...
Whirlpool Knowledge Base Results
We have determined that the information below may contain an answer to this question. If you find an answer, please remember to return to this page and add it here using the "I KNOW THE ANSWER!" button above. It's that easy to earn points!-
How do I use the control feature on my chest freezer?
...compressor will run constantly until the freezer is first started, the compressor will turn on and off as needed to remove heat from packages and air space inside the freezer. The freezer's design and main function is opened. Adjusting the control ... food per cubic foot of the freezer feel warm. My freezer will not operate The motor on my chest freezer and how does it work? -
How do I clean my upright freezer?
...cleansers containing petroleum products on the cooling coil. To remove and replace base grille How do I clean and care for my upright freezer? The motor on my upright freezer seems to runs too much There...several layers of mild detergent in warm water or two tablespoons (26 mg) baking soda to remove unwanted grime and dirt and leaves behind the base grille) where it on plastic parts, ... -
Display shows F25 or F06 - Front-load washer
... the motor is shipped from the rear of the shipping bolts, and the four plastic spacers that are designed to remove all of the washer before you operate it. shipping bolt To remove the ... Display shows F25 or F06 - All four (4) shipping bolts and the plastic spacers must be removed from the factory with four bolts, which are with them by entering your model number in the search...
Similar Questions

Dryer Will Not Turn On.
my dryer wil not turn on. I have checked a fuses and they are good. What's next?
my dryer wil not turn on. I have checked a fuses and they are good. What's next?
(Posted by Dtidavid54 7 years ago)

Power But No Tumbler?
The unit is only four years old, in a rental with one tenant, looks brand new! It powers on, switche...
The unit is only four years old, in a rental with one tenant, looks brand new! It powers on, switche...
(Posted by jwoloszyn14 8 years ago)


Heat Comes Out, But Dryer Drum Does Not Come On, And No Motor Noise
could this be the motor, or switch / worked fine two days ago, now today when I turn on the dryer, I...
could this be the motor, or switch / worked fine two days ago, now today when I turn on the dryer, I...
(Posted by shervan 9 years ago)

My Dryer Isn't Venting. And A Code Af Comes Up
My dryer isn't exhausting. And I get a code of af
My dryer isn't exhausting. And I get a code of af
(Posted by Joeandrade 9 years ago)