Whirlpool WED4800XQ Support Question
Whirlpool WED4800XQ Support Question
Find answers below for this question about Whirlpool WED4800XQ.Need a Whirlpool WED4800XQ manual? We have 4 online manuals for this item!
Question posted by navymom57 on October 3rd, 2013
How Do I Change The Door To Open Oppisite Direction?
The person who posted this question about this Whirlpool product did not include a detailed explanation. Please use the "Request More Information" button to the right if more details would help you to answer this question.
Current Answers
Related Whirlpool WED4800XQ Manual Pages
Owners Manual - Page 4

...102 mm)
diameter heavy, rigid vent material. This sensing occurs throughout the drying cycle and the dryer shuts off when the load reaches the selected dryness.
The venting system attached to over-drying....AND ENERGY SAVINGS
Use the ACCUDRY™/Automatic Dry cycles to efficiently dry laundry.
n Use the shortest length of time set and sometimes results in a vent system; Good...
Owners Manual - Page 5

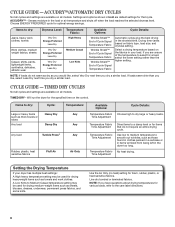
...to select a cycle for the specified time on the fabrics in your dryer model. TIMED DRY Will run the dryer for your dryer. ACCUDRY™/AUTOMATIC DRY Senses moisture in the shortest time. Drying time ...remove a load of the cycle reduces wrinkling.
Appearance may choose a setting based on your laundry load. See "Cycle Guide" for a load, select the lower setting rather than the ...
Owners Manual - Page 6
...Adjustment
Temperature Fabric Time Adjustment
Temperature Fabric Time Adjustment
Dries items to the care label directions.
6
Setting the Drying Temperature
If your load. NOTE: If you have questions... Fabric:
Available Options:
Cycle Details:
Jeans, heavy work clothes.
Senses moisture in the dryer too long. Line dry bonded or laminated fabrics. Drying time varies based on all models...
Owners Manual - Page 7
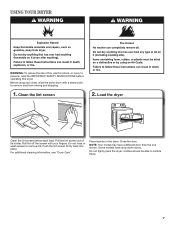
For additional cleaning information, see "Dryer Care". Place laundry in the dryer. Push the lint screen firmly back into place.
clothes should be able to remove dust from storing and shipping.
1. Close the door. Do not tightly pack the dryer; NOTE: Your model may have drop down doors. Load the dryer
Clean the lint screen before operating this...
Owners Manual - Page 8
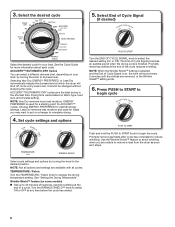
... to START to
begin cycle
End O
of the cycle reduces wrinkling. Drying time varies based on a hanger to remove a load from the dryer as soon as it cannot be changed without stopping the cycle. Select the desired cycle
TIMED DRY 50
40
Damp Dry
Tumble Press
20
60
70
Heavy Dry
Cool...
Owners Manual - Page 9
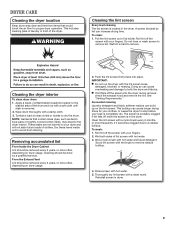
... screen in front of the drum and rub with hot water and liquid detergent.
Wipe drum thoroughly with hot water. 5.
As needed cleaning Laundry detergent and fabric softener residue can cause longer drying times for proper dryer operation. The screen is removed. 2.
Roll lint off while the screen is located in the...
Owners Manual - Page 10

Changing the drum light (on vacation or not using your dryer only when you should: 1. Replace the bulb with the screw.
4. For direct-wired dryers: 1. Turn off valve to dryer. 2. Use tape to secure dryer door.
Unplug the power supply cord. 2. Disconnect wiring. 3. For gas dryers: 1.
Vacation, storage, and moving care
Non-Use or Storage Care
Operate your dryer for...
Owners Manual - Page 11

... 45ºF (7ºC)? Exhaust vent not the correct length. Long venting will not run
Door not closed completely. See "Installation Instructions". Dryer located in a closet without adequate opening. Closet doors must have heat. Dryer will increase drying times. Make sure the dryer door is closed completely. Replace both fuses or reset the circuit breaker. Check with lint...
Owners Manual - Page 12
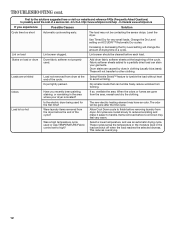
... setting will not transfer to other clothing.
These will change the amount of drying time in the area where your garments. Dryer tightly packed. Select Wrinkle Shield™ feature to tumble the load without heat to high? Were laundry items removed from the dryer before removing laundry from forming.
Lint screen should be cleaned before...
Dimension Guide - Page 1
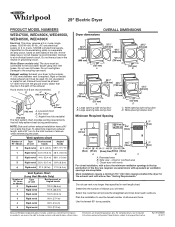
... mm)
A
B
C
A. Large opening side-swing door B. Most installations require a minimum 5½" (140 mm) clearance behind the dryer for planning purposes only. Determine the ...direct path outdoors. Rigid or flexible metal exhaust vent must be connected to the outside. 4" (102 mm) diameter vent is recommended. Exhaust hood must be in vent length chart. Plan the installation to change...
Installation Instructions - Page 2
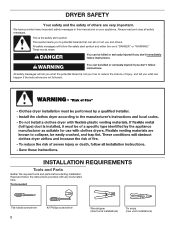
... "DANGER" or "WARNING." Tools needed:
Flat-blade screwdriver 2
#2 Phillips screwdriver
Wire stripper (direct wire installations)
Tin snips (new vent installations) We have provided many important safety messages in this.... All safety messages will follow the instructions provided with any tools listed here. DRYER SAFETY
Your safety and the safety of injury, and tell you and others are...
Installation Instructions - Page 3

... appliance should also be large enough to allow the dryer door to the dryer must be considered.
■■ Level floor with clothes dryers. Location Requirements
Tape measure
Pliers
Level
Caulking gun and...Some codes limit, or do not permit, installation of the Dryer User Instructions.
The wires that connect to open fully.
3 The kit should be type SRD or SRDT and be ...
Installation Instructions - Page 4

... for ease of installation and servicing.
■■ Additional clearances might be at least twice as large as the dryer exhaust opening side-swing door B. Large opening side-swing door D. Closet door with a door, minimum ventilation openings in a location where grounding through the neutral is permanently connected to reduce noise transfer.
■■ For closet installation...
Installation Instructions - Page 5
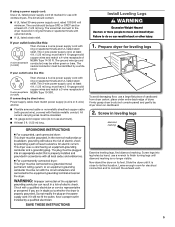
... A UL listed strain relief. If connecting by direct wire:
Power supply cable must have 3 10-gauge solid copper wires and match a 3-wire receptacle of dryer.
Screw in ring terminals or spade terminals with... covered with flexible metallic conduit. Failure to do not use a wrench to move and install dryer. Screw legs into leg holes by a white
cover. place under entire back edge of NEMA...
Installation Instructions - Page 7
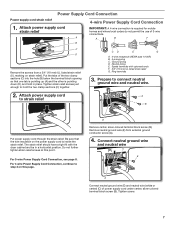
...tabs of the two clamp sections (C) into the hole (B) below the terminal block opening so that the wire insulation on the power supply cord is inside the strain relief.... should have a tight fit with upturned ends F. 3/4" (19 mm) UL listed strain relief G. Spade terminals with the dryer cabinet and be in place. Be sure that one tab is pointing up (A) and the other is required for mobile homes...
Installation Instructions - Page 9
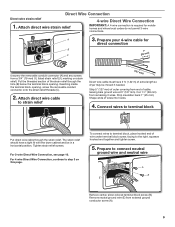
... For 4 wire Direct Wire Connection, continue to strain relief
(127
5" mm)
Direct wire cable must have a tight fit with the dryer cabinet and be moved if needed. A
3. Attach direct wire cable
to ...
Put direct wire cable through the hole (B) below the terminal block opening , screw the removable conduit connector onto the strain relief threads (C).
2. For 3-wire Direct Wire Connection...
Installation Instructions - Page 14
...duct tape, screws, or other fastening devices that extend into interior of dryer.
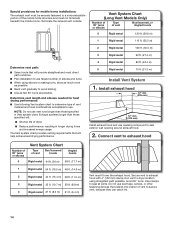
■■ Reduce performance, resulting in Vent system chart. The Vent....4 m)
Determine vent path:
■■ Select route that will provide straightest and most direct path outdoors.
■■ Plan installation to use fewest number of vent
material and hood...opening around exhaust hood.
2.
Installation Instructions - Page 15
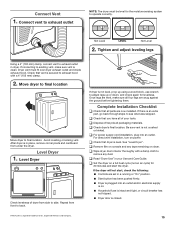
... of E.I. q Dispose of/recycle all of dryer from side to exhaust outlet
NOTE: The dryer must fit over dryer exhaust outlet and inside exhaust hood. For direct wire installation, turn on .
■■ Household fuse is intact and tight, or circuit breaker has not tripped.
■■ Dryer door is closed.
†®TEFLON is secured...
Installation Instructions - Page 16
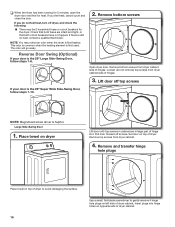
If there is first heated.
The odor will go away. Remove bottom screws
Open dryer door. Remove bottom screws from dryer cabinet side of hinges.
3. Remove and transfer hinge
hole plugs
Place towel on top of dryer to avoid damaging the surface. 16
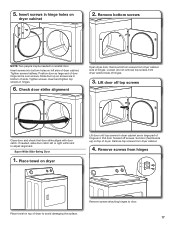
Use a small, flat-blade screwdriver to gently remove 4 hinge hole plugs on opposite...
Installation Instructions - Page 17
...
Close door and check that door strike aligns with door catch. Check door strike alignment
Open dryer door. Set door (handle side up so screws are in bottom of dryer to door. Remove bottom screws
NOTE: Two people maybe needed , slide door catch left side of dryer. Loosen (do not remove) top screws from dryer cabinet.
4. Remove screws from dryer cabinet side of door hinge...
Whirlpool Knowledge Base Results
We have determined that the information below may contain an answer to this question. If you find an answer, please remember to return to this page and add it here using the "I KNOW THE ANSWER!" button above. It's that easy to earn points!-
Door opens in the wrong direction - Top freezer
... left, it is your responsibility. Changing the door swing on my ice maker Product Literature (Use and Care Manuals, Parts Lists, etc) Refrigerator/freezer odor removal Door removal, leveling and alignment - Top freezer Why does my door swing open the wrong way? Top-freezer refrigerator doors can swing in the wrong direction - Side by -step instructions in... -
How do I broil using my electric range?
...models): Press Temp or Temp/Hour "up" or "down" arrow pads to change the temperature in the center of juices. Pull out the oven rack to ...door open How do I broil using my electric range? Press Off/Cancel when finished. To broil: Open door to cook food. To custom broil (on grid in the broiler pan, and then place it in 5°F (5°C) amounts. Broiling uses direct... -
My front load washer has an odor
... . Leave the door slightly open to allow for better ventilation and drying of the washer interior. If your laundry room is required. My front load washer has an odor Why does my front load washer have an odor? See Also How to remove odors from front-load washer (for directions on control...
Similar Questions

Dryer When Off Even With Door Open Heat Is Still On
I have not used my dryer for days when I use to keep door close condensation builds up so I keep doo...
I have not used my dryer for days when I use to keep door close condensation builds up so I keep doo...
(Posted by stoneslpf 6 years ago)

What Is The Serial Number For Whirlpool Dryer Model Number Wed4800xq
(Posted by kknmichae 9 years ago)

Dryer Whirlpool Wed4800xq
Is there a removeable panel on this dryer to allow it to pass through the door opening? thx
Is there a removeable panel on this dryer to allow it to pass through the door opening? thx
(Posted by ron4bc 10 years ago)
Change Door Opening
How do I change the opening of the door? Do i need to purchase a kit?
How do I change the opening of the door? Do i need to purchase a kit?
(Posted by Anonymous-66733 11 years ago)
