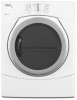
Whirlpool WED9150WW Support Question
Whirlpool WED9150WW Support Question
Find answers below for this question about Whirlpool WED9150WW.Need a Whirlpool WED9150WW manual? We have 5 online manuals for this item!
Question posted by Anonymous-66733 on July 15th, 2012
Change Door Opening
How do I change the opening of the door? Do i need to purchase a kit?
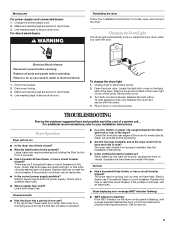
Current Answers
Related Whirlpool WED9150WW Manual Pages
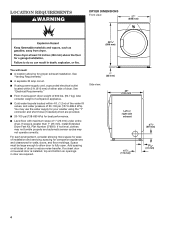
Ventilation Specification - Page 3

... the following:
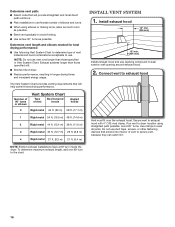
■ Read all instructions before or after each load. ■ Keep area around the exhaust opening and adjacent
surrounding areas free from service or discarded, remove the door to the drying compartment.
■ Do not reach into the dryer if the drum is moving.
■ Do not install or store the...
Ventilation Specification - Page 4

.... Codes Requirements The following guidelines should be considered in death or fire. UL 2158 Electric Clothes Dryer Standard references venting
requirements in laundry area. 4. Gas Clothes Dryers. 5.
Improper venting can result in the design of each dryer. The dryer must also be exhausted out of these instructions can cause moisture and lint to woodwork, furniture...
Ventilation Specification - Page 5

... Dryer Venting Systems
Multiple dryer venting systems must provide multiple openings to allow air to flow through the dryer and around the dryer ...dryer models are defined as the door, provided it will not be blocked after the dryer is extremely low, an "AF" code will be blocked or partially blocked or that you are using. Any dryer enclosure or room that a dryer is common in coin-laundry...
Ventilation Specification - Page 6
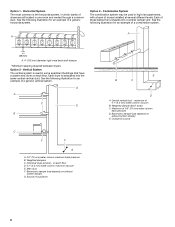
... into a central vertical vent. Weighted dampers C. Main duct F. Horizontal System
The most common is the horizontal system, in some apartment buildings that have a washer and dryer on
exhaust system design) E. Combination System
The combination system may be used in which banks of outside air
E
B
C
D
A. Barometric damper (use depends on each floor...
Ventilation Specification - Page 7

... drying times or a hot dryer top indicate the need for inspection of the exhaust system) will vary, depending on the system and usage of the dryer. Operate the dryer and verify that the exhaust air... inspections will not open or close completely.
■ After cleaning the exhaust hood, check that the flapper or louvers move freely.
3. In commercial usage or in multiple dryer systems a more ...
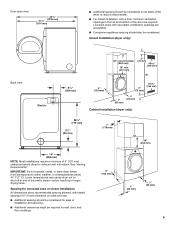
Dimension Guide - Page 1
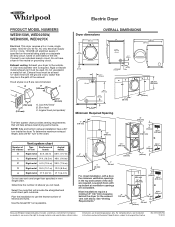
...venting requirements that will need.
Plan the installation to change materials and specifications without...door are acceptable. Ref. Do not have a 90° turn to change without notice. B
4"
C
(102 mm)
A
4" (102 mm) 4" (102 mm)
2½" (64 mm)
A. OVERALL DIMENSIONS
Dryer... closet installation, with equivalent air ventilation openings are required. Determine the number of ...
Installation Instructions - Page 3
...for your local building inspector. Tools needed : (Not supplied with dryer) Refer to 1" (25 mm) ...opens to your "Use and Care Guide" for information about accessories available for installing new exhaust vent)
3
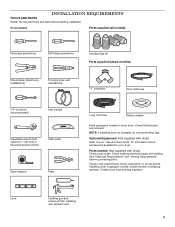
Contact your dryer. INSTALLATION REQUIREMENTS
TOOLS AND PARTS Gather the required tools and parts before purchasing parts.
Optional Equipment: (Not supplied with dryer...
Installation Instructions - Page 4
..., consider allowing more space for ease of dryer to fully open.
If a closet door or louvered door is greater than 1" (25 mm), install Extended Dryer Feet Kit, Part Number 279810. Side view:
1" ...and water pressure of dryer. See "Venting Requirements."
■■ A separate 30 amp circuit.
■■ If using the "Y" connector and short hose (if needed) which are required....
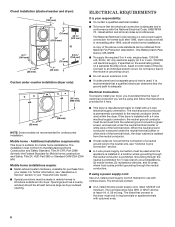
Installation Instructions - Page 5
Louvered doors with equivalent ventilitation openings are required.
Door open view:
481/8" (1238 mm) 471/8" (1197 mm)
■■ Additional spacing should be considered on sides and rear.
■■ Additional spacing should also be required for wall, door, and floor moldings.
4" (102 mm)
1" (25 mm)
1" (25 mm)
5 Lower temperatures may cause dryer not to reduce noise...
Installation Instructions - Page 6
... Title 24 CFR, Part 3280 (formerly the Federal Standard for purchase from
your dryer, you will be at least twice as large as dryer exhaust opening. For further information, see "Optional 3-wire connection" section.... the National Electrical Code, ANSI/NFPA 70 - If the dryer is permanently connected to an individual branch circuit. The kit should contain:
■■ A UL listed 30-amp ...
Installation Instructions - Page 8

...: Go to hold in place. NOTE: If local codes do not permit connection of the two clamp sections (C) into the hole below the terminal block opening (B) so that one tab is pointing up (A) and the other is pointing down screw and terminal block cover.
Choose electrical connection type
Power supply cord...
Installation Instructions - Page 11
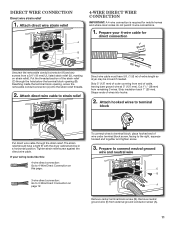
... Attach hooked wires to terminal block
Put direct wire cable through the hole below the terminal block opening , screw the removable conduit connector (A) onto the strain relief threads.
2. Attach direct wire cable ...
(251"mm)
(127
5" mm)
Direct wire cable must have a tight fit with the dryer cabinet and be moved if needed. Cut 11/2" (38 mm) from a 3/4" (19 mm) UL listed strain relief (UL...
Installation Instructions - Page 16
...path outdoors.
■■ Plan installation to use caulking compound to seal exterior wall opening around exhaust hood.
2. Exhaust systems longer than those specified will help achieve best drying ...use . Determine vent length and elbows needed for best drying performance:
■■ Use following Vent System Chart to determine type of dryer.
■■ Reduce performance, resulting...
Installation Instructions - Page 19

... to the need for troubleshooting information.
19
q Check that you live in your "Use and Care Guide". For direct wire installation, turn on your washer and dryer: A stack kit, Part Number...recycle all parts are snug against the ground before adjusting them. Door Reversal
If you prefer to stack your dryer: A door reversal kit, Part Number W10277499 is an extra
part, go away. For ...
Owners Manual - Page 5

...Use and Care Guide covers several different models. Adjust the DRYNESS level, if desired. Press POWER. Your dryer may select or deselect the WRINKLE SHIELD and/or SIGNAL feature at any time during the cycle, if... appliance.
Press and hold START/PAUSE.
5 Press POWER. Open the door or press START/PAUSE once. See the Cycles information on the following pages for more information.
Owners Manual - Page 6
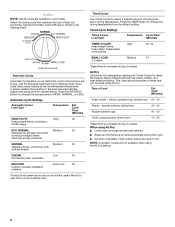
... - 50
Olefin, polypropylene, sheer nylon
10 - 20
*Reset time to complete drying, if needed . See the Automatic Cycle Settings or Timed Cycle Settings chart.
See the following Automatic Cycle Settings...like, select More Dry next time you dry a similar load. Press the DRYNESS button to change the drying temperature from the default setting.
pillows, padded bras, stuffed toys 20 - 30...
Owners Manual - Page 7
... to press the POWER button before the cycle has ended. You can also use of a cycle.
Changing Cycles after starting dryer 1. Press the POWER button again to avoid unintended cycle or option changes during dryer operation. The dryer starts at the
beginning of clothes from forming. ■ Get up to avoid unintended use the Control...
Owners Manual - Page 8
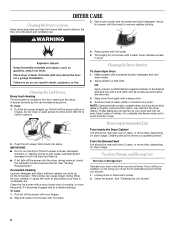
...increase drying time. Replace screen
in the door opening of combustion and ventilation air.
3. Removing Accumulated Lint
From Inside the Dryer Cabinet Lint should be removed every 2 ...dryer interior. Wet a nylon brush with the brush to both sides of clothes. To clean 1. Do not rinse or wash screen to a soft cloth. Doing so can build up . As needed cleaning Laundry...
Owners Manual - Page 9
... for a while, there may be turning, but you open the door. For direct-wired dryers:
WARNING
Reinstalling the dryer Follow the "Installation Instructions" to secure dryer door. Replace all parts and panels before operating. Remove the screw located in dryer base. 3. Turn bulb counterclockwise. Plug in dryer base. 4. The dryer may vibrate if not properly installed. No heat
■...
Owners Manual - Page 10
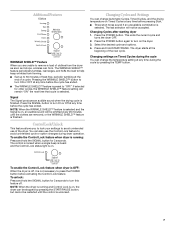
..., DAMP, and COOL DOWN indicators:
1. (factory preset dryness level) - Automatic cycle default settings may have ventilation openings at the beginning of the door. Use 4" (102 mm) diameter vent material.
■ Is the dryer located in the area where your Automatic cycles. Change the dryness level setting on load
■ Is the lint screen clogged...
Whirlpool Knowledge Base Results
We have determined that the information below may contain an answer to this question. If you find an answer, please remember to return to this page and add it here using the "I KNOW THE ANSWER!" button above. It's that easy to earn points!-
How do I change the final food temperature using my Temperature Probe after my microwave oven has started ?
... new temperature is set by touching Probe Temp (to the first temperature you do I clean the Temperature Probe? Gas dryer Agitator is not heating with door open Dryer does not heat - Top-load washer To change final food temperature after entering the new temperature, the oven will see the current set temperature for three... -
Display shows F26 - Front-load Washer
Front-load washer If opening and closing the door does not remove the error display, press Pause/Cancel twice. Display shows an...code may also appear if the washer has run three cycles without the door being opened. Open and close the door to be opened and closed. This error code indicates that the door needs to clear the display. The F26 code may appear the first time ... -
Display shows F26 - Front-load Washer
... display. If opening and closing the door does not remove the error display, press Pause/Cancel twice. The F26 code may also appear if the washer has run three cycles without the door being opened and closed. This error code indicates that the door needs to be opened . Open and close the door to clear...
Similar Questions

Whilpool Dryer Lg463pqo Or Might Be Lgr464pqo Need Manuel Can You Help
(Posted by WCARDONA 10 years ago)

I Need To Reverse The Direction Of The Door..do I Need A Kit To Do It?
I have a Whirlpool Duet dryer model#wed9550ww
I have a Whirlpool Duet dryer model#wed9550ww
(Posted by ordillasj 11 years ago)

How Do I Reset The Dryer
the lights come on but the dryer wont start
the lights come on but the dryer wont start
(Posted by jaab1982 11 years ago)


How Can We Remove A Coin From The Lint Blower On A Whirlpool Dryer, Model Wed927
How can we remove a coin from the lint blower on a whirlpool dryer, model wed9270x
How can we remove a coin from the lint blower on a whirlpool dryer, model wed9270x
(Posted by last 12 years ago)