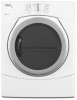
Whirlpool WED9150WW Support Question
Whirlpool WED9150WW Support Question
Find answers below for this question about Whirlpool WED9150WW.Need a Whirlpool WED9150WW manual? We have 5 online manuals for this item!
Question posted by jaab1982 on August 30th, 2012
How Do I Reset The Dryer
the lights come on but the dryer wont start
Current Answers
Related Whirlpool WED9150WW Manual Pages
Ventilation Specification - Page 1

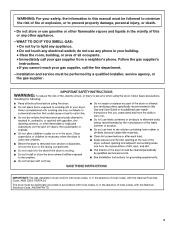
... and liquids in the event the customer smells gas.
FOR YOUR SAFETY Do not store or use in the vicinity of others are installing a gas dryer, it is recommended that can be killed or seriously injured if you and others.
W10100920C WARNING
You can happen if the instructions are not followed...
Ventilation Specification - Page 3

...INSTRUCTIONS
IMPORTANT: The gas installation must be cleaned periodically by the manufacturer of the dryer or attempt any servicing unless specifically recommended in this Use and Care Guide or ... rubber or similarly textured rubber-like materials.
■ Clean lint screen before using the dryer.
■ Do not place items exposed to eliminate static unless recommended by qualified service ...
Ventilation Specification - Page 4

... codes requirements. 2. Codes Requirements The following guidelines should be considered in the central duct system.
4 Improper venting can result in the laundry area.
See "Venting Requirements" for instructions on each dryer. INSTALLATION REQUIREMENTS
WARNING
Local codes and ordinances that came with your local building inspector for more information. To remove excess heat...
Ventilation Specification - Page 5

... literature. If the airflow in many apartment buildings.
Connecting a number of dryers to a single vent system is common in coin-laundry stores and in the dryer is allowed 40 ft (12.2 m) of total vent length with your vent may be used for dryer installation must provide multiple openings to allow air to flow through...
Ventilation Specification - Page 6
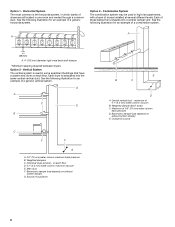
...1"* (25 mm)
A. 4" (102 mm) diameter rigid metal back draft damper
*Minimum spacing required between dryers Option 2 - Barometric damper (use depends on each floor. Weighted damper (each floor D. 0.1" (2.5 mm...G. Source of a generic vertical system. Central vertical duct - Option 3 - Individual dryer exhaust - maximum of 0.6" (15 mm) water column
back pressure D. Outside air source...
Ventilation Specification - Page 7

... sure that the flapper or louvers move freely.
3. For single-family usage, an annual inspection is recommended. Lint may collect in multiple dryer systems a more frequent inspection is recommended. DRYER INSPECTION AND CLEANING
Frequency of Exhaust System Cleaning
Every exhaust system must be inspected periodically and cleaned to ensure that it is...
Dimension Guide - Page 1
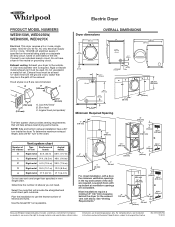
... system chart provides venting requirements that will provide the straightest and most direct path outdoors. OVERALL DIMENSIONS
Dryer dimensions
27" (686 mm)
29" (736 mm)
481/8" (1238 mm) 471/8" (1197 ...a separate 30-amp circuit, fused on both sides of the exhaust. Exhaust venting: Exhaust your dryer to the chart.
Louvered doors with a door, the minimum ventilation openings in .2 (155 cm2...
Installation Instructions - Page 2
... hazards that can be killed or seriously injured if you and others are not followed.
2
This symbol alerts you to reduce the chance of others . DRYER SAFETY
Your safety and the safety of injury, and tell you what can be killed or seriously injured if you don't immediately follow instructions.
We...
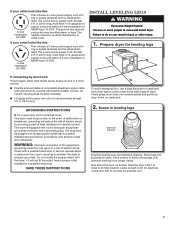
Installation Instructions - Page 3
... are included. Some codes limit, or do not use leveling legs. Contact your dryer.
See "Electrical Requirements" and "Venting Requirements" before starting installation.
Level
Caulking gun and compound (for your local building inspector.
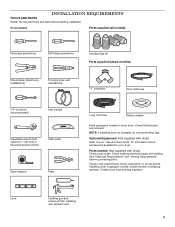
Optional Equipment: (Not supplied with dryer) Check local codes. Check code requirements.
Check existing electrical supply and venting...
Installation Instructions - Page 4
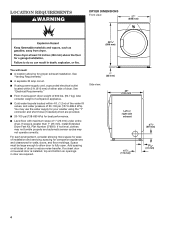
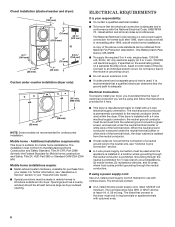
... companion appliances and clearances for proper exhaust installation. Add spacing on all sides of installation and servicing; Space must support dryer weight of 20-100 psi (137.9-689.6 kPa). LOCATION REQUIREMENTS
DRYER DIMENSIONS Front view:
27" (686 mm)
35 3/8"
(899 mm)
You will need:
■■ A location allowing for walls, doors, and...
Installation Instructions - Page 5
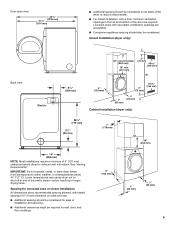
... 471/8" (1197 mm)
■■ Additional spacing should be considered on all sides of the dryer to reduce noise transfer.
■■ For closet installation, with tested spacing of 0" (0 mm... sides and rear.
■■ Additional spacing should also be considered. Lower temperatures may cause dryer not to shut off at temperatures below 45° F (7° C). Spacing for recessed area...
Installation Instructions - Page 6
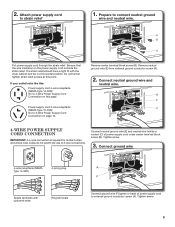
...that connect to the neutral wire, see "Assistance or Service" section in your dryer, you must be obtained from the external ground connector (green screw), and secured ... grounding through the neutral is adequate and in conformance with a 3-wire electrical supply connection. Closet Installation (stacked washer and dryer):
6" (152 mm)
3" (76 mm)
76" (1930 mm)
48 in.2 (310 cm2)
51/2"
(140...
Installation Instructions - Page 7
...grounding conductor can result in back or other injury.
1.
Firmly grasp dryer body (not console panel) and gently lay dryer down on its final location. place under entire back edge of the... outlet that is no longer visible. Leave enough room for electric current. Failure to move and install dryer. In the event of NEMA Type 14-30 R.
If your outlet looks like this :
3-wire...
Installation Instructions - Page 9
... terminals
A F
Connect ground wire (F) (green or bare) of 3-wire connections. Connect ground wire
4-wire receptacle (NEMA type 14-30R)
4-prong plug
Spade terminals with the dryer cabinet and be in a horizontal position.
Tighten screw.
3. Be sure that the wire insulation on this point.
Power supply cord 3-wire receptacle (NEMA Type 10...
Installation Instructions - Page 10
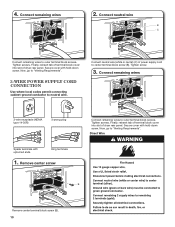
... screw (B). 10 Connect remaining wires
2. Secure cover with upturned ends
Ring terminals
1. Connect neutral wire (white or center) (C) of dryer rear panel. Finally, reinsert tab of terminal block cover into slot of dryer rear panel. Tighten screw.
3. Remove center screw
Connect remaining wires to outer terminal block screws.
Finally, reinsert tab of...
Installation Instructions - Page 15
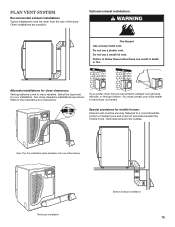
...)
Periscope installation
Bottom Exhaust installation
15
Alternate installations for close -clearance installations are possible. Refer to a noncombustible portion of the dryer. Terminate exhaust vent outside. Two close clearances
Venting systems come in death or fire.
Special provisions for your local dealer to exhaust out right side, left side, or through bottom. Do...
Owners Manual - Page 3
The dryer must be electrically grounded in accordance with local codes, or in the absence of local codes, with the ...the gas supplier. Installation and service must conform with local codes, or in the vicinity of fire or explosion, or to light any appliance. • Do not touch any electrical switch;
Do not store or use any phone in your gas supplier from a neighbor's ...
Owners Manual - Page 7
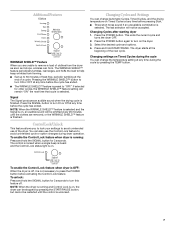
... is preset to 60 minutes of a cycle. Select the desired cycle and options. 4. The dryer starts at any time before the cycle has ended. If selected for 3 seconds. The control is... locked when a single beep is heard and the Control Lock status light is on .
Changing Cycles after starting dryer 1.
Control Lock/Unlock
This feature allows you are removed, or the WRINKLE ...
Owners Manual - Page 8
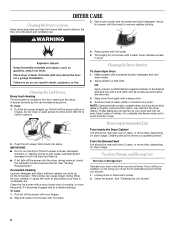
... fabrics. ■ If lint falls off the screen into place. Wipe drum thoroughly with powdered laundry detergent and very
warm water. 2.
Clean lint screen. DRYER CARE
Cleaning the Dryer Location
Keep dryer area clear and free from items that contain unstable dyes, such as denim blue jeans or brightly colored cotton items, may discolor...
Owners Manual - Page 9
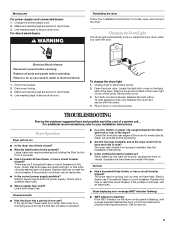
.... 2. To change the drum light
1. Locate the light bulb cover on the dryer control panel is the dryer level front to back and side to secure dryer door. There may be 2 household... first few minutes of the dryer? For additional recommendations, refer to locate, level, and connect the dryer. Replace the fuse or reset the circuit breaker.
Dryer displaying error message (WET indicator...
Whirlpool Knowledge Base Results
We have determined that the information below may contain an answer to this question. If you find an answer, please remember to return to this page and add it here using the "I KNOW THE ANSWER!" button above. It's that easy to earn points!-
Cooktop indicator light stays on
...lights come on when power is turned on from the breaker. controlled glass cooktop to have been turned off What is turned on after the burner has been turned off the hot warning lights. Is the cooktop On light..., depending on the right side of the control panel. The Cooktop On indicator light is a Hot Surface light. This light, located above the knob, is located on how long it takes to a... -
Refrigerator not operating
...the dispenser panel at all? If the refrigerator compartment light does come on, but the refrigerator is not cooling, make sure the light comes back on the freezer door. Cooling On/Off ...door to completely cool. Top freezer FAQs Knowledgebase search tips If the refrigerator compartment light does not come on , check the following. Make sure the refrigerator is not tripped. Does... -
Cooktop indicator light stays on
... glow when any surface control knob is turned on my electric ceramic glass cooktop? This light, located above the knob, is my cooktop not working Are all control knobs have its hot indicator lights come on when power is turned on how long it takes to two hours after power was turned on...
Similar Questions

Cabrio Dryer Wont Start Sensing Light
(Posted by mrtallcze 10 years ago)

Dryer Wont Start
indicator lights are on, beeps when you change automatic cycles but light stays on bulky items. unpl...
indicator lights are on, beeps when you change automatic cycles but light stays on bulky items. unpl...
(Posted by csmontgomery 10 years ago)


How Can We Remove A Coin From The Lint Blower On A Whirlpool Dryer, Model Wed927
How can we remove a coin from the lint blower on a whirlpool dryer, model wed9270x
How can we remove a coin from the lint blower on a whirlpool dryer, model wed9270x
(Posted by last 12 years ago)

Whirlpool Gas Dryer Comes On And Heat Comes On, But Then The Heat Shuts Off
(Posted by asadiamonds 12 years ago)