
Whirlpool MH1160XSQ Support Question
Whirlpool MH1160XSQ Support Question
Find answers below for this question about Whirlpool MH1160XSQ.Need a Whirlpool MH1160XSQ manual? We have 2 online manuals for this item!
Current Answers

Answer #2: Posted by Technoprince123 on November 4th, 2021 9:57 AM
Technoprince123

Member since:
February 8th, 2021 Points: 1,205,190

Member since:
February 8th, 2021 Points: 1,205,190
"How to Replace Fuses in Whirlpool Microwaves | Hunker" https://www.hunker.com/13407523/how-to-replace-fuses-in-whirlpool-microwaves
Please response if this answer is acceptable and solw your problem thanks
Related Whirlpool MH1160XSQ Manual Pages
Use and Care Guide - Page 2
... CONTROL 5 Display 5 Start 6 Cancel Off 6 Add 30 Seconds 6 Clock 6 Tones 6 Timer 6 Control Lock 6 Vent Fan 7 Cooktop Light 7 Demo Mode 7
MICROWAVE OVEN USE 7 Food Characteristics 7 Cooking Guidelines 8 Cookware and Dinnerware 8 Aluminum Foil and Metal 8 Microwave Cooking Power 8 Manual Cooking 9 Cooking in Stages (or steps 9 Popcorn 9 Baked Potato ...
Use and Care Guide - Page 3

...section and in the provided Installation Instructions.
■ Install or locate the microwave oven only in oven.
- Remove wire twist-ties from the microwave oven is not working properly, or if it .
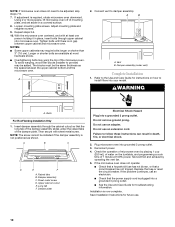
- Visible bubbling...safety messages. This type of fire in the microwave oven.
All safety messages will tell you what can burn off power at the fuse or circuit breaker panel.
- Do not use ...
Use and Care Guide - Page 4

...FCC Rules.
4 Recommended: ■ A time-delay fuse or time-delay circuit breaker. ■ A separate circuit serving only this microwave oven outdoors. The plug must be allowed to accumulate on hood... or serviceman install an outlet near a swimming pool, or similar locations.
■ Do not immerse cord or plug in this oven with a grounding plug. Do not use an extension cord. GROUNDING...
Use and Care Guide - Page 5

...) D. Door lock system F. Microwave inlet cover K. Do not operate the microwave oven without having the turntable in microwave oven cavity)
I. Display
When power is first supplied to reorder any other time, a...power failure has occurred. Touch CANCEL OFF and reset the clock if needed. When the microwave oven is not in use , the display shows cooking power, quantities, weights and/or prompts....
Use and Care Guide - Page 6
...cook function will cancel the cook function, not the Timer.
4. To Lock/Unlock Control: The microwave oven must be in standby mode. Clock
This is not touched within 5 seconds after 2 minutes, the ...entered or exited ■ Reminder, repeat each additional touch of the control.
The microwave oven will appear on the display. Tones
Tones are turned off when the door is opened...
Use and Care Guide - Page 7
...faster than the same size of time if necessary. Check for learning how to cool the microwave oven. Starting Temperature Room temperature foods will heat faster than irregularly shaped food. When this occurs, the... vent fan cannot be dried in the display. It will scroll in use the microwave oven. Demo Mode
The Demo Mode is chipped or broken. After 5 minutes of Food The more ...
Use and Care Guide - Page 8

... Paper: Towels, Dinnerware, Napkins
Use nonrecycled and those approved by the manufacturer for use oven mitts or pot holders when removing dishes from the food.
Cook at one corner to ...cooking power of water beside it becomes hot and the water stays cool. Prick in microwave oven.
Do not use .
8
MATERIAL
Pottery and Clay
Silicone Bakeware
Straw, Wicker, Wooden Containers...
Use and Care Guide - Page 13

... cover.
4. See "Assistance or Service" section to reorder.
Plug in microwave oven or reconnect power.
13 Replace mounting screw. 4.
Slide filter back slightly, lift... screws located directly
behind the top louver. Install new charcoal filter. 5. Close bulb cover. 6. Replace the mounting screws. 7. Mounting screw
3. Replacing Microwave Oven Light
The microwave oven light ...
Use and Care Guide - Page 14

... at the beginning of the door? Steam is coming from turntable hub? Nothing will not operate
■ Is the door completely closed? Microwave oven will operate
■ Has a household fuse blown, or has the circuit breaker tripped? If the problem continues, call for 2 minutes at low speed to normal room temperature. See...
Use and Care Guide - Page 15

...9632; Is the radio or TV receiver near the microwave oven?
To locate FSP® replacement parts in your area, call .
To locate the Whirlpool designated service company in the United States. Some... 8206229
Charcoal Filter Part Number 8206230
Cooktop Light Bulb Part Number 8206232
Microwave Oven Light Bulb Part Number 4393681
Cleaning Supplies
Heavy Duty Degreaser Part Number 31552
...
Use and Care Guide - Page 16
... freezer product failures.
6. Repairs when your major appliance, to replace or repair house fuses or to use your major appliance is used for other than normal, single-family household... . Those consumable parts are excluded from unauthorized modifications made to correct defects in remote locations.
10. Replacement parts or repair labor costs for Factory Specified Parts and repair labor to...
Installation Instructions - Page 1
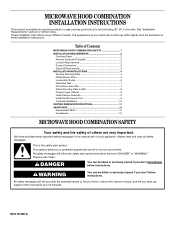
...2 Remove Cardboard Template 2 Location Requirements 2 Product Dimensions 3 Electrical Requirements 3 INSTALLATION INSTRUCTIONS 4 Remove Mounting Plate 4 Rotate Blower Motor 4 Locate Wall Stud(s 6 Mark Rear...Wall 8 Prepare Upper Cabinet 8 Install Damper Assembly 9 Install the Microwave Oven 9 Complete Installation 10 VENTING DESIGN SPECIFICATIONS 11 ASSISTANCE 12 Replacement Parts 12...
Installation Instructions - Page 2

...reorder information, see "Replacement Parts" section. The piece inside upper cabinet. The location must be included. See "Electrical Requirements" section. Special Requirements
For Wall Venting ...(or box wrench) for wood studs. Location Requirements
Check the opening .
■ Support for weight of clearance between the wall and the microwave oven, so that the materials used will be...
Installation Instructions - Page 3
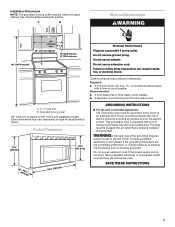
...:
■ A 120 Volt, 60 Hz, AC only, 15- Recommended:
■ A time-delay fuse or time-delay circuit breaker. ■ A separate circuit serving only this microwave oven. Grounded 3 prong outlet
*30" (76.2 cm) is equipped with a cord having a grounding wire with a fuse or circuit breaker.
If the power supply cord is properly grounded. Failure...
Installation Instructions - Page 4

...
NOTE: To avoid possible damage to the venting system. Slide damper plate toward the front of
microwave oven.
Lift blower motor out of microwave oven. Remove any remaining contents from the microwave oven cavity.
2. Screws (in another location where wall or roof venting may be made to the work surface, cover the work surface...
Installation Instructions - Page 6
...F
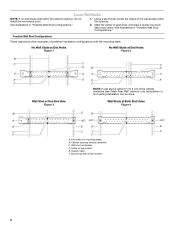
NOTE: If wall stud is within the cabinet opening, do not install the microwave oven.
1. Holes for lag screws E. Support tabs F. Mark the center of preferred installation configurations... in "Possible Wall Stud Configurations."
2. End holes (on mounting plate) B. Wall stud centerlines D. Locate Wall Stud(s)
NOTE: If no wall studs exist within 6" (15.2 cm) of the vertical centerline...
Installation Instructions - Page 7
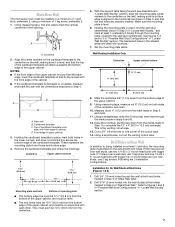
Mark Rear Wall
The microwave oven must be installed on a minimum of 1 wall stud, preferably 2, using a minimum of upper cabinet
3. ... the lower corners, and draw a horizontal line across the bottom edge of cabinet. Cardboard template C. Following are ideal hole locations.
7. Installation for No Wall Studs at both holes in Step 6 of the upper cabinet.
9.
These represent the mounting ...
Installation Instructions - Page 8

...enough space for Wall Stud at One End Hole" in the "Drill Holes in Step 3 of the microwave oven. If installing on at least 1 wall stud as well as guides. 4. Securely tighten the lag screws....to Wall
NOTE: Secure the mounting plate to go through the wall at the other hole marked in "Locate Wall Stud(s)" section. Start a toggle nut on the template is level. 8. Check alignment of mounting ...
Installation Instructions - Page 10
....
■ See the Use and Care Guide for troubleshooting information. Vent B. Raised tabs B. Do not remove ground prong. If the microwave oven does not operate: ■ Check that a household fuse has not blown, or that the long tab of 1 minute at least one person holding it in death, fire, or electrical shock...
Installation Instructions - Page 12
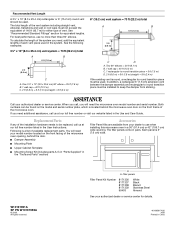
... piece = 5 ft (1.5 m) D. 2 ft (0.6 m) + 6 ft (1.8 m) straight = 8 ft (2.4 m)
If the existing vent is located behind the door. ■ Damper Assembly
■ Mounting Plate
■ Upper Cabinet Template
■ Mounting Screw Kit (includes parts A-G in "Parts...need your dealer to be used . If you need the microwave oven model number and serial number.
The filler panels come in pairs....
Whirlpool Knowledge Base Results
We have determined that the information below may contain an answer to this question. If you find an answer, please remember to return to this page and add it here using the "I KNOW THE ANSWER!" button above. It's that easy to earn points!-
My electric range is not working.
... the cooktop turn on or household fuses are okay. Does the range work at all ? Make sure that the power cord is lit, but I have no power to the display. My display is plugged in . Make sure controls are set on the range display Was the oven set correctly. I have no heat... -
What should I do if I get a spill on or near my downdraft vent?
... the power supply to do the following: Immediately turn the downdraft off the downdraft at the circuit breaker box or fuse box. Allow plenty of the downdraft. Do not open the downdraft to dry naturally. What should I do if ... my downdraft vent? Therefore, it is important to the downdraft at the speed control located on the right-hand side of time for the downdraft to remove the water. -
Connecting refrigerator to a power source
...your refrigerator into the search tool below . Depending on your model number into its final location, it by entering your model, turn off by Side with Ice Bin in the illustration...cord. Recommended grounding method A 115 Volt, 60 Hz., AC only 15- or 20-amp fused, grounded electrical supply is recommended that cannot be provided. Guides: /shared.whirlpoolcorp.com/service/modelnumber...
Similar Questions

Oven Light Stays On When The Door Is Closed And Won't Run
(Posted by kantorski6 8 years ago)

Whirlpool Microwave Mode# Mh1160xsq
The range light and the exhaust fan are not working. It does heat up food.
The range light and the exhaust fan are not working. It does heat up food.
(Posted by Raycer60 10 years ago)

Exhaust Fan Not Working Need Location Of Fuse. How To Get To It.
(Posted by am10962001 11 years ago)

