
Whirlpool MH1160XSQ Support Question
Whirlpool MH1160XSQ Support Question
Find answers below for this question about Whirlpool MH1160XSQ.Need a Whirlpool MH1160XSQ manual? We have 2 online manuals for this item!
Current Answers
Related Whirlpool MH1160XSQ Manual Pages
Use and Care Guide - Page 2
... Power 8 Manual Cooking 9 Cooking in Stages (or steps 9 Popcorn 9 Baked Potato 10 Pizza 10 Doneness 10 Preset Cooking 10 Reheating 11 Defrosting 11
MICROWAVE OVEN CARE 12 General Cleaning 12 Replacing Filters 12 Replacing Cooktop Light 13 Replacing Microwave Oven Light 13
TROUBLESHOOTING 14 ASSISTANCE OR SERVICE 15
Replacement Parts 15 WARRANTY 16
®
2
Use and Care Guide - Page 3

...Use extreme care when inserting a spoon or other combustible materials are placed inside the oven ignite, keep oven door closed glass jars - Pieces can happen if the instructions are able to be... for examination, repair, or adjustment.
■ See door surface cleaning instructions in the microwave oven for its intended use .
■ As with metal scouring pads. THIS COULD RESULT IN VERY...
Use and Care Guide - Page 4

... A time-delay fuse or time-delay circuit breaker. ■ A separate circuit serving only this oven with metal foil. Do not use an extension cord. This will cause overheating of electric shock by...91.44 cm).
■ Clean Ventilating Hoods Frequently -
Do not use the microwave oven near the microwave oven. The plug must be adjusted or repaired by providing an escape wire for the ...
Use and Care Guide - Page 5

... the display.
To Adjust Scroll Speed: 1. Do not operate the microwave oven without having the turntable in microwave oven cavity)
I. The speed of day or Timer countdown. Touch and hold CLOCK for FAST.
3. Microwave oven light E. Grease filters (shipped in place. When the microwave oven is not in this manual. Touch number pad "1" for SLOW...
Use and Care Guide - Page 6
...appear in the display as a reminder.
Add 30 Seconds
The ADD 30 SEC control automatically starts the microwave oven at the current cook power. Touch CLOCK. 2. Touch CLOCK or START. Touch CLOCK. 2. Touch 0. ...locked, only the Vent Fan and Light pads will add 30 seconds of cook time at 100% power for 3 seconds until 2 tones sound.
To Set: The microwave oven and timer must be canceled. ...
Use and Care Guide - Page 7
... and sugar will reach a higher temperature, and will finish cooking while standing.
■ Do not cook or reheat whole eggs inside the shell. The microwave oven light will come on the microwave generator (magnetron). Touch and hold the number pad "3" for up when microwave...
Use and Care Guide - Page 8

...
Follow manufacturer's recommendations.
Do not use .
To Test Cookware or Dinnerware for microwave oven use oven mitts or pot holders when removing dishes from bottom to touch the inside cavity
walls,... ceiling or floor.
■ Always use by the natural conduction of light) can be turned...
Use and Care Guide - Page 9
...section, follow directions on the dish, and then starting the cycle. This allows the microwave oven to pop another bag of popcorn immediately following the cycle. ■ Do not use regular...%, Medium-High
Reheating a single serving of -cycle tones will appear in Stages (or steps)
The microwave oven can be accepted) or
4.
If cooking with 100% power, skip Step 3.
3. Touch COOK POWER,...
Use and Care Guide - Page 10
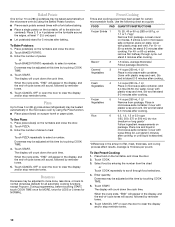
... pizza slice(s) on a paper towel or paper plate.
Doneness may be baked automatically in the microwave oven by reminder tones.
5.
Loosen cover on
package.
Add 2-4 tbs (30-60 mL) water. Stir...in microwave-safe container. To Use Pizza: 1. If entrée is not in the microwave oven by reminder tones.
6.
Cover with a fork before touching START, touch COOK TIME once for MORE...
Use and Care Guide - Page 11
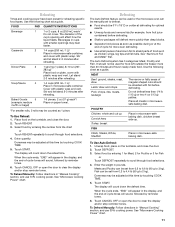
.... Beverages in microwave-safe container. Stir and let stand 2-3 minutes after
reheating.
Touch REHEAT. 3. Doneness may heat
faster.
It should be used or the microwave oven can be manually set to defrost.
■ Food should not be 0°F (-18°C) or colder at this time by entering 1 for Meat, 2 for Poultry...
Use and Care Guide - Page 12
.... TURNTABLE
Replace turntable immediately after cleaning them in the dishwasher. Tabs
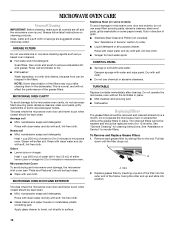
2. MICROWAVE OVEN CARE
General Cleaning
IMPORTANT: Before cleaning, make sure all -purpose cleaner:
Rinse with...9632; Liquid detergent or all controls are suggested unless otherwise noted. A
A.
MICROWAVE OVEN DOOR AND EXTERIOR
Stainless Steel (on cleaning products. Rub in the filters. The ...
Use and Care Guide - Page 13

...
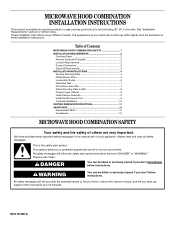
A. Top louver C. Tip the vent grille forward and down , then lift out to remove.
Replacing Cooktop Light
The cooktop light is a candelabra base bulb. Close bulb cover. 6. A. See "Assistance or Service" section to reorder. Unplug microwave oven or disconnect power. 2. Mounting screws
3. Replace vent grille and mounting screws.
Reattach vent grille. A B
C
3. To Replace...
Use and Care Guide - Page 14

...first in order to avoid the cost of water on the turntable, then restart microwave oven.
Place 1 cup (250 mL) of an unnecessary service call for service. Turntable...tripped? If the problem continues, call for service. See Installation Instructions provided with your microwave oven. Microwave oven makes humming noise
■ This is normal.
There has been a power failure or the ...
Use and Care Guide - Page 15

...power set properly? Radio, TV or cordless phone interference
■ Is the microwave oven plugged into the same outlet? Some 2.4 GHz-based cordless phones and home wireless networks...
Grease Filters Part Number 8206229
Charcoal Filter Part Number 8206230
Cooktop Light Bulb Part Number 8206232
Microwave Oven Light Bulb Part Number 4393681
Cleaning Supplies
Heavy Duty Degreaser Part Number ...
Installation Instructions - Page 1
... particular model may differ slightly from the illustration in Rear Wall 7 Attach Mounting Plate to Wall 8 Prepare Upper Cabinet 8 Install Damper Assembly 9 Install the Microwave Oven 9 Complete Installation 10 VENTING DESIGN SPECIFICATIONS 11 ASSISTANCE 12 Replacement Parts 12 Accessories 12
MICROWAVE HOOD COMBINATION SAFETY
Your safety and the safety of your...
Installation Instructions - Page 2

...the cardboard template to the side and refer to withstand the heat produced by the microwave oven for 1/4" x 2" lag screws
■ Scissors
■ 1½" (3.8 cm) diam...wall stud and minimum 3/8" (9.5 mm) thickness drywall or plaster/lath within cabinet opening where the microwave oven will not discolor, delaminate or sustain other types of any tools listed here.
■ Measuring tape...
Installation Instructions - Page 3
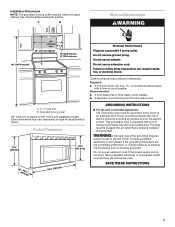
...9632; A time-delay fuse or time-delay circuit breaker. ■ A separate circuit serving only this microwave oven. A. 2" x 4" wall stud B.
Product Dimensions
17¹⁄₄"
(43.8 cm)
16¹...with a cord having a grounding wire with a fuse or circuit breaker.
The microwave oven is typical for the electric current. SAVE THESE INSTRUCTIONS
3
WARNING: Improper use an ...
Installation Instructions - Page 4

... motor
4 Damper plate
2. Screws (in another location where wall or roof venting may be made to the microwave oven, do not grip or use the door or door handle while the microwave oven is reinstalled in recessed holes)
4. INSTALLATION INSTRUCTIONS
Remove Mounting Plate
NOTE: To avoid possible damage to back of microwave...
Installation Instructions - Page 5
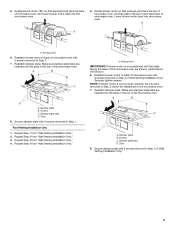
... "Wall Venting Installation Only." Securely tighten screws. NOTE: If blower motor is not positioned with 2 screws removed in Step 3 of the microwave oven. Lower blower motor back into the microwave oven.
5.
Secure damper plate with 2 screws removed in Step 3.
7. Repeat Step 4 from "Wall Venting Installation Only." 3. Damper plate B. Repeat Step 2 from "Wall...
Installation Instructions - Page 6
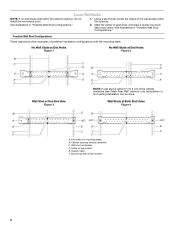
... centerline (see "Mark Rear Wall" section), only recirculation or roof venting installation can be done.
Wall stud centerlines D. Cabinet opening , do not install the microwave oven.
1. See illustrations in "Possible Wall Stud Configurations."
Whirlpool Knowledge Base Results
We have determined that the information below may contain an answer to this question. If you find an answer, please remember to return to this page and add it here using the "I KNOW THE ANSWER!" button above. It's that easy to earn points!-
How do I operate the cooktop light on my microwave oven?
... three times to replace the aluminum filter/light lens, or charcoal filter pads on my microwave oven? The cooktop light has three settings: high, low and off the light. How do I use in my microwave oven? What type of light bulb do I replace the cooking light in my convertible range hood? What should I do... -
What does the touch screen do on my SpeedCook microwave oven with convection?
What does the touch screen do on my SpeedCook microwave oven with convection? The LCD touch screen is used to medium-pressure touch of the fingertip will activate the menu choice. Menu selections and ... which accepts no input. to make menu selections, adjust settings and input commands. What does the touch screen do on my SpeedCook microwave oven with convection? A light- -
Baked goods undercooked in the center
... material affects cooking results. Uneven browning. If you used rack position #1: Reduce oven temperature. Note: You need to rack position #2 or #1. Results using rack .... Recommendations when using stainless steel bakeware: Results when using stainless steel bakeware: Light, golden crusts. Ovenproof glassware, ceramic glass or ceramic. calibration Foods undercook...
Similar Questions

Oven Light Stays On When The Door Is Closed And Won't Run
(Posted by kantorski6 8 years ago)

Have Double Oven Whirlpool Problems
No display showing. Power to oven is on. Light to oven works on off. help
No display showing. Power to oven is on. Light to oven works on off. help
(Posted by fireplaceinc2 9 years ago)
Turntable Turns Automatically And Cavity Light On.
When door is closed, turntable will turn automatically and cavity light is on when cooktop light is ...
When door is closed, turntable will turn automatically and cavity light is on when cooktop light is ...
(Posted by jyknight 9 years ago)

Whirlpool Microwave Mode# Mh1160xsq
The range light and the exhaust fan are not working. It does heat up food.
The range light and the exhaust fan are not working. It does heat up food.
(Posted by Raycer60 10 years ago)

Display Will Not Light Up Making Oven Not To Work, Inside Light Comes On
(Posted by lbjgator 12 years ago)