Whirlpool GFE461LVS Support Question
Whirlpool GFE461LVS Support Question
Find answers below for this question about Whirlpool GFE461LVS - 30" Ing Electric Range.Need a Whirlpool GFE461LVS manual? We have 4 online manuals for this item!
Question posted by jlindley039 on November 27th, 2013
One Side Of My Warming Drawer Came Out And Now I Cannot Get It To Slide In.
Do I need to take both side screws out ? Tx
Current Answers
Related Whirlpool GFE461LVS Manual Pages
Owners Manual - Page 1

...-quality product. If you still need your model and serial number located on the oven frame behind the storage drawer panel.
Table of Contents
RANGE SAFETY 2 The Anti-Tip Bracket... 10 Warming Drawer 10 RANGE CARE 11 Self-Cleaning Cycle 11 SteamClean 11 General Cleaning 12 Oven Light 12 TROUBLESHOOTING 13 ACCESSORIES 14 WARRANTY 16
W10200354B
®
ELECTRIC RANGE
USER ...
Owners Manual - Page 2
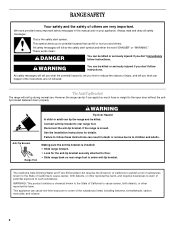
...the installation instructions for the anti-tip bracket securely attached to floor. • Slide range back so rear range foot is , tell you how to cause cancer, birth defects, or other...tip if you don't immediately follow instructions.
Anti-Tip Bracket Range Foot
Making sure the anti-tip bracket is installed: • Slide range forward. • Look for details.
WARNING
You can be ...
Owners Manual - Page 3

...ARE INSTALLED PROPERLY, SLIDE RANGE FORWARD, LOOK FOR ANTI-TIP BRACKET SECURELY ATTACHED TO FLOOR, AND SLIDE RANGE BACK SO REAR RANGE FOOT IS UNDER...units may penetrate the broken cooktop and create a risk of electric shock. The use , do not touch, or let clothing...should be used to wipe spills on . Be sure the range is essential for Warming or Heating the Room.
■ Do Not Leave Children...
Owners Manual - Page 4
... the oven will sound to turn off .
5. WARM DRAWER Warming drawer Press WARM DRAWER ON to clear the display. 7. Your model may have some models) Press WARM DRAWER OFF to signal the end of day. 4.
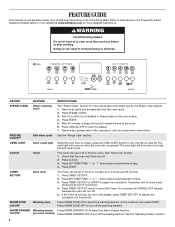
Add...information and helpful tips for 5 seconds. PRECISE CLEAN™
Self-clean cycle See the "Range Care" section. Press CLOCK. 3. If enabled, end-of countdown.
4. FEATURE GUIDE
This...
Owners Manual - Page 5
.... 3. Press CANCEL/OFF when finished.
Press START. 4. If Start is not pressed within 30 seconds after 5 minutes. KEYPAD ENERGY SAVE
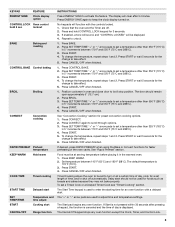
FEATURE
Clock display option
CONTROL LOCK Oven control
hold...Preheat temperature
KEEP WARM
Hold warm
COOK TIME
Timed cooking
START TIME
SET TEMP/TIME START
CANCEL/OFF
Delayed start
Temperature and time adjust Cooking start
Range function
INSTRUCTIONS
...
Owners Manual - Page 6
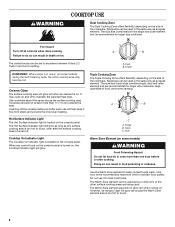
... knob on the console panel is located on the console panel. Use the Warm Zone element to maintain food quality.
The Warm Zone element can be used in the same way as a regular element. However...to touch.
6 When any surface cooking area is in food poisoning or sickness. Single
REMEMBER: When range is too hot to do so can result in use will glow as long as the surface cooking...
Owners Manual - Page 8
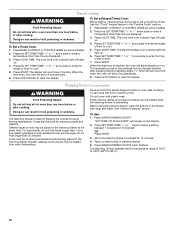
...cleaning
results. Press BAKE.
2. "SAb" will appear in a bake setting until turned off the range. No temperature will appear in the display.
4. For best cooking results, do not line the ... seconds. Rack 3: Most baked goods on 2 racks use the Warm Zone and/or Warm Drawer during Sabbath Mode, press the WARM ZONE and /or WARM DRAWER keypad before turning on the oven.
■ Do not move ...
Owners Manual - Page 10
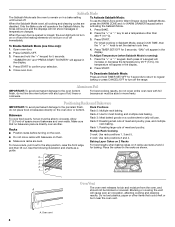
...Press the SET TEMP/TIME "+" or "-" arrow pads to enter a temperature other than 30 minutes. Press COOK TIME. When the start time is set cook time ends, the... placed in the warming drawer at serving temperature before being placed in the warming drawer.
Remove food from room temperature. See "General Cleaning" section. The Warming Drawer operates within a temperature range of time to...
Owners Manual - Page 12

...warming drawer is cool and empty before cleaning. Cleaning Method: ■ Soap and water:
Pull knobs straight away from socket.
Cooktop Scraper Part Number WA906B is also recommended for contact information. Store razor blades out of the reach of grain to stainless steel surfaces, do not remove seals under knobs. Unplug range... regularly to help them slide. Scrape off position.
...
Owners Manual - Page 16
...need assistance using your product or you would like to schedule service, you on the oven frame behind the storage drawer ... to use your correspondence. This warranty is reported to Whirlpool within 30 days from accident, alteration, misuse, abuse, fire, flood, acts... to replace or repair
house fuses, or to Whirlpool with electrical or plumbing codes, or use or when it is not available...
Dimension Guide - Page 1

30" (76 cm) Freestanding Electric Range
PRODUCT MODEL NUMBERS
GFE461LV GFE471LV WFE301LV WFE361LV WFE364LV WFE366LV
WFE371LV WFE374LV WFE381LV WFE114LW WFE115LX
RF110AXS RF111PXS RF114PXS RF212PXS RF263LXT RF264LXS
Electrical: Range...max.) with leveling legs
screwed all the way in* C. 36"... on the oven frame behind
storage drawer panel)
*Range can be raised approximately 1" (2.5 ...
Installation Instructions - Page 1

... INSTRUCTIONS 30" (76 CM) FREESTANDING ELECTRIC RANGES
Table of Contents
RANGE SAFETY 2 INSTALLATION REQUIREMENTS 3
Tools and Parts 3 Location Requirements 3 Electrical Requirements - U.S.A. Only 7 Verify Anti-Tip Bracket Location 12 Level Range 12 Storage Drawer 12 Complete Installation 13 Moving the Range 14 ANTI-TIP BRACKET TEMPLATE 15
IMPORTANT:
Save for local electrical inspector...
Installation Instructions - Page 3

...electrical supply. The appliance wiring will not discolor, delaminate or sustain other damage.
Read and follow the instructions provided with installation clearances specified on the left side frame behind the storage drawer panel.
■ The range should be used. Tools needed... Given dimensions are shown must be revised. Longer screws are included. ■ 3 - 10-32 hex nuts (...
Installation Instructions - Page 4

... B. 30" (76.2 cm) min. opening width C. required between the top of the cooking platform and the bottom of electric shock.
WARNING: Improper connection of the equipment-grounding conductor can result in a risk of an uncovered wood or metal cabinet. Model/serial rating plate (located on the left side frame behind
storage drawer panel)
*Range...
Installation Instructions - Page 5

... is manufactured with kit. For 50-amp rated cord kits, use of the range or inside the storage drawer in a NEMA Type 10-50P plug on the oven frame behind the control panel or on the supply end. See "Electrical Connection." mobile homes; and recreational vehicles, or an area where local codes prohibit...
Installation Instructions - Page 6

...-tip bracket to move and install range. Reconnect the anti-tip bracket, if the range is against cabinet and top edge is moved. Before moving range, slide range onto shipping base, cardboard or hardboard...of this time. B
A. ¼" drive ratchet B. Wrench or pliers
6 On Ranges Equipped with a warming drawer, the rear legs cannot be centered in back or other injury.
1.
A. Rear ...
Installation Instructions - Page 12

...be needed for the anti-tip bracket securely attached to disengage the storage drawer one side at a time.
2. Push the
drawer back approximately 1" (2.5 cm). It will be necessary to floor.
■ Slide range back so rear range foot is level.
then front to the drawer stop. Drawer clip
3. Depress the drawer clip by removing the warming drawer. A
A. On models with Warming Drawers...
Installation Instructions - Page 13

... more information, read the "Range Care" section of liquid household cleaner and warm
water to a level position. 3. Read "Range Use" in the Use and Care Guide. Slowly push the storage drawer into appropriate outlet. Once the storage drawer is fully engaged on both sides, slide the drawer back into an outlet.
■ Electrical supply is plugged into the...
Installation Instructions - Page 14

... tip the range and be killed. Electrical Shock Hazard Disconnect power before operating. Check that range is under anti-tip
bracket.
5. Failure to rear range foot. Slide range forward. 3. Complete cleaning or maintenance. 4. When moving range, slide range onto cardboard or hardboard to floor. ■ Slide range back so rear range foot is level.
14 Slide range forward. 2. Complete...
Warranty - Page 1

...when it was purchased. Damage resulting from warranty
coverage. 3. Costs associated with electrical or plumbing codes, or use of repair or replacement under this warranty. ...that have access to the Internet and you need further assistance, you on the oven frame behind the storage drawer panel.
WHIRLPOOL SHALL NOT BE LIABLE FOR... within 30 days from your complete model number ready.
Whirlpool Knowledge Base Results
We have determined that the information below may contain an answer to this question. If you find an answer, please remember to return to this page and add it here using the "I KNOW THE ANSWER!" button above. It's that easy to earn points!-
Drawer does not close completely
... Knowledgebase search tips How do I remove the oven door on my electric range? Follow the instruction below to remove and reinstall the drawer to the first stop. Slide the drawer closed. How do I clean the ceramic glass on my gas range? To remove: Pull drawer straight out to be sure it out. Lift up the back of... -
Control moisture level - built-in indoor warming drawer
... moisture level in my built-in , while the Dry setting allows steam and moisture to the Dry setting, which closes the vents. The Moist-Dry slide control, located inside the door of the warming drawer, allows you to the Moist setting, which opens the vents. Opening the vents releases moisture from the... -
How do I remove and clean the warming drawer on my gas range?
... high or too low How do I remove and clean the warming drawer on the slides. Warming drawer (on my gas range? Drawer does not close the drawer to self clean The oven temperature on my gas range is seated properly on my gas range? To replace: Align the drawer glides with the receiving guides. Push the drawer in all the way out.
Similar Questions


Feature Not Available Is Showing After Oven Overheated
my whirlpool electric range GFE461LVS oven burned some food and some kind of default message came up...
my whirlpool electric range GFE461LVS oven burned some food and some kind of default message came up...
(Posted by mikedebenito 9 years ago)

Whirlpool Glass Top Electric Range Does Not Get Hot
(Posted by haloric 9 years ago)
Whirlpool Electric Range Model Rf263lxtq 3
I found foil type heat shield in lower storage compartment (broiler compartment of a gas oven) of my...
I found foil type heat shield in lower storage compartment (broiler compartment of a gas oven) of my...
(Posted by busterc1 10 years ago)

Electric Range Model Number Gfe461lvs, Oven And Stove Top Will Not Heat Up
(Posted by ks6804 11 years ago)