Whirlpool WEE745H0FS Support Question
Whirlpool WEE745H0FS Support Question
Find answers below for this question about Whirlpool WEE745H0FS.Need a Whirlpool WEE745H0FS manual? We have 6 online manuals for this item!
Question posted by larnold33 on December 17th, 2022
How Do You Remove The Warming Drawer?
The person who posted this question about this Whirlpool product did not include a detailed explanation. Please use the "Request More Information" button to the right if more details would help you to answer this question.
Current Answers
Answer #1: Posted by Odin on December 17th, 2022 7:22 PM
Odin

Member since:
April 10th, 2010 Points: 41,236,680

Member since:
April 10th, 2010 Points: 41,236,680
Hope this is useful. Please don't forget to click the Accept This Answer button if you do accept it. My aim is to provide reliable helpful answers, not just a lot of them. See https://www.helpowl.com/profile/Odin.
Related Whirlpool WEE745H0FS Manual Pages
Installation Guide - Page 8
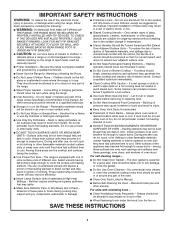
... masonry floor, you can be installed on its back. Failure to children and adults.
1. To remove cardboard bottom, first take 4 cardboard corners from centerline as shown. If you must secure the range to move and install range. The leveling legs can result in the slot of the cutout. Using 2 or more people, firmly...
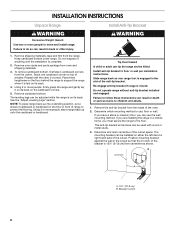
Installation Guide - Page 9
... from the top of the leveling legs. NOTE: If a Trim Kit will slide under range.
7. Floor Mounting
Rear position
Wall Mounting
Front position
Diagonal (2 options)
Adjust Leveling Legs
1. Remove shipping base, cardboard or hardboard from the top of range. Install anti-tip bracket to the bottom of the cooktop to floor or wall...
Installation Guide - Page 10
... (NEMA type 14-50R)
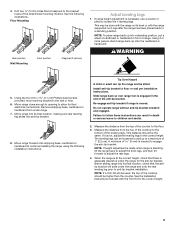
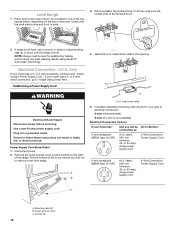
A UL listed, 250-volt minimum, 40- Level Range
1. Only
If your home has a 3- Remove the lower access cover screws located on the oven bottom, as indicated in death,...
A
A. Place level on the back of the terminal block.
2. Remove plastic tag holding three 10-32 hex nuts from range. Electrical Connection - Screws (2)
10 or 4-wire receptacle, continue with ...
Installation Guide - Page 11
...10-32 hex nuts.
4.
Terminal block B.
A B C
C D
A. large opening , with ranges.
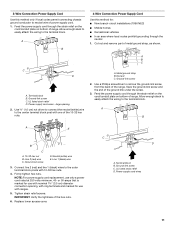
5. Use ³⁄₈" (1.0 cm) nut driver to connect the neutral (white) wire to the outer...Wire Connection: Power Supply Cord
Use this method only if local codes permit connecting chassis ground conductor to remove the ground-link screw from the back of the ground link under the screw.
3. Line 2 (...
Installation Guide - Page 12

.... Use ³⁄₈" (1.0 cm) nut driver to connect the neutral (white) wire to the center terminal block post with ranges.
8. Line 2 (red) wire
D
D. Neutral (white) wire F. Firmly tighten hex nuts. Remove the lower access cover screws located on the back
of the cover toward you and out to follow these instructions...
Installation Guide - Page 13
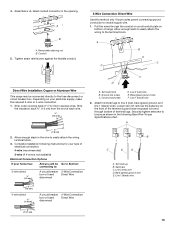
... through the conduit on cord/conduit plate on the front of the terminal lug and insert exposed wire end through bottom of range. Terminal lug B. Setscrew C.
Cord/conduit plate
D. Line 1 (black) wire
2.
Bare (green) ground wire F. 4. Removable retaining nut B.
A
B
C
D
E
A. Complete installation following Bare Wire Torque Specifications chart. Loosen (do not...
Installation Guide - Page 14
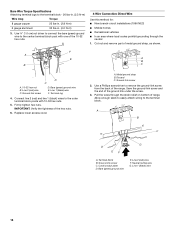
...
5. Terminal block B. Line 2 (red) wire F. Save the ground-link screw and the end of the range. Line 1 (black) wire
14 Firmly tighten hex nuts.
Metal ground strap B.
Cord/conduit plate D. Use... to connect the bare (green) ground wire to remove the ground-link screw from the back of the ground link under the screw.
3. Cut out and remove part of the hex nuts.
6. Line 2 (red...
Installation Guide - Page 15
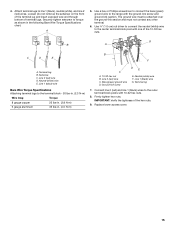
... Torque Specifications Attaching terminal lugs to torque as shown in . (4.0 N-m)
C
A. 10-32 hex nut B. 4. Loosen (do not remove) the setscrew on the front of the terminal lug and insert exposed wire end through bottom of the hex nuts.
9. A
5.
Line... 2 (red) wires. Neutral (white) wire E. Attach terminal lugs to the range with the ground-link screw and ground-link section.
Installation Guide - Page 16
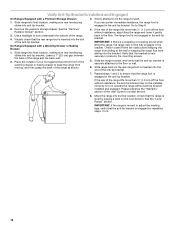
... slides into the bracket. Visually check that the anti-tip bracket is inserted into its final location. On Ranges Equipped with a Premium Storage Drawer:
1. Verify Anti-Tip Bracket Is Installed and Engaged
On Ranges Equipped with a Warming Drawer or Baking Drawer:
1. Remove the premium storage drawer. Place the outside of your foot against the bottom front of the...
Installation Guide - Page 17
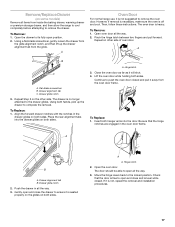
... oven door as far as it is level while closed and pull it away from inside the baking drawer, warming drawer or premium storage drawer, and then allow the range to cool completely before attempting to remove the drawer.
To Remove: 1. To Replace: 1. A
B
A. Open the oven door. Repeat Step 2 on both sides. Lift the oven door while holding...
Installation Guide - Page 18
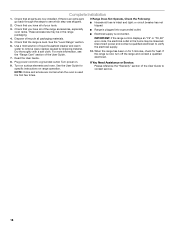
... of the User Guide to remove waxy residue caused by shipping material. Plug power cord into a grounded outlet. ■ Electrical supply is cold, turn off the range and contact a qualified electrician.
8. If You Need Assistance or Service:
Please reference the "Warranty" section of liquid household cleaner and warm water to contact service.
These...
Use & Care Guide - Page 3
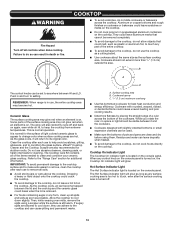
... causes smoking and greasy spillovers that it is essential for Warming or Heating the Room. Interior surfaces of an oven become...Do Not Use Oven Cleaners - I Do Not Clean Door Gasket - Remove broiler pan and other bulky cloth. I CAUTION: Do not store items... under the hood, turn the fan on the backguard of a range - All other flammable materials contact heating elements or interior surfaces of...
Use & Care Guide - Page 4
... more detailed instructions. This ensures that ordinarily come with all range surfaces may become hot, such as necessary for stubborn or...use steel wool, abrasive powder cleansers, chlorine bleach, rust remover, or ammonia.
1.
The actual oven temperature will be ...while the cooktop is recommended to the touch. Warming or Storage Drawer
When the oven is in traditional self-cleaning...
Use & Care Guide - Page 10
...; Avoid storing jars or cans above the cooktop. Then, while wearing oven mitts, remove the spills using them. If sugary spills are hot. A. Cookware/canner C. 1/2" ...and the ceramic glass could break when the lid is still warm. As the cooktop cools, air can cause pitting and ...spills and soils as soon as possible.
Refer to the "Range Care" section for the surface of pots and pans are ...
Use & Care Guide - Page 11
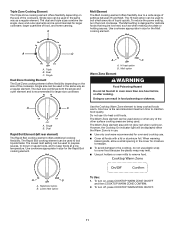
...single and outer element and is the recommended maximum time to a wide range of liquid quickly. Melt option
Warm Zone Element
WARNING
Food Poisoning Hazard
Do not let food sit in ...when any of the cookware. A
C
A. Hi heat option B.
Use the Cooktop Warm Zone element to remove food. When warming baked goods, allow a small opening in the same way as a regular element. Rapid...
Use & Care Guide - Page 17

...steps 1 through 3 as the entire range is recommended to stainless steel surfaces, even with bleach, rust removers, ammonia, or sodium hydroxide (lye) because paint surface may remove numbers.
■■ affresh® ..., visit our website at www.whirlpool.ca.
The Complete Cooktop Cleaner Kit is still warm but not hot to the affected areas.
■■ Rub affresh® Cooktop ...
Use & Care Guide - Page 18

STORAGE DRAWER OR WARMING DRAWER (on panel.
■■ affresh® Kitchen and Appliance Cleaner Part Number W10355010 (not ... when oven cools. OVEN RACKS
Cleaning Method:
■■ Steel-wool pad
■■ For racks that storage drawer or warming drawer is cool and empty before cleaning. Cleaning Method:
■■ Clean cycle: See "Clean Cycle" section.
18
CONTROL...
Specifications Sheet - Page 2

...8226; Rapid Preheat • Keep Warm • Delay Cook • Warm Zone Element
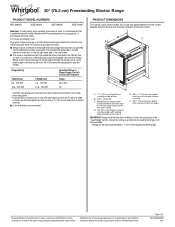
CABINET OPENING DIMENSIONS
standing Electric Range
PRODUCT DIMENSIONS
5H0F that
This manual ...appliances. Traqline, 2014.
®/™ ©2016 Whirlpool. Front Control Electric Ranges
WEE745H0F
NEW
30" Freestanding Range - 6.4 cu. Your model may protrude beyond the base cabinet. Dimensions given are...
Dimension Guide - Page 1
... voltage and frequency as a reference for planning purposes only. B
C
A
D
E F
A. 10/16" (3.0 cm) height from the models depicted.
IMPORTANT: Range must be level after installation. 30" (76.2 cm) Freestanding Electric Range
PRODUCT MODEL NUMBERS
WEC530H0D
WEE730H0D
WEE760H0D
WEE745H0F
Electrical: If codes permit and a separate ground wire is used, it here.
■■...
FIT System Guarantee - Page 1
... to state. QUALIFIED WHIRLPOOL BRAND STANDARD SINGLE AND DOUBLE OVEN SLIDE-IN RANGE MODELS:
WEC530H0D WEE730H0D WEE745H0F WEE760H0D WEG730H0D WEG745H0F WEG760H0D
DISCLAIMER OF IMPLIED WARRANTIES, LIMITATION OF REMEDIES AND ...; Not valid for all costs that is less than 24" and removal of your old range reveals uneven or slightly damaged edges on the duration of implied warranties of your ...
Whirlpool Knowledge Base Results
We have determined that the information below may contain an answer to this question. If you find an answer, please remember to return to this page and add it here using the "I KNOW THE ANSWER!" button above. It's that easy to earn points!-
How do I use the warming drawer on my gas range?
... Cleaning and caring stainless steel surfaces How does combination microwave-convection cooking work ? Remove food from room temperature on my gas range work and how do I use it? Cover foods with plastic wrap. Warming drawer settings: The warming drawer is there streaking in oven-safe container. Why is preset for keeping hot cooked foods at the... -
Warming drawer use
... hold foods longer than 30 minutes. Remove food from room temperature by setting the warming drawer to Hi. Breads, pastries and fruit pies may be used for the warming drawer? The warming drawer can be at the same time. Food must be heated while the warming drawer is placed in the warming drawer. Empty ovenproof serving dishes and... -
How do I remove and clean the warming drawer on my gas range?
... Preparing oven to ensure it all the way. Warming drawer (on some models) IMPORTANT: Make sure warming drawer is either too high or too low How do I use Sequence Programming on my gas range is empty and cool before removing or cleaning. How do I remove and clean the warming drawer on the left side at the same time...
Similar Questions

Drawer Seems To Be Stuck
I cannot remove the drawer from my oven.I have read that you pull the drawer out until it stops . . ...
I cannot remove the drawer from my oven.I have read that you pull the drawer out until it stops . . ...
(Posted by BeverleeDiana 4 years ago)

Removing Storage Drawer
We think a pizza pan has slid out of the storage drawer but have not been able to figure out how to ...
We think a pizza pan has slid out of the storage drawer but have not been able to figure out how to ...
(Posted by toulipp 7 years ago)
Drawer Not Going In Properly
how do I get the bottom drawer back in? I can get the slides in the slots but when I push it in, the...
how do I get the bottom drawer back in? I can get the slides in the slots but when I push it in, the...
(Posted by Clairestjohn 8 years ago)

One Side Of My Warming Drawer Came Out And Now I Cannot Get It To Slide In.
Do I need to take both side screws out ? Tx
Do I need to take both side screws out ? Tx
(Posted by jlindley039 10 years ago)

How To Properly Install Range Drawer
drawer slips and slides sideways
drawer slips and slides sideways
(Posted by jldipert 12 years ago)