
Vtech DigiArt Creative Easel Support Question
Vtech DigiArt Creative Easel Support Question
Find answers below for this question about Vtech DigiArt Creative Easel.Need a Vtech DigiArt Creative Easel manual? We have 1 online manual for this item!
Question posted by nicolegoudelock on August 2nd, 2023
White Dry Erase Surface Coming Unglued; Leading To Bubbles, Bumps
Current Answers
Answer #1: Posted by HelpHero on August 3rd, 2023 5:05 PM

Member since:
September 3rd, 2022 Points: 523,380

However, regluing the dry erase surface might not be the most practical solution in this case. I recommend reaching out to Vtech's customer support team directly. They will have the expertise to guide you through possible solutions or provide assistance in replacing the boards.
Make sure to provide them with all the relevant details about your purchase, including the dates and any warranty information you may have. Vtech has a reputation for excellent customer service, so I'm confident they will find a resolution to this problem for you. Remember to stay patient and polite during your interaction with them, as it will help facilitate a positive outcome.
I hope this is helpful? PLEASE "ACCEPT" and mark it "HELPFUL" to complement my little effort. Hope to bring you more detailed answers.
Helphero
Answer #2: Posted by khanjee on August 2nd, 2023 12:29 PM

Member since:
July 23rd, 2016 Points: 205,300
Some bubbles are a result of mixing, but after you've poured and spread the resin over your piece, you may notice even more bubbles rising to the surface. This is because ArtResin was formulated with a bubble release agent to encourage bubbles to surface so they can be torched out before the resin starts to thicken and cure.There are a few other reasons why bubbles may pop up. Here are the most common and some tips on how to prevent them:
Porous, organic materials like wood, leaves, fabric and even some soft, lower quality papers contain air and moisture, which is absorbed and emitted depending on the climate. These materials will continue to breathe," releasing air even after being covered with liquid resin. This is called off-gassing and it results in air bubbles in the resin, sometimes hours after you have poured and torched.
Sealing your work, prior to resining, will help prevent this.
For paper, leaves, fabric etc, you can use either a brush on or a spray sealant.
For a sturdier material like wood, you can use a brush-on sealant or even a thin coat of ArtResin, rubbed in with gloved hands (see our video How To Resin A Charcuterie Board to see how it's done.)
You may still get a bubble or two (in which case you will need to sand down your piece and apply another coat) but sealing will help to minimize bubbles.
2) Reactions
On occasion, you may find there is a reaction between ArtResin, photo paper and the adhesive used to mount the photo to your substrate.
This reaction can result in ... you guessed it - bubbles!
Sealing with a brush-on or spray sealant will create a barrier between your photo and the resin, to prevent bubbles from forming as your piece is curing.3) Cold temperatures
The ideal temperature for both your ArtResin and your workspace is slightly warmer than room temperature: 75-85F or 24-30C. Room temperature ArtResin epoxy resin is clear, with a beautiful, honey-like consistency. Cold resin, on the other hand, is thick, clumpy, and difficult to work with. It takes on a cloudy, milky appearance due to thousands of cold-induced micro-bubbles, which you will never be able to torch out.
How To Fix Bubbles In Cured ResinThankfully, epoxy resin is forgiving, meaning that many problems (including bubbles) can be fixed with a simple sanding and re-pour.
Here's what you need to do:
Wearing a mask, sand down the entire surface of your piece, paying particular attention to sanding out bubbles. The purpose of sanding is to create some tooth for the fresh resin layer to adhere to, so it's very important that you sand the entire piece and use a coarse sandpaper, like 80 grit. After you've sanded, your piece will look scratched, but don't worry: the ArtResin will fill in those scratch marks and your piece will look crystal clear again.
Use a damp paper towel to wipe off the sanding dust. Wipe as many times as necessary - your surface needs to be absolutely clear of sanding residue before you pour your fresh layer of resin. Feel free to use a can of compressed air as a little extra insurance, especially if your piece has any nooks and crannies where dust may get trapped.
Mix a fresh batch of carefully measured and thoroughly mixed ArtResin as directed, and apply a fresh coat of resin over your piece. Spread, torch out bubbles, cover and wait 24 hrs for a touch-dry cure, and 72 hrs for a full cure.
Use room temperature ArtResin on your sealed piece to help prevent bubbles ... and if you already have pesky bubbles in your cured resin, follow our simple steps to get rid of them. Here's Joanne with a re-cap!
Please Accept my answer by providing you with the best possible solution. Would be more glade.
THANK YOU
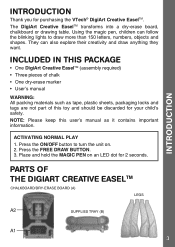
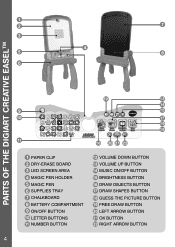
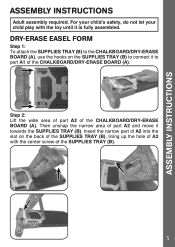
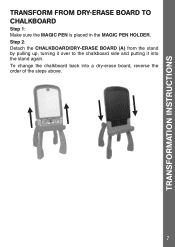
Related Vtech DigiArt Creative Easel Manual Pages


Similar Questions

The stickiness to our white board has warn. Is it possible to get a replacement?

What can be done to correct this problem?

The red and black wires coming from the batteries have come loose. Where do they connect on the circ...

To whom it may concern, We purchased the write and learn art board some years ago but now three chi...