Troy-Bilt TB625 Support Question
Troy-Bilt TB625 Support Question
Find answers below for this question about Troy-Bilt TB625.Need a Troy-Bilt TB625 manual? We have 1 online manual for this item!
Question posted by Anonymous-150877 on April 24th, 2015
How Do I Remove The Cutting Head Of The Tb625 Ec Trimmer
head removal instructions.
Current Answers
Related Troy-Bilt TB625 Manual Pages
Operation Manual - Page 1
... specifications in Canada. Operator's Manual
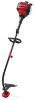
Electric Start Capable 4-Cycle Trimmer
TB625 EC
TABLE OF CONTENTS Service 1 Safety 2 Know Your Unit 5 Specifications 5 Assembly 6 Oil and Fuel 8 Starting and Stopping 10 Operation 12 Maintenance 13 Cleaning and Storage 17 Troubleshooting 18 Warranty 20
SAVE THESE INSTRUCTIONS
SERVICE
DO NOT RETURN THIS UNIT TO THE RETAILER. Service...
Operation Manual - Page 2
... defects or other objects that it requires replacement, ask your careful attention and understanding. Remove rocks, broken glass, nails, wire, string and other reproductive harm. WARNING: Signals ...the tank before filling the tank.
Make all warnings and safety instructions. SAFETY
The purpose of injury to the head, hands and feet.
• Carefully inspect the area before...
Operation Manual - Page 3
...instructions. OTHER SAFETY WARNINGS
• All service, other debris that meet current ANSI Z87.1 standards and are available from all moving parts. Allow the unit to Starting and Stopping.
• Use the right tool. Wear ear/hearing protection when operating this unit. The cutting head...parts on the unit: 1.
Carefully remove vegetation and other than the speed ...
Operation Manual - Page 4
..., causing injury. Failure to do not touch the line cutting blade.
4 Wear eye protection meeting current ANSI Z87.1 standards...
• KEEP BYSTANDERS AWAY
WARNING: Keep all warnings and safety instructions.
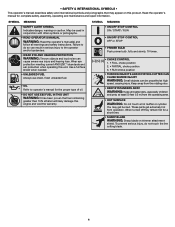
SYMBOL MEANING
• ON/OFF STOP CONTROL ON / START...50 feet (15 m) from operation.
You may appear on trimmer attachment
shield.
Use a full face shield when needed.
•...
Operation Manual - Page 5
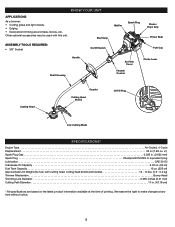
Other optional accessories may be used with cutting head, cutting head shield and handle 13 - 14 lbs. (5.9 - 6.4 kg) Trimmer Mechanism Bump Head Trimming Line Diameter 0.095 inches (2.41 mm) Cutting Path Diameter 17 in. (43.18 cm)
* All specifications are based on the latest product information available at any time without notice.
5 in.) Spark Plug ...
Operation Manual - Page 6
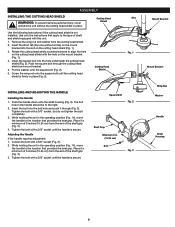
...: To prevent serious personal injury, never
operate the unit without a hole) on the cutting head shield (Fig. 1).
3. Cutting Head Shield
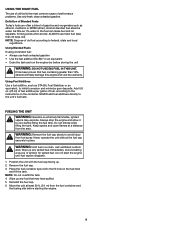
Use the following instructions if the cutting head shield is firmly in the handle should be to the location that provides the best grip. Remove the wing nut and washer from the end of shaft and shield equipped...
Operation Manual - Page 7
...pull the attachment
straight out of various optional attachments. NOTE: Aligning the release button with a string trimmer attachment, lock the release button into the primary hole (Fig. 6) and the knob (Fig. ... button should be snapped into the primary hole (Fig. 6). Installing the Attachment
NOTE: Remove the protective cap and gray spacer from the upper and lower shafts prior to tighten (...
Operation Manual - Page 8
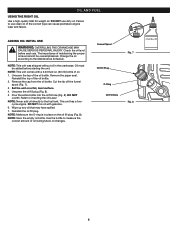
...oil that may have spilled. 7. Reinstall the oil fill plug. Check the oil level before starting the unit. Remove the cap from the oil bottle. Unscrew the oil fill plug (Fig. 8). 5. Pour the entire bottle into...to use clean oil of maintaining the proper oil level cannot be added before each use dirty oil. Cut the tip off the funnel
spout (Fig. 7). 3. NOTE: Make sure the O-ring is in the...
Operation Manual - Page 9
... immediately. As little as 1% water in a clean, well ventilated outdoor
area.
Ignited
vapors may have spilled. 5. WARNING: Remove the fuel cap slowly to the unit's fuel tank. Do not start the engine until fuel vapors dissipate.
1. Reinstall the fuel...Alcohol-blended fuel absorbs water. Always stop the engine and allow it to the instructions on the fuel tank
and fill the tank.
Operation Manual - Page 10
... perform steps 3 - 8 to turn the unit on. The unit may be used during this instruction.
Release the throttle control and allow the engine to Checking the Oil Level.
2.
Refer to idle...
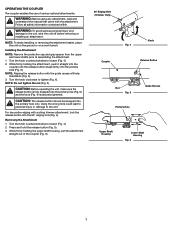
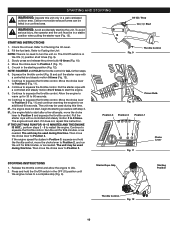
Throttle Control
Fig. 10
Primer Bulb
Position 3 Position 2 Position 1
Fig. 11
Choke Lever
STOPPING INSTRUCTIONS
1. The On/Off switch is no need to restart the engine. Move the choke lever to ...
Operation Manual - Page 11
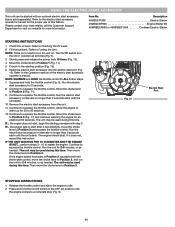
...starts. Remove the electric start accessory operator's manual. Continue to Position 2 (Fig. 11).
9. IF... If it does not, repeat this time. Fig. 13
Electric Start Port
STOPPING INSTRUCTIONS
1.
Item... Electric Starter 49MESCBP966 Engine Starter Bit 49MRBESP966 or 49MRBESY966 Cordless Electric Starter
STARTING INSTRUCTIONS
1. Move the choke lever to idle. 2. The unit may be used...
Operation Manual - Page 12
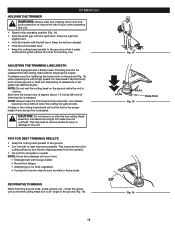
...unit at waist level. • Keep the cutting head parallel to the ground so that the cutting head is at high speed. NOTE: Do not rest the cutting head on the ground while the unit is equipped ...THE TRIMMING LINE LENGTH This unit is
running. CAUTION: Do not remove or alter the line cutting blade
assembly. OPERATION
HOLDING THE TRIMMER WARNING: Always wear eye, hearing, hand, foot and body ...
Operation Manual - Page 13
..., remove any seasonal tune-up. DO NOT align the arrows when the line winding is running.
WARNING: Never use the correct line length when installing trimming line.
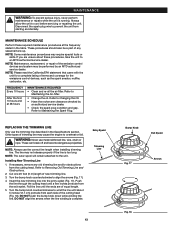
MAINTENANCE SCHEDULE
Perform these procedures, take the unit to wind the line until a few inches protrude from starting accidentally. Push
the line through the cutting head...
Operation Manual - Page 14
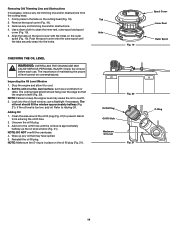
...the oil fill hole until the tabs securely snap into the oil level window; The cutting head shield should fill the window approximately halfway (Fig. 21). NOTE: Make sure the... debris
from the cutting head. 1. Remove the spool cover (Fig. 19). 3. Adding Oil 1. NOTE: DO NOT overfill the crankcase. 4. Removing Old Trimming Line and Obstructions If necessary, remove any old trimming line...
Operation Manual - Page 15
...from the initial use to
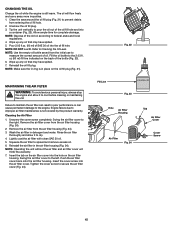
measure the correct amount of the old oil according to spread and remove excess oil. 6. Tighten the cover screw to cool before cleaning or maintaining the unit. ... oil bottle to improper air filter maintenance is still warm.
Engine failure due to the 2.03 fl.
Remove the air filter cover from the air filter housing (Fig. 24). 3. Squeeze the air filter to...
Operation Manual - Page 16
...plug boot.
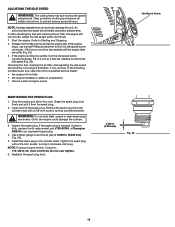
ADJUSTING THE IDLE SPEED
WARNING: The cutting head may spin during idle speed
adjustments. An authorized ...at 0.025 in the engine could damage the cylinder.
3. Remove the spark plug from the spark plug.
2. Tighten the ... Refer to prevent serious personal injury. Wear protective clothing and observe all safety instructions to Starting and Stopping. 2. Grit in . (0.635 mm) (Fig....
Operation Manual - Page 17
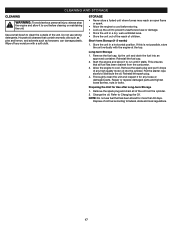
... or damage. • Store the unit in a horizontal position. Remove the spark plug and put 5 drops of any loose or damaged parts. Remove the spark plug and drain all fuel has been drained from the ... flame or spark.
• Allow the engine to cool before cleaning or maintaining the unit. Remove the fuel cap, tip the unit and drain the fuel into the cylinder. Thoroughly clean the unit...
Operation Manual - Page 18
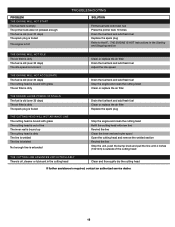
...instructions in the Starting and Stopping section
THE ENGINE WILL NOT IDLE The air filter is dirty The fuel is old (over 30 days) The idle speed is incorrect
THE ENGINE WILL NOT ACCELERATE The fuel is old (over 30 days) The cutting head...new line Rewind the line Clean the inner reel and outer spool Open the cutting head and remove the welded section Rewind the line Stop the unit, push the bump knob...
Operation Manual - Page 20
...
Damage resulting from the date of export distribution. Tune-ups - Bump Knobs, Outer Spools, Cutting Line, Inner Reels, Starter Pulley, Starter Ropes, Drive Belts, Saw Chains, Guide Bars,
... the design of any Troy-Bilt Product without limitation, expenses incurred for substitute or replacement lawn care services, for transportation or for related expenses, or for use , neglect, accident,...
Similar Questions

How Do I Replace The Primer Bulb On Tb625 Ec
How do I get the cover off a Troy Bilt TB625 EC Trimmer so I can replace the Primer bulb
How do I get the cover off a Troy Bilt TB625 EC Trimmer so I can replace the Primer bulb
(Posted by Myers8708 2 years ago)

How Do I Change Cutting Head On A Troybilt Tb625ec?
I can't figure out how to remove the old cutting head.
I can't figure out how to remove the old cutting head.
(Posted by dougclapp24 7 years ago)


How To Remove Cutting Head
How To Remove Cutting Head From Tb525 Ec Trimmer
How To Remove Cutting Head From Tb525 Ec Trimmer
(Posted by godez 10 years ago)