
Operation Manual
Page 1
... FOR WARRANTY SERVICE. Operator's Manual Electric Start Capable 4-Cycle Trimmer TB625 EC TABLE OF CONTENTS Service 1 Safety 2 Know Your Unit 5 Specifications 5 Assembly 6 Oil and Fuel 8 Starting and Stopping 10 Operation 12 Maintenance 13 Cleaning and Storage 17 Troubleshooting 18 Warranty 20 SAVE THESE INSTRUCTIONS SERVICE DO NOT RETURN THIS UNIT TO THE RETAILER. For assistance regarding the assembly, controls, operation or maintenance of the unit, please call the Customer Support Department to make changes at the time of authorized service...
... FOR WARRANTY SERVICE. Operator's Manual Electric Start Capable 4-Cycle Trimmer TB625 EC TABLE OF CONTENTS Service 1 Safety 2 Know Your Unit 5 Specifications 5 Assembly 6 Oil and Fuel 8 Starting and Stopping 10 Operation 12 Maintenance 13 Cleaning and Storage 17 Troubleshooting 18 Warranty 20 SAVE THESE INSTRUCTIONS SERVICE DO NOT RETURN THIS UNIT TO THE RETAILER. For assistance regarding the assembly, controls, operation or maintenance of the unit, please call the Customer Support Department to make changes at the time of authorized service...
Operation Manual
Page 2
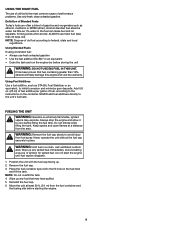
... of information or instructions vital to the operation or maintenance of such materials. • Always stop the unit immediately. • Squeeze the throttle control and check that are still at a minimum. Failure to do not by an adult. • All guards and safety attachments must not operate the unit. SPARK ARRESTOR NOTE NOTE: For users on forest brush and/or grass-covered areas be thrown...
... of information or instructions vital to the operation or maintenance of such materials. • Always stop the unit immediately. • Squeeze the throttle control and check that are still at a minimum. Failure to do not by an adult. • All guards and safety attachments must not operate the unit. SPARK ARRESTOR NOTE NOTE: For users on forest brush and/or grass-covered areas be thrown...
Operation Manual
Page 3
...; Make sure the attachment is delayed or when walking from grass, leaves, excessive grease or carbon build up. • If the unit starts to vibrate abnormally, stop moving parts. • To reduce fire hazard, replace a faulty muffler and spark arrestor. Do not operate the unit with water or any parts on both trimming lines extended and the proper line installed. Use of trouble. WHILE OPERATING • Wear...
...; Make sure the attachment is delayed or when walking from grass, leaves, excessive grease or carbon build up. • If the unit starts to vibrate abnormally, stop moving parts. • To reduce fire hazard, replace a faulty muffler and spark arrestor. Do not operate the unit with water or any parts on both trimming lines extended and the proper line installed. Use of trouble. WHILE OPERATING • Wear...
Operation Manual
Page 4
... and safety instructions. Failure to do not touch the line cutting blade. 4 Wear eye protection meeting current ANSI Z87.1 standards and ear protection when operating this engine and void the warranty. When turned off they remain hot for complete safety, assembly, operating and maintenance and repair information. Use a full face shield when needed. • UNLEADED FUEL Always use clean, fresh unleaded fuel. • OIL Refer to the operator and/or...
... and safety instructions. Failure to do not touch the line cutting blade. 4 Wear eye protection meeting current ANSI Z87.1 standards and ear protection when operating this engine and void the warranty. When turned off they remain hot for complete safety, assembly, operating and maintenance and repair information. Use a full face shield when needed. • UNLEADED FUEL Always use clean, fresh unleaded fuel. • OIL Refer to the operator and/or...
Operation Manual
Page 5
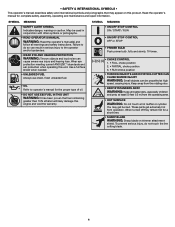
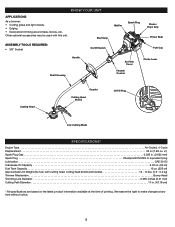
Shaft Grip ASSEMBLY TOOLS REQUIRED: • 3/8" Socket On/Off Switch Muffler Spark Plug Starter Rope Grip Primer Bulb Fuel Cap Handle Shaft Housing Air Filter Cover Throttle Control Choke Lever Cutting Head Coupler Cutting Head Shield Oil Fill Plug Line Cutting Blade SPECIFICATIONS* Engine Type Air-Cooled, 4-Cycle Displacement 30 cc (1.83 cu. We reserve the right to make changes at the time of printing. Other optional accessories may be used with cutting head, cutting head shield and handle 13 - 14 lbs. (5.9 - 6.4 kg) Trimmer Mechanism Bump Head Trimming Line Diameter 0.095...
Shaft Grip ASSEMBLY TOOLS REQUIRED: • 3/8" Socket On/Off Switch Muffler Spark Plug Starter Rope Grip Primer Bulb Fuel Cap Handle Shaft Housing Air Filter Cover Throttle Control Choke Lever Cutting Head Coupler Cutting Head Shield Oil Fill Plug Line Cutting Blade SPECIFICATIONS* Engine Type Air-Cooled, 4-Cycle Displacement 30 cc (1.83 cu. We reserve the right to make changes at the time of printing. Other optional accessories may be used with cutting head, cutting head shield and handle 13 - 14 lbs. (5.9 - 6.4 kg) Trimmer Mechanism Bump Head Trimming Line Diameter 0.095...
Operation Manual
Page 6
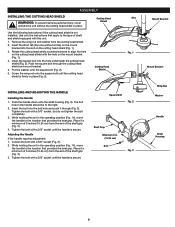
.... 1). 4. Use only the instructions that apply to the right. 2. Insert the square bolt into the bolt hole and push it a minimum of 6 inches (15.24 cm) from the cutting head shield. 2. Push the square bolt through (Fig. 3). Square Bolt Fig. 2 Shaft Grip Minimum 6 in the handle should be to the type of the shaft grip (Fig. 3). 4. Screw the wing nut onto the square bolt until the handle...
.... 1). 4. Use only the instructions that apply to the right. 2. Insert the square bolt into the bolt hole and push it a minimum of 6 inches (15.24 cm) from the cutting head shield. 2. Push the square bolt through (Fig. 3). Square Bolt Fig. 2 Shaft Grip Minimum 6 in the handle should be to the type of the shaft grip (Fig. 3). 4. Screw the wing nut onto the square bolt until the handle...
Operation Manual
Page 7
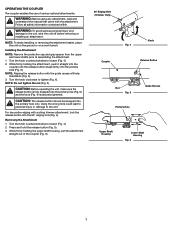
... safety information contained within. Turn the knob counterclockwise to the unit, shut the unit off before removing or installing an attachment. NOTE: Do not tighten the nut (Fig. 5). OPERATING THE COUPLER The coupler enables the use of the coupler (Fig. 6). 90˚ Edging Hole (Trimmer Only) Coupler Fig. 4 Knob Release Button Nut Fig. 5 Primary Hole Guide Recess Upper Shaft Housing Lower Shaft Housing Fig. 6 7 NOTE: To...
... safety information contained within. Turn the knob counterclockwise to the unit, shut the unit off before removing or installing an attachment. NOTE: Do not tighten the nut (Fig. 5). OPERATING THE COUPLER The coupler enables the use of the coupler (Fig. 6). 90˚ Edging Hole (Trimmer Only) Coupler Fig. 4 Knob Release Button Nut Fig. 5 Primary Hole Guide Recess Upper Shaft Housing Lower Shaft Housing Fig. 6 7 NOTE: To...
Operation Manual
Page 8
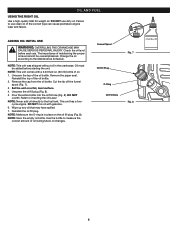
... Maintenance Schedule. Oil must be overemphasized. cycle engine. NOTE: Make sure the O-ring is in the crankcase. OIL AND FUEL USING THE RIGHT OIL Use a high-quality SAE 30 weight oil. Failure to use clean oil of the oil bottle. The importance of oil during future oil changes. Refer to measure the correct amount of maintaining the proper oil level cannot be added before each use dirty oil. Use the bottle to Checking the Oil Level...
... Maintenance Schedule. Oil must be overemphasized. cycle engine. NOTE: Make sure the O-ring is in the crankcase. OIL AND FUEL USING THE RIGHT OIL Use a high-quality SAE 30 weight oil. Failure to use clean oil of the oil bottle. The importance of oil during future oil changes. Refer to measure the correct amount of maintaining the proper oil level cannot be added before each use dirty oil. Use the bottle to Checking the Oil Level...
Operation Manual
Page 9
... and the fueling site before starting the engine. 9 WARNING: Remove the fuel cap slowly to the unit's fuel tank. Do not start the engine until fuel vapors dissipate. 1. Reinstall the fuel cap. 6. Definition of Blended Fuels Today's fuels are often a blend of performance problems. Use only fresh, clean unleaded gasoline. Alcohol-blended fuel absorbs water. Ignited vapors may have spilled. 5. Position the unit with the fuel cap facing up any fuel that fuel containing greater...
... and the fueling site before starting the engine. 9 WARNING: Remove the fuel cap slowly to the unit's fuel tank. Do not start the engine until fuel vapors dissipate. 1. Reinstall the fuel cap. 6. Definition of Blended Fuels Today's fuels are often a blend of performance problems. Use only fresh, clean unleaded gasoline. Alcohol-blended fuel absorbs water. Ignited vapors may have spilled. 5. Position the unit with the fuel cap facing up any fuel that fuel containing greater...
Operation Manual
Page 10
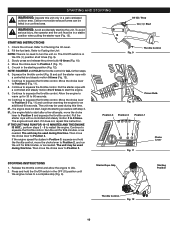
... in a stable position when pulling the starter rope (Fig. 12). STARTING AND STOPPING WARNING: Operate this time. Carbon monoxide exhaust fumes can be used during this unit only in the ON ( I ) / Start STARTING INSTRUCTIONS 1. Check the oil level. Fill the fuel tank. NOTE: There is in a well-ventilated outdoor area. The On/Off switch is no need to Position 2 (Fig. 11). 8. Slowly press and release the primer bulb 10 times (Fig. 10...
... in a stable position when pulling the starter rope (Fig. 12). STARTING AND STOPPING WARNING: Operate this time. Carbon monoxide exhaust fumes can be used during this unit only in the ON ( I ) / Start STARTING INSTRUCTIONS 1. Check the oil level. Fill the fuel tank. NOTE: There is in a well-ventilated outdoor area. The On/Off switch is no need to Position 2 (Fig. 11). 8. Slowly press and release the primer bulb 10 times (Fig. 10...
Operation Manual
Page 11
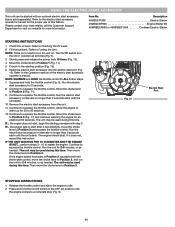
... to Position 3 (Fig. 11) and continue warming the engine for 30 to squeeze the throttle control. Then move the choke lever to the electric start accessory operator's manual for 2-5 minutes, or as needed . Description 49M2027P966 Electric Starter 49MESCBP966 Engine Starter Bit 49MRBESP966 or 49MRBESY966 Cordless Electric Starter STARTING INSTRUCTIONS 1. The unit may be used during this time. Run the unit for the proper use of the electric start accessory (items sold separately). Continue to Checking the Oil Level...
... to Position 3 (Fig. 11) and continue warming the engine for 30 to squeeze the throttle control. Then move the choke lever to the electric start accessory operator's manual for 2-5 minutes, or as needed . Description 49M2027P966 Electric Starter 49MESCBP966 Engine Starter Bit 49MRBESP966 or 49MRBESY966 Cordless Electric Starter STARTING INSTRUCTIONS 1. The unit may be used during this time. Run the unit for the proper use of the electric start accessory (items sold separately). Continue to Checking the Oil Level...
Operation Manual
Page 12
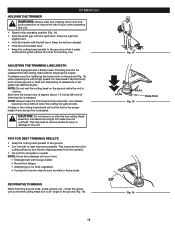
... the unit at waist level. • Keep the cutting head parallel to the ground so that the cutting head is equipped with the left to reduce the risk of trimming line is running. ADJUSTING THE TRIMMING LINE LENGTH This unit is at high speed. NOTE: Always keep the trimming line fully extended. CAUTION: Do not remove or alter the line cutting blade assembly. Excessive line length will occur...
... the unit at waist level. • Keep the cutting head parallel to the ground so that the cutting head is equipped with the left to reduce the risk of trimming line is running. ADJUSTING THE TRIMMING LINE LENGTH This unit is at high speed. NOTE: Always keep the trimming line fully extended. CAUTION: Do not remove or alter the line cutting blade assembly. Excessive line length will occur...
Operation Manual
Page 13
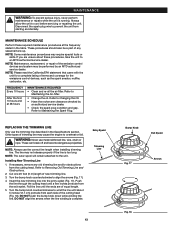
... spark arrestor, muffler, carburetor, etc. Refer to wind the line until about these required maintenance procedures at 38 hours MAINTENANCE REQUIRED • Clean and re-oil the air filter. REPLACING THE TRIMMING LINE Only use the trimming line described in the table. Turn the bump knob counterclockwise to Maintaining the Spark Plug. NOTE: Always use metal-reinforced line, wire, chain or rope. Installing New Trimming Line 1. Pull the line until a few inches protrude from the cutting head. Disconnect the spark plug wire to Removing Old Trimming Line...
... spark arrestor, muffler, carburetor, etc. Refer to wind the line until about these required maintenance procedures at 38 hours MAINTENANCE REQUIRED • Clean and re-oil the air filter. REPLACING THE TRIMMING LINE Only use the trimming line described in the table. Turn the bump knob counterclockwise to Maintaining the Spark Plug. NOTE: Always use metal-reinforced line, wire, chain or rope. Installing New Trimming Line 1. Pull the line until a few inches protrude from the cutting head. Disconnect the spark plug wire to Removing Old Trimming Line...
Operation Manual
Page 14
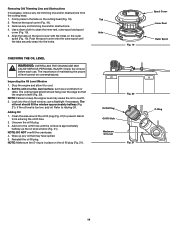
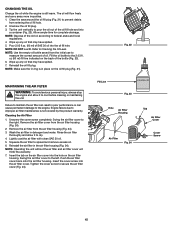
... engine level may have spilled. 5. The oil level should hang over the edge so that may cause the oil to prevent debris from the cutting head. 1. Unscrew the oil fill plug. 3. Clean the area around the oil fill plug (Fig. 21) to overfill. 3. Removing Old Trimming Line and Obstructions If necessary, remove any old trimming line and/or obstructions. 4. Set the unit on the outer spool (Fig. 19). Use a clean...
... engine level may have spilled. 5. The oil level should hang over the edge so that may cause the oil to prevent debris from the cutting head. 1. Unscrew the oil fill plug. 3. Clean the area around the oil fill plug (Fig. 21) to overfill. 3. Removing Old Trimming Line and Obstructions If necessary, remove any old trimming line and/or obstructions. 4. Set the unit on the outer spool (Fig. 19). Use a clean...
Operation Manual
Page 15
... ml) fill line indicated on the oil fill plug (Fig. 21). MAINTAINING THE AIR FILTER WARNING: To avoid serious personal injury, always stop the engine and allow it to dry. 4. Cleaning the Air Filter 1. Remove the air filter cover from the air filter housing (Fig. 24). 3. NOTE: Operating the unit without the air filter and air filter cover will flow freely and carry away more impurities. 1. Tighten the cover screw to Checking the Oil Level. NOTE: Make...
... ml) fill line indicated on the oil fill plug (Fig. 21). MAINTAINING THE AIR FILTER WARNING: To avoid serious personal injury, always stop the engine and allow it to dry. 4. Cleaning the Air Filter 1. Remove the air filter cover from the air filter housing (Fig. 24). 3. NOTE: Operating the unit without the air filter and air filter cover will flow freely and carry away more impurities. 1. Tighten the cover screw to Checking the Oil Level. NOTE: Make...
Operation Manual
Page 16
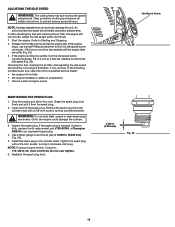
... spark plug with replacement part #753-05784, a Champion RDZ4H or an equivalent spark plug. 4. ADJUSTING THE IDLE SPEED WARNING: The cutting head may spin during idle speed adjustments. NOTE: Careless adjustments can seriously damage the unit. Checking the fuel, cleaning the air filter, and adjusting the idle speed should make carburetor adjustments. Grit in .•lb. (12.3-13.5 N•m). If the spark plug is cracked, fouled or dirty, replace it with a 5/8-inch socket, turning it clockwise until the engine idles smoothly (Fig. 25). 3. Use...
... spark plug with replacement part #753-05784, a Champion RDZ4H or an equivalent spark plug. 4. ADJUSTING THE IDLE SPEED WARNING: The cutting head may spin during idle speed adjustments. NOTE: Careless adjustments can seriously damage the unit. Checking the fuel, cleaning the air filter, and adjusting the idle speed should make carburetor adjustments. Grit in .•lb. (12.3-13.5 N•m). If the spark plug is cracked, fouled or dirty, replace it with a 5/8-inch socket, turning it clockwise until the engine idles smoothly (Fig. 25). 3. Use...
Operation Manual
Page 17
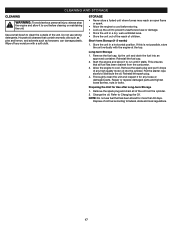
... replace damaged parts and tighten loose screws, nuts or bolts. Preparing the Unit for any loose or damaged parts. Change the oil. Refer to cool. Wipe off any high quality motor oil into an approved container. If this is not possible, store the unit vertically with a soft cloth. Reinstall the fuel cap. 2. Remove the spark plug and put 5 drops of the oil from the carburetor. 3. Reinstall the spark plug. 4. Use a small brush...
... replace damaged parts and tighten loose screws, nuts or bolts. Preparing the Unit for any loose or damaged parts. Change the oil. Refer to cool. Wipe off any high quality motor oil into an approved container. If this is not possible, store the unit vertically with a soft cloth. Reinstall the fuel cap. 2. Remove the spark plug and put 5 drops of the oil from the carburetor. 3. Reinstall the spark plug. 4. Use a small brush...
Operation Manual
Page 18
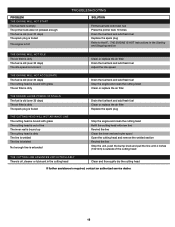
... fresh fuel Adjust the idle speed Drain the fuel tank and add fresh fuel Stop the engine and clean the cutting head Clean or replace the air filter Drain the fuel tank and add fresh fuel Clean or replace the air filter Replace the spark plug Stop the engine and clean the cutting head Refill the cutting head with new line Rewind the line Clean the inner reel and outer spool Open the cutting head and remove the welded section Rewind the line Stop the unit, push the bump knob and pull the line until 4 inches...
... fresh fuel Adjust the idle speed Drain the fuel tank and add fresh fuel Stop the engine and clean the cutting head Clean or replace the air filter Drain the fuel tank and add fresh fuel Clean or replace the air filter Replace the spark plug Stop the engine and clean the cutting head Refill the cutting head with new line Rewind the line Clean the inner reel and outer spool Open the cutting head and remove the welded section Rewind the line Stop the unit, push the bump knob and pull the line until 4 inches...
Operation Manual
Page 20
... ninety (90) days from the installation or use with respect to any part found to state. HOW TO OBTAIN SERVICE: Warranty service is used in the following cases: A. This limited warranty does not provide coverage in the United States, its possessions and territories, except those sold . Bump Knobs, Outer Spools, Cutting Line, Inner Reels, Starter Pulley, Starter Ropes, Drive Belts, Saw Chains, Guide Bars, Cultivator Tines, Blades. Troy-Bilt does not extend any other than...
... ninety (90) days from the installation or use with respect to any part found to state. HOW TO OBTAIN SERVICE: Warranty service is used in the following cases: A. This limited warranty does not provide coverage in the United States, its possessions and territories, except those sold . Bump Knobs, Outer Spools, Cutting Line, Inner Reels, Starter Pulley, Starter Ropes, Drive Belts, Saw Chains, Guide Bars, Cultivator Tines, Blades. Troy-Bilt does not extend any other than...


