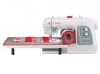
Singer 8500Q MODERN QUILTER Support Question
Singer 8500Q MODERN QUILTER Support Question
Find answers below for this question about Singer 8500Q MODERN QUILTER.Need a Singer 8500Q MODERN QUILTER manual? We have 1 online manual for this item!
Question posted by Ehoeltgen on November 28th, 2018
Singer 8500q Error Fivekeeps Coming Up And After Turning Machine Off And On Won
Singer 8500 Q error code 5 keeps coming up and won't reset after turning machine on and off so it then won't sew at all
Current Answers
Answer #1: Posted by Odin on November 28th, 2018 7:27 PM
Odin

Member since:
April 10th, 2010 Points: 41,236,680

Member since:
April 10th, 2010 Points: 41,236,680
Hope this is useful. Please don't forget to click the Accept This Answer button if you do accept it. My aim is to provide reliable helpful answers, not just a lot of them. See https://www.helpowl.com/profile/Odin.
Related Singer 8500Q MODERN QUILTER Manual Pages
Instruction Manual - Page 2
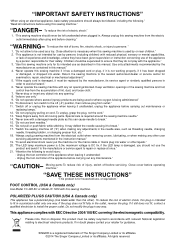
³,03257$176$)(7
Instruction Manual - Page 5
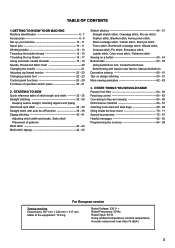
STARTING TO SEW Quick reference table of stitch length and width --------- 32 - 35 Straight stitching 36 - 39
Keeping seams straight, Inserting zippers and piping Hand-look quilt ...Special accessories 72 - 81 Helpful messages 82 - 83 Programming the memory 84 - 89
For European version
Sewing machine Dimensions: 567 mm × 240 mm × 317 mm Mass of operation switch panel 30 - 31
2. ...
Instruction Manual - Page 8

...
14
27. Bobbin winding tension disk
3. 1. Foot control
19
34. Presser foot screw
22. Power/light switch
14. Bobbin winder spindle
8. GETTING TO KNOW YOUR MACHINE
MACHINE IDENTIFICATION
2
1
1. Thread guide
12
20.
Instruction Manual - Page 10
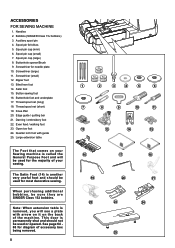
... and will see a plate with guide 25. ACCESSORIES FOR SEWING MACHINE
1. Blind hem foot 14. Open toe foot 24.
See page 64 65 for needle plate 10. Button sewing foot 16. Knee lifter 20. Darning / embroidery foot 22.
Needles 2. Large extension table
The Foot that comes on the back of accessory box being removed...
Instruction Manual - Page 12

... of the power line cord into the machine socket (3), when using sewing machine only.
Place felt disc over it. Place a thread spool on . SET UP YOUR MACHINE
Be sure to wipe off any surplus...interrupteur moteur/ lumière sur "OFF".
POWER/LIGHT SWITCH
Your machine will not operate until the power/light switch is turned on the spool pin.
Spool Bobine Carrete
Felt disc Rondelle feutre ...
Instruction Manual - Page 14
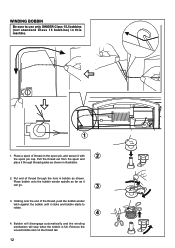
... thread tail.
12 Pull the thread out from the spool and
place it clicks and bobbin starts to use only SINGER Class 15J bobbins (not standard Class 15 bobbins) in this machine.
1
1. Bobbin will disengage automatically and the winding mechanism will stop when the bobbin is full.
Holding onto the end of...
Instruction Manual - Page 18

...the presser foot raised, pull the thread towards the the back of the machine. Raise the presser foot lifter. Turn the hand wheel counter clockwise (toward you) until the needle is in ...following page for instructions on operation of the Automatic Needle Threader.)
IMPORTANT: To verify that the machine is threaded properly in the tension discs, do not detect the resistance you should detect only...
Instruction Manual - Page 26
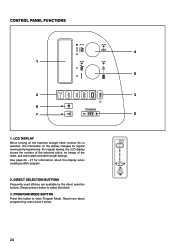
See page 26 - 27 for regular sewing and programming. The information on the machine straight stitch number 00, is selected. Simply press a button to enter...direct selection buttons. For regular sewing, the LCD display shows the number of the selected stitch, an image of the stitch, and stitch width and stitch length settings. LCD DISPLAY
When turning on the display changes for ...
Instruction Manual - Page 28
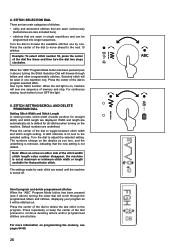
...sequences. Note: When an arrow on the machine. For more information on the display as it will sew one repetition only. STITCH SELECTION DIAL
There are saved until the machine is set to turn , and the underlining is removed, indicating... (see pages 84-89.
26 Press repeatedly or keep the center of the dial to move ahead to continue deleting letters and/or programmed stitches one .
Instruction Manual - Page 30
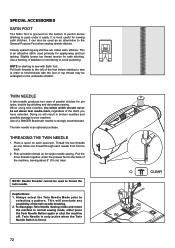
... selecting buttonhole pattern with the direct selection button, indicating that Twin Needle Safety is lit. THREAD CUTTING MODE
Press this button to normal sewing mode, either press the Twin Needle Safety button again or turn the machine off. Note: Twin needle safety and Thread cutting mode cannot be sewn with twin needle. When...
Instruction Manual - Page 32
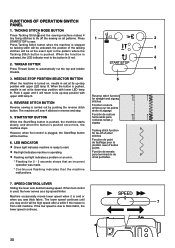
... red light indicates a problem or an error.
* Flashing for 2 - 3 seconds shows that an incorrect operation was made.
* Continuous flashing indicates that the machine malfunctions.
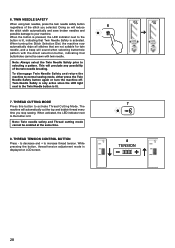
6
Reverse stitch function for straight...sets desired sewing speed. When foot control is due to automatically cut the top and bobbin
5
threads.
3.
NEEDLE STOP POSITION SELECTOR BUTTON
When the machine is turned on,...
Instruction Manual - Page 38
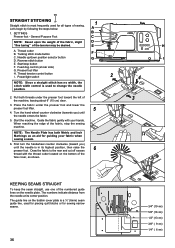
... cover plate is most frequently used for all types of the machine, leaving about 6" (15 cm) clear.
3
3. Let's begin by following the steps below.
1. Tacking stitch mode button C. Presser foot lifter H. First turn the handwheel counter clockwise (toward the left of sewing. Thread cutter B.
Feed dog control (at its highest position, then raise...
Instruction Manual - Page 68
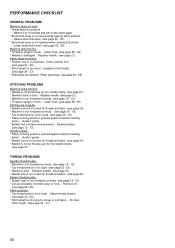
... presser foot.
(see page 16 - 19). * Thread is not raised when sewing stitch patterns.
- Replace needle. (see page 21). * Machine is not threaded correctly. (see page 64 - 65). * Stitch length is not lowered when sewing buttonhole.
-
Fabric puckers. * Top thread tension is turned off.
- Guide it gently. * Bobbin has not been wound evenly. - Shorten...
Instruction Manual - Page 70
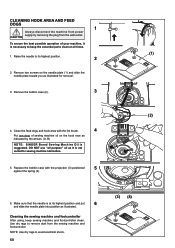
... necessary to remove dust from the sewing machine and footcontroller. CLEANING HOOK AREA AND FEED DOGS
1
Always disconnect the machine from power
CAUTION supply by the arrows. (A, B)
NOTE: SINGER Brand Sewing Machine Oil is VXJJHVWHG '2 127 XVH ³DOO SXUSRVH´ RLO DV LW LV QRW
suited for removal.
3.
Use dry rags to keep sewing machine and footcontroller clean.
Instruction Manual - Page 72
... Guia
70 Put one drop of oil other than Sewing Machine Oil will cause damage to the points indicated
by arrows.
1
Face cover Plaque frontale Cubierta frontal
Helpful Hints : For the machine used . For best results always use SINGER Brand Sewing Machine Oil.
Use of sewing machine oil to your machine.
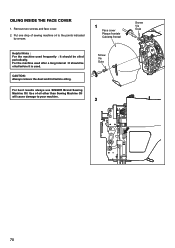
OILING INSIDE THE FACE COVER
1. Remove two screws...
Instruction Manual - Page 74
... parallel stitches for satin stitching. Use of a SINGER Brand twin needle is an optional purchase. Thread the two threads as for single needle sewing. Pick up bobbin thread as one thread through ...the foot before starting to sew in broken needles and possible damage to your machine. To disengage Twin Needle Sewing mode and return the machine to the back of the machine, leaving about 6" (15 ...
Instruction Manual - Page 76
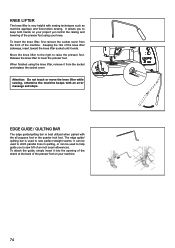
...used to help guide you to sew 5/8 of the machine.
It allows you to keep both hands on your knee. ...machine applique and free-motion sewing. To attach the guide, simply insert it ends. KNEE LIFTER
The knee lifter is very helpful with the all purpose foot or the quarter inch foot. Attention: Do not touch or move the knee lifter while sewing, otherwise the machine beeps with an error...
Instruction Manual - Page 78
...until it is about halfway down , turn the fabric 90° and repeat the process. Place fabric in even movements.
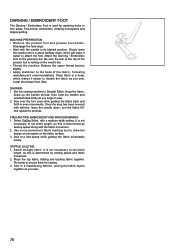
DARNING 1. Set the sewing machine to the pressure bar. Draw up...manufacturer's recommendations. DARNING / EMBROIDERY FOOT
The Darning / Embroidery Foot is used for sewing. 3. Hoop the fabric. Sew. Sew over the torn area while guiding the fabric back and forth in a hoop, which...
Instruction Manual - Page 82
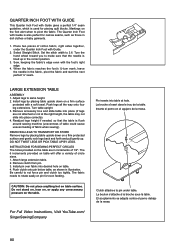
...extensions. Readjust legs height if needed, so that the needle is flush around sewing machine (unevenness of table could cause uneven feeding of 1/2".
DO NOT TWIST LEGS ...¼-turn mark, leave the needle in illustration.
Turn the hand wheel toward you to pivot the fabric.
Be careful to 3.6. Markings on table. 4. Place two pieces of circle sizes. 1. Sew, keeping the fabric...
Instruction Manual - Page 86
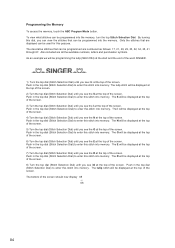
...be programming the tulip (Stitch #34) at the start and the end of the word SINGER.
1) Turn the top dial (Stitch Selection Dial) until you see the N at the top of ... be displayed at the top of the screen. The tulip stitch will be programmed into the memory, turn the top Stitch Selection Dial. Only the stitches that can be programmed into the memory. Programming the Memory...
Similar Questions

What Is Error Code C 09
My Singer modern quilter keeps showing error code C 09. I do know what the problem is
My Singer modern quilter keeps showing error code C 09. I do know what the problem is
(Posted by karenkawycz 10 months ago)

How Do I Clear E7 Error Code On Singer Fashion Mate Model 7256 Sewing Machine
(Posted by cathyhowden1 2 years ago)

8500q Error Code C
What does the error code C stand for on the 8500q? After one stitch, the START/STOP Turns red and th...
What does the error code C stand for on the 8500q? After one stitch, the START/STOP Turns red and th...
(Posted by Julieames1980 4 years ago)

Keep Getting 'hoop Is Too Small For Design' Error Code
How do I clear the "Hoop is too small for design" error code when the machine stopped while it was s...
How do I clear the "Hoop is too small for design" error code when the machine stopped while it was s...
(Posted by mschatty1 4 years ago)

Error Code
I keep getting error code 16 on Singer 8500Q. I use it a lot to make flannel pillow cases for a char...
I keep getting error code 16 on Singer 8500Q. I use it a lot to make flannel pillow cases for a char...
(Posted by jmheaton 7 years ago)