Singer 5625 Stylist II Sewing Machine Support Question
Singer 5625 Stylist II Sewing Machine Support Question
Find answers below for this question about Singer 5625 Stylist II Sewing Machine.Need a Singer 5625 Stylist II Sewing Machine manual? We have 1 online manual for this item!
Question posted by peppersmom2u on December 3rd, 2014
Rotten Stiches
bottom stiches are loose looks like the under thread is just lying on top of fabrick being caut by top thread loosley, besbt i can get is a garbled up mess on the under side. top side is good. ive tried every thing to tighten up the under stiches tension tightning or loosening dont do it.this machine has only been used 4 times nothing heavy. worst piece of junk ive ever bought.
Current Answers
Answer #1: Posted by TommyKervz on December 11th, 2014 2:54 AM
TommyKervz

Member since:
January 10th, 2013 Points: 17,776,843

Member since:
January 10th, 2013 Points: 17,776,843
Troubleshooting instructions below
http://www.singerco.com/support/frequently-asked-questions
if not helped` you can also email the problem to a singer technicien
Related Singer 5625 Stylist II Sewing Machine Manual Pages
Instruction Manual - Page 2
... affiliates. ©2010 The Singer Company Limited or its service agent or similarly qualified persons in this sewing machine. "CAUTION--
Close attention is being used by a person responsible for household use as threading needle, changing
needle, threading bobbin, or changing presser foot, etc." 18. Special care is a registered trademark of the appliance when leaving...
Instruction Manual - Page 5
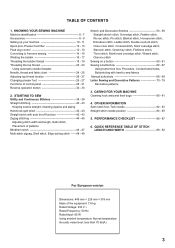
KNOWING YOUR SEWING MACHINE Machine identification 6 - 7 Accessories 8 - 9 Setting up your machine 10 - 11 Spool pins, Presser foot lifter 12 - 13 Feed dog control 12 - 13 Converting to -sew fabrics Manual buttonhole 68 - 69 Letter Sewing and Decorative Patterns 70 - 79 Decorative patterns
3. CARING FOR YOUR MACHINE Cleaning hook area and feed dogs 80 - 81
4. PERFORMANCE ...
Instruction Manual - Page 8

... shaft 9. Buttonhole lever 20. Presser foot screw 23. Foot control 35. Thread tension control 4. Thread cutter/holder 7. Face cover 6. Bobbin winder stop 10. Reverse stitch button ...Thread guide 22. Needle clamp screw 29. Power line cord 34. Hand wheel 14. General purpose foot 30. Feed dog control 19. Needle 24. KNOWING YOUR SEWING MACHINE
MACHINE...
Instruction Manual - Page 10

... foot with plate 13. Darning & embroidery foot (stippling foot) 22. Spool pin cap (small) 7. Spool pin cap (large) 8. Circular sewing attachment 14. When purchasing additional bobbins, be used for the majority of your Sewing machine is another very useful foot and should be sure they are Class I5 J.
1
2
3
4
5
6
7
8
9
10
11
12
13
14...
Instruction Manual - Page 14
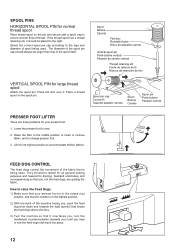
... Dogs:
1) Make sure that your presser foot.
1. Select the correct spool pin cap according to sew.
2. Place a thread spool on the pin and secure with a spool cap to change presser foot.
3. Lift it .... fabric, and to ensure smooth flow of the machine facing you hear or see the feed dogs click back into place.
12
If the thread spool has a thread retaining slit, it now faces you, turn the...
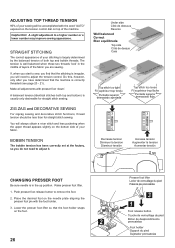
Instruction Manual - Page 16

...a large working surface as a standard flat-bed model. With the extension table removed the machine converts into place until it clicks. With the extension table in position, it off to ...into a slim free-arm model for sewing children's clothes, cuffs, trouser legs, and other difficult to the left as a freearm model. CONVERTING TO FREE-ARM SEWING
Your machine can be used either as a flat...
Instruction Manual - Page 26
...machine from power supply by turning the hand wheel counter clockwise.
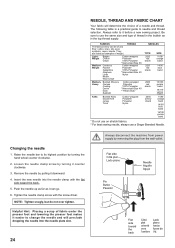
2. Helpful Hint: Placing a scrap of fabric under the presser foot and lowering the presser foot makes it easier to use a Singer Branded Needle. NEEDLE, THREAD... use on stretch fabrics. * For best sewing results, always use the same size and type of thread in the top thread supply.
Tighten the needle clamp screw with ...
Instruction Manual - Page 28
...is well balanced when these two threads 'lock' in the up position.
If, when you start to sew, you find that the machine is irregular, you do not ...machine.
Under side Côté de dessous Reverso
Well balanced Correct Bien equilibrada
Top side Côté de dessus Cara
Top stitch too tight Fil supérieur trop tendu
Puntada superior demasiado apretada
Top stitch too loose...
Instruction Manual - Page 30
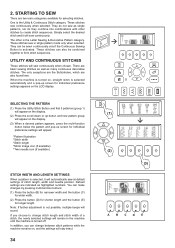
... one of six patterns.
Pop-up screen for continuous pattern sewing. 1
2
A BC DE
3
6
4
7
5
8
9
10
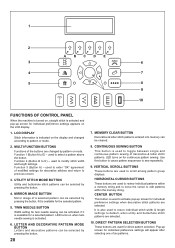
FUNCTIONS OF CONTROL PANEL
When the machine is turned on, straight stitch is selected and pop-up ...patterns entered into memory can be cleared.
8. LED turns on when twin needle sewing is indicated on the LCD display.
1. HORIZONTAL CURSOR BUTTONS
These buttons are selected...
Instruction Manual - Page 32
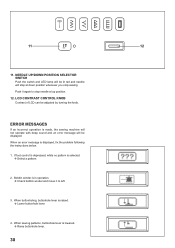
... is displayed, fix the problem following the instructions below.
1. Bobbin winder is made, the sewing machine will not operate with beep sound and an error message will be displayed. When buttonholing, buttonhole... lever is lowered. Raise buttonhole lever.
30 When sewing patterns, buttonhole lever is raised. Lower buttonhole lever.
4. Push it to...
Instruction Manual - Page 34

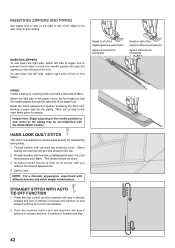
NOTE: This function is very useful for tie-off of other stitches ( ) The sewing machine makes 4 tiny tacking stitches to tie off the sewing pattern to sew in the pattern where the reverse/tacking stitch button is pushed. REVERSE OPERATION BUTTON
Dual purpose reverse/tacking stitch button
Reverse stitch button Interrupteur couture ...
Instruction Manual - Page 36
... and stitch width of stitch length, width and needle position. These stitches sew continuously when selected. When the machine is turned on the display.
(3) When a desired pattern appears, press the...activated. The other stitches to form stitch sequences. These stitches sew in the machine until the machine is selected automatically and a pop-up screen for individual preference settings appears on ,...
Instruction Manual - Page 38
Doing so will reduce the stitch width automatically and save broken needles and possible damage to normal sewing mode.
36 Note: Turning off the machine returns the machine to your machine. MIRROR IMAGE SETTING
Mirror image of a selected pattern can be selected by pressing the twin needle button, if the twin needle icon...
Instruction Manual - Page 42
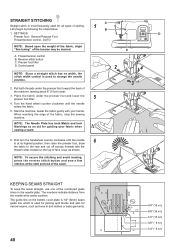
... at its center position. AUTO
NOTE: Based upon the weight of the fabric, slight "fine tuning" of the fabric, stop the sewing machine. A. Start the machine. Guide the fabric gently with the
thread cutter located on the top of face cover as shown. NOTE: To secure the stitching and avoid raveling, press the reverse...
Instruction Manual - Page 44
... side of the zipper foot.
Thread machine with different tension and stitch length combinations. Press the foot control and the machine will sew 4 stitches forward and then 4 stitches in forward and stop.
42 INSERTING ZIPPERS To sew down the left side, attach right side of foot to the cording. HAND-LOOK QUILT STITCH
This stitch is...
Instruction Manual - Page 46
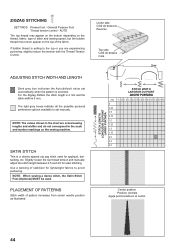
...
STITCH WIDTH LARGEUR DU POINT
ANCHO PUNTADA mm 0 0.5 1.0 1.5 2.0 2.5 3.0 3.5 4.0 4.5 5.0 5.5 6.0 0 0.25 0.5 0.75 1.0 1.25 1.5 1.75 2.0 2.5 3.0
Center position Position centrale Aguja posicionada en el centro
44 AUTO
The top thread may appear on the bottom depending on the thread, fabric, type of stitch and sewing speed, but the bobbin thread must never appear on the sewing machine.
Instruction Manual - Page 64

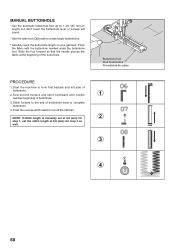
... "Changing presser foot" on a scrap of buttonhole patterns.
2. Stabilizer or regular interfacing can be used.
* Make a practice buttonhole on page 26 - 27.)
3. SEWING A BUTTONHOLE USING BUTTONHOLE FOOT
Your machine offers you are placed. Replace the presser foot with the selected button.
1. tab A Languette A Lengüeta A
tab B Languette B Lengüeta B
PROCEDURE...
Instruction Manual - Page 66
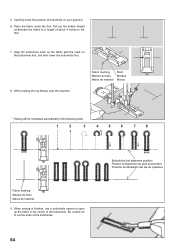
While holding the top thread, start the machine. Place the fabric under the foot.
Fabric marking Marque du tissu Marca de material
mark Marque Marca
* Sewing will be completed automatically in the center of buttonhole on the buttonhole foot, and then lower the buttonhole foot.
8. Be careful not to cut the ...
Instruction Manual - Page 70
Sew second bartack and stitch backward until needle
1
reaches beginning of
buttonhole. 2. Buttonhole foot Pied boutonnière Prensatelas de ojales
PROCEDURE
1. Start the machine to form first bartack and left side of buttonhole.
3. NOTE: If stitch length is manually set at 0.8 (mm) for
2
step 1, set the stitch length at ...
Instruction Manual - Page 76
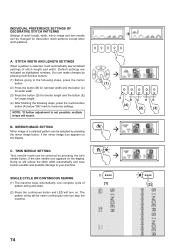
...indicated as highlighted numbers.
C. SINGLE CYCLE OR CONTINUOUS SEWING
(1) The machine sews automatically one complete cycle of pattern string and stops... the display. The pattern string will automatically sew at default settings of stitch length and width. MIRROR IMAGE SETTING
Mirror image of a selected pattern can be sewn continuously until you stop the machine.
(1)
A
BC...
Similar Questions

I Have Threaded And Retreaded This Machine Dozens Of Times And Tension Is Still
the tension is a mess - creates a birds nest mess on underside of fabric- it will work for a few sti...
the tension is a mess - creates a birds nest mess on underside of fabric- it will work for a few sti...
(Posted by Anonymous-165169 5 years ago)

Thread When Sewing Doesn't Catch Bobbin Thread, What Do I Do?
How do I fix this problem? When I pull the thread it was only the spool thread.
How do I fix this problem? When I pull the thread it was only the spool thread.
(Posted by arcand1772 9 years ago)

New Machine Bottom Tensionproblem
Hello, New machine used 1 hour broke needle now bottom tension will not lift up or down. Replaced ne...
Hello, New machine used 1 hour broke needle now bottom tension will not lift up or down. Replaced ne...
(Posted by noblegtecnn 9 years ago)

Beeping From Singer Sewing Machine Stylist Ii 5625
My sewing machine will beep and stop sewing after three inches of sewing. I have taken it to be repa...
My sewing machine will beep and stop sewing after three inches of sewing. I have taken it to be repa...
(Posted by arusheria 9 years ago)
