Singer 5625 Stylist II Sewing Machine Support Question
Singer 5625 Stylist II Sewing Machine Support Question
Find answers below for this question about Singer 5625 Stylist II Sewing Machine.Need a Singer 5625 Stylist II Sewing Machine manual? We have 1 online manual for this item!
Question posted by mommarow on June 13th, 2014
Problems Understanding My Buttonhole Feature I Dont Understand The Instructions
The person who posted this question about this Singer product did not include a detailed explanation. Please use the "Request More Information" button to the right if more details would help you to answer this question.
Current Answers
Related Singer 5625 Stylist II Sewing Machine Manual Pages
Instruction Manual - Page 2
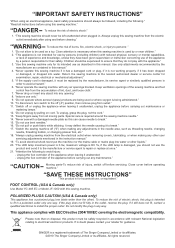
..., sensory or mental capabilities, or lack of experience and knowledge, unless they have been given supervision or instruction concerning use of the appliance by persons (including children) with the appliance." 3. "IMPORTANT SAFETY INSTRUCTIONS"
"When using this sewing machine."
To reduce the risk of electric shock, this plug is damaged, it unattended: - "If the supply...
Instruction Manual - Page 5
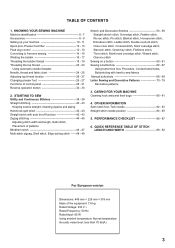
... Satin stitch foot, Twin needle 82 - 83 Straight stitch needle position 84 - 85
5. KNOWING YOUR SEWING MACHINE Machine identification 6 - 7 Accessories 8 - 9 Setting up your machine 10 - 11 Spool pins, Presser foot lifter 12 - 13 Feed dog control 12 - 13 Converting to -sew fabrics Manual buttonhole 68 - 69 Letter Sewing and Decorative Patterns 70 - 79 Decorative patterns
3.
Instruction Manual - Page 8

...KNOWING YOUR SEWING MACHINE
MACHINE IDENTIFICATION
1. Pre-tension guide 2. Thread cutter/holder 7. Extension table (Accessory box) 8. Bobbin winder stop 10. Reverse stitch button 11. Cord socket 16. Identification plate 17. Buttonhole lever 20. Thread guide 22. Needle 24. Needle bar 26. General purpose foot 30. Power line cord 34. Instruction manual
2 3 4 5 6 7
12...
Instruction Manual - Page 10

... additional bobbins, be used for needle plate 10. Open toe foot 27. Buttonhole opener/brush/seam ripper 9. Blind foot 12.
Button sewing foot 18. Quarter-Inch foot 20. ACCESSORIES
1. Needles 2. Spool pin cap (large) 8. Screwdriver for the majority of your Sewing machine is another very useful foot and should be sure they are Class...
Instruction Manual - Page 14
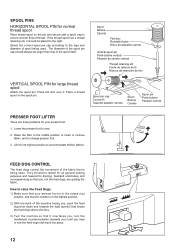
...three positions for your presser foot is being used. They should be raised for all general sewing purposes and lowered for darning, freehand embroidery and monogramming so that the needle is in the...counterclockwise (towards the right (symbol that shows the feed dogs above the line).
3) Turn the machine so that is in the highest position.
2) With the back of the spool itself.
FEED DOG...
Instruction Manual - Page 16

... the extension table, hold it firmly with both hands and pull it provides a large working surface as a standard flat-bed model. CONVERTING TO FREE-ARM SEWING
Your machine can be used either as a flat-bed or as shown. To replace, slide the extension table back into a slim free-arm model for...
Instruction Manual - Page 20

... on top of the bobbin, pull the
5
thread until it is snipped with
cutter on the needle plate until it stops in the slot (B). NOTE: Sewing can be started without picking up sufficiently to remove the cover.
3. THREADING THE BOBBIN THREAD
1. Remove the bobbin cover plate by rotating the hand
1
wheel...
Instruction Manual - Page 22

... check:
1.) With the presser foot raised, pull the thread towards the the back of the machine. Always be obtained.)
B. Thread the machine with your left hand while firmly gripping the thread with your right hand in the following page for instructions on operation of the Automatic Needle Threader.)
IMPORTANT: To verify that the...
Instruction Manual - Page 26
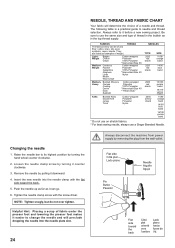
... the hand wheel counter clockwise.
2. Push the needle up as far as it before a new sewing project.
Raise the needle bar to needle and thread selection. FABRICS The fabrics below can go.... 6. Insert the new needle into the needle plate slot.
24
Always disconnect the machine from the wall-outlet.
Changing the needle
1. NOTE: Tighten snugly, but do not over tighten. Helpful ...
Instruction Manual - Page 28
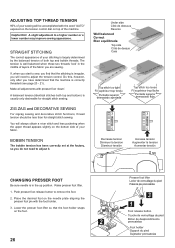
... Helpful Hint: A slight adjustment to remove the foot. 2. ZIG ZAG and DECORATIVE SEWING
For zigzag sewing and decorative stitch functions, thread tension should be accomplished with the word "AUTO" exposed... lifter. 1. Lower the presser foot lifter so that the machine is usually only desireable for straight stitch sewing.
STRAIGHT STITCHING
The correct appearance of your fabric. The tension...
Instruction Manual - Page 30
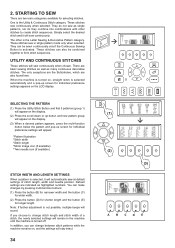
... or mode.
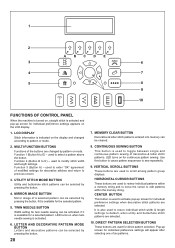
2. Function 3 (Button A) - UTILITY STITCH MODE BUTTON
Utility and buttonhole stitch patterns can be selected by pressing the button.
4. LETTER AND DECORATIVE PATTERN MODE BUTTON... when twin needle sewing is available for twin needle sewing can be selected by pattern or mode. 1
2
A BC DE
3
6
4
7
5
8
9
10
FUNCTIONS OF CONTROL PANEL
When the machine is turned on...
Instruction Manual - Page 32
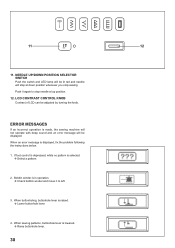
... is displayed, fix the problem following the instructions below.
1. When sewing patterns, buttonhole lever is selected. Select a pattern.
2. N EEDLE UP/DOWN POSITION SELECTOR SWITCH
Push the switch and LED lamp will be lit red and needle will be adjusted by turning the knob. When buttonholing, buttonhole lever is made, the sewing machine will not operate with beep...
Instruction Manual - Page 34

The position of the tacking stitches will continue to sew in the pattern where the reverse/tacking stitch button is pushed. The machine will be at the start and end of other stitches ( ) The sewing machine makes 4 tiny tacking stitches to tie off the sewing pattern to avoid raveling at the exact spot in reverse as...
Instruction Manual - Page 36
... with other is activated. The other stitches to change between stitch patterns while the machine remains on the LCD display. The only exceptions are the Buttonholes, which are two main categories available for longer length. Default settings are basic sewing stitches as well as highlighted numbers. In addition, you choose to create stitch...
Instruction Manual - Page 38
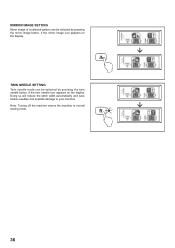
... the twin needle icon appears on the display.
Doing so will reduce the stitch width automatically and save broken needles and possible damage to normal sewing mode.
36 Note: Turning off the machine returns the machine to your...
Instruction Manual - Page 64

... B Lengüeta B
PROCEDURE
* Use an interfacing in the area of buttonhole patterns.
2.
Then try the buttonhole with the buttonhole foot. (Refer to "Using buttonhole foot" above.)
4. Select one of the garment where buttonholes are using. Replace the presser foot with the selected button.
1. SEWING A BUTTONHOLE USING BUTTONHOLE FOOT
Your machine offers you are placed.
Instruction Manual - Page 66
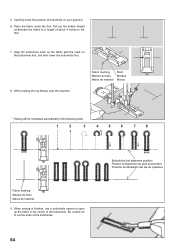
... on the fabric with the mark on your garment.
6. While holding the top thread, start the machine. When sewing is finished, use a buttonhole opener to cut the ends of buttonhole on the buttonhole foot, and then lower the buttonhole foot.
8. Place the fabric under the foot.
Be careful not to open up the fabric in the...
Instruction Manual - Page 68
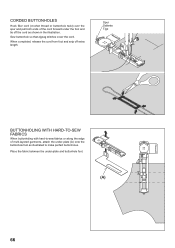
... edge of the cord forward under the foot and tie off extra length. Sew buttonhole so that zigzag stitches cover the cord. Place the fabric between the under-plate and buttonhole foot.
(A)
66 CORDED BUTTONHOLES
Hook filler cord (crochet thread or buttonhole twist) over the spur and pull both ends of multi-layered garments, attach...
Instruction Manual - Page 70
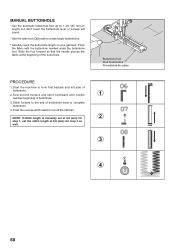
... the needle pierces the fabric at 0.8 (mm) for
2
step 1, set the stitch length at the beginning of buttonhole mark to the end of the buttonhole. Sew second bartack and stitch backward until needle
1
reaches beginning of
buttonhole. 2. NOTE: If stitch length is manually set at 0.8 (mm) for step 3 as
well.
3
4
68 Stitch forward to...
Instruction Manual - Page 88
... 24
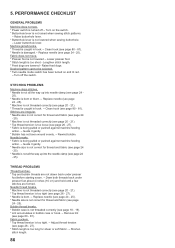
- 25). * Needle is caught in hook. - Raise buttonhole lever. * Buttonhole lever is not lowered - Lower buttonhole lever. Machine jams/knocks. * Thread is not all the way up into needle... hold until a few stitches are lowered - PERFORMANCE CHECKLIST
GENERAL PROBLEMS
Machine does not sew. * Power switch is not raised when sewing stitch patterns.
- Turn on and lit red.
- Turn ...
Similar Questions

Buttonhole Does Not Do An Automatic Size From Button? Troubleshoot? Does Pull
(Posted by Wildpeg 10 months ago)

Instructions For Machine Cutter Attachment Or Serger
(Posted by brendaprather 9 years ago)
Rotten Stiches
bottom stiches are loose looks like the under thread is just lying on top of fabrick being caut by t...
bottom stiches are loose looks like the under thread is just lying on top of fabrick being caut by t...
(Posted by peppersmom2u 9 years ago)

Beeping From Singer Sewing Machine Stylist Ii 5625
My sewing machine will beep and stop sewing after three inches of sewing. I have taken it to be repa...
My sewing machine will beep and stop sewing after three inches of sewing. I have taken it to be repa...
(Posted by arusheria 9 years ago)

Needle/bobbin Threading Problem
needle seems to be "hitting" something and it's not catching the bobbin thread. the bobbin doesn't a...
needle seems to be "hitting" something and it's not catching the bobbin thread. the bobbin doesn't a...
(Posted by acoe1129 10 years ago)