Singer 5523 SCHOLASTIC Support Question
Singer 5523 SCHOLASTIC Support Question
Find answers below for this question about Singer 5523 SCHOLASTIC.Need a Singer 5523 SCHOLASTIC manual? We have 1 online manual for this item!
Question posted by 47jwilson on September 10th, 2016
Feed Dog Switch Not Working!
what to do when it will not sew and move material?
Current Answers
Answer #1: Posted by waelsaidani1 on September 10th, 2016 7:07 AM
waelsaidani1

Member since:
May 12th, 2013 Points: 19,501,797

Member since:
May 12th, 2013 Points: 19,501,797
You have to open it up and check if something is blocking it. here is a video guide: https://www.youtube.com/watch?v=cSxW8i760Qc
Related Singer 5523 SCHOLASTIC Manual Pages
Instruction Manual - Page 2
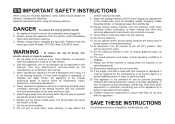
...working properly, if it must be used by persons (including children) with reduced physical, sensory or mental capabilities, or lack of the appliance by a person responsible for their safety. 21. Switch the sewing machine off the machine or unplug when the machine...in. 2. WARNING - Close attention is necessary
when this sewing machine. Never operate the appliance with
same type rated 15 ...
Instruction Manual - Page 6
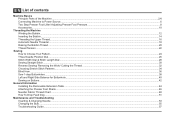
... Sewing/ Removing the Work/ Cutting the Thread ...32 Choosing Stretch Stitch Patterns ...34 Blind Hem ...36 Sew 1-step Buttonholes ...38 Left and Right Side Balance for Buttonhole ...40 Sewing on Buttons ...42
General Information Installing the Removable Extension Table ...44 Attaching the Presser Foot Shank ...46 Needle/ Fabric/ Thread Chart ...48 How To Drop Feed Dog...
Instruction Manual - Page 9
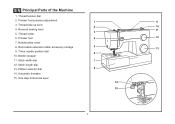
EN Principal Parts of the Machine
1. Thread cutter
6. Bobbin stopper
11. One step buttonhole lever
14
15
2 Reverse sewing lever
11
3
5. Presser foot
4
12
7. Presser foot pressure adjustment
1
9
3. Removable extension table/ accessory storage
5
13
9. Three needle position dial
6
10. Stitch length dial
13. Needle ...
Instruction Manual - Page 11

...feed control
29. Handwheel
20. Buttonhole stitch balance adjustment slot
18
21. Presser foot lifter 22
28. Main plug socket
23. Face plate
20
26. Power cord
4
23 24 25 26 27
29 30
28 Upper thread guide
25. Hole for second spool pin
17
19. EN Principal Parts of the Machine...
16. Horizontal spool pin
17. Power and light switch 19
22. Bobbin...
Instruction Manual - Page 13
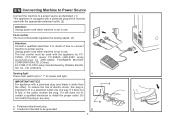
... by Wakaho Electric Ind. If it does not fit fully in any way. Polarized attachment plug
b. Unplug power cord when machine is intended to power source. Co., Ltd. (Vietnam)
Sewing light
1
Press main switch (A) to be used with a polarized plug (one way. Do not modify the plug in the outlet, reverse the plug...
Instruction Manual - Page 15
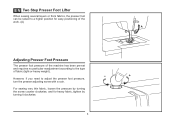
... a higher position for heavy fabric, tighten by turning it clockwise.
8 For sewing very thin fabric, loosen the pressure by turning the screw counter clockwise, and for easy positioning of the work. (A)
A
Adjusting Presser Foot Pressure
The presser foot pressure of the machine has been pre-set and requires no particular readjustment according to...
Instruction Manual - Page 17
... 006917008
006016008
0061850081
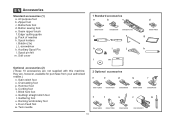
10 Buttonhole foot d. they are not supplied with this machine; Hemmer foot q. Blind hem foot s. Zipper foot c. Seam ripper/ brush f. Gathering foot u. Auxiliary Spool Pin l. Satin stitch foot o. Overcasting foot p. Edge/ quilting guide g. Even Feed foot w. Cording foot r. Darning/ embroidery foot v. Pack of needles h. Spool holders...
Instruction Manual - Page 19

....
Wind thread clockwise around bobbin winder tension discs. (4)
- Hold thread end. (7) 1
- Please Note:
When the bobbin winder spindle is in "bobbin winding"
position, the machine will not sew and the handwheel turn. Thread bobbin as illustrated and place on foot control pedal. (8)
- Place thread and corresponding spool holder on to right. (6)
- EN...
Instruction Manual - Page 21
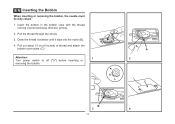
Pull out about 15 cm (6 inches) of thread and attach the bobbin cover plate. (C)
Attention:
1
Turn power switch to off ("O") before inserting or
removing the bobbin. Pull the thread through the slit (A).
3.
Insert the bobbin in the bobbin case with the thread running ...
Instruction Manual - Page 31

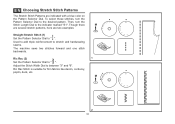
...the stitch patterns available on page 34.
The Pattern Selector Dial may be turned in gray. a
b
c d e
a. Reverse Sewing Lever b.
Stitch Length Dial e. To select the patterns indicated with the gray color, turn the Pattern Selector Dial. (e) Use ...the Pattern Selector Dial in blue.
Use the Stitch Width Dial (c) to sew these stretch patterns is on the machine. Stitch Width Dial d.
Instruction Manual - Page 33
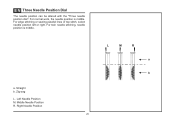
Left Needle Position M.
Straight b. For normal work, the needle position is middle. For edge stitching or sewing parallel lines of top stitch, select needle position left or right. Right Needle Position
26
L
M
R
a b a. Zig-zag L. EN Three Needle Position Dial
The needle position ...
Instruction Manual - Page 37
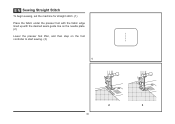
EN Sewing Straight Stitch
To begin sewing, set the machine for straight stitch. (1) Place the fabric under the presser foot with the fabric edge lined up with the desired seam guide line on the needle plate. (2) Lower the presser foot lifter, and then step on the foot controller to start sewing. (3)
1
2
3
30
Instruction Manual - Page 39
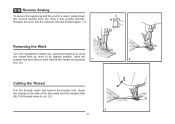
... secure the beginning and the end of the face plate and into thread cutter (B). Sew a few reverse stitches. Pull threads down
the reverse sewing lever (A). A
Release the lever and the machine will sew forward again. (1)
Removing the Work
Turn the handwheel toward you (counterclockwise) to bring
the thread take up lever to the side of...
Instruction Manual - Page 41
... patterns, here are indicated with a blue color on the Pattern Selector Dial. Ric Rac (2) Set the Pattern Selector Dial to stretch and hardwearing seams. The machine sews two stitches forward and one stitch backwards. Ric Rac Stitch is suitable for firm fabrics like denim, corduroy, poplin, duck, etc. Adjust the Stitch Width...
Instruction Manual - Page 43
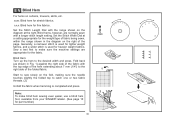
...the hem extending about 7 mm (1/4") to the
right side of the folded fabric.
1
Start to sew slowly on the fold, making sure the needle touches slightly the folded top to the desired width and ... weight
fabrics, and a wider stitch is completed and press.
2 Note: To make sure the machine settings are normally sewn
with a longer stitch length setting.
EN Blind Hem
For hems on the right...
Instruction Manual - Page 45
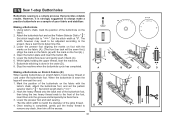
..., it back (C). 6. Making a Buttonhole 1. Sew a test first to " ". Open the button plate and insert the button (B). 5. Stop the machine when the buttonhole cycle has completed. Using tailor's...to match the diameter of your fabric and stabilizer. While lightly holding the upper thread, start sewing.
*Set the stitch width to the project. Attach the buttonhole foot and set the pattern
...
Instruction Manual - Page 49
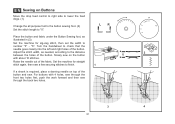
... to right side to lower the feed dogs. (1)
Change the all purpose foot to the button sewing foot. (2) Set the stitch length to finish.
1
If a shank is required, place a darning needle on the button with 4 holes, sew through the front two holes first, push the work forward and then sew through the back two holes.
3
4
42...
Instruction Manual - Page 58

To raise (a) and lower (b) feed dog. (2)
1
2
51
a
ba
b EN How To Drop Feed Dog
For ordinary sewing, keep the feed dog up, for freehand embroidery, sewing on buttons and darning, drop the feed dog.
Instruction Manual - Page 60
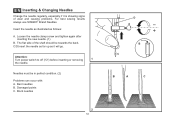
... & Changing Needles
Change the needle regularly, especially if it will go. Attention:
Turn power switch to off ("O") before inserting or removing
1
the needle. Blunt needles
2
53
D A
B C
B
A
C
The flat side of wear and causing problems. For best sewing results always use SINGER® Brand Needles. Damaged points C. C/D.Insert the needle as far up...
Instruction Manual - Page 64
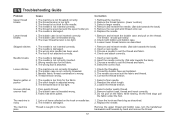
...damaged. 3. Poor quality thread. 2. Lint or oil have collected on the fabric while sewing, let the feed dogs pull
the fabric under the foot.
1. Insert a new needle. 2. The bobbin case...and reinsert the bobbin case and pull on the thread. Insert a new needle. 3. The machine is attached.
1.
The needle is not attached correctly.
1. Loosen lower thread tension as ...
Similar Questions

Singer 7470 Machine Feed Dog Not Working Howi Do I Get The Back Of The Case
advise on getting the back case of Feed dog not working going up or down Feed dog is making a noise ...
advise on getting the back case of Feed dog not working going up or down Feed dog is making a noise ...
(Posted by Mariawatson2218 2 years ago)

Feed Dogs Remain Lower
My Feed Dogs Are Not Moving They Remain Lowered. Before There Was Clanking Sound Coming From The Bob...
My Feed Dogs Are Not Moving They Remain Lowered. Before There Was Clanking Sound Coming From The Bob...
(Posted by donna5905 3 years ago)

Sewing Machine Model 5523 Page 53 In Manual Does Not Show Me How To Attach Pres
The page in your instructions I had and was reading it when it deleted
The page in your instructions I had and was reading it when it deleted
(Posted by ramseyrobert 7 years ago)

Machine Not Sewing - Seems Like Motor Is Slipping After Winding Bobbin
After filling the bobbing and switching the bobbin into sewing mode, the motor makes a noise but the...
After filling the bobbing and switching the bobbin into sewing mode, the motor makes a noise but the...
(Posted by cvaughn1532 9 years ago)

Feed Dog Won't Come Back Up.
I tried moving the feed dog lever back and forth and I also held the lever for the up postition whil...
I tried moving the feed dog lever back and forth and I also held the lever for the up postition whil...
(Posted by fmjenness 10 years ago)