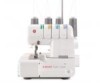
Singer 14J250 Stylist II Serger Support Question
Singer 14J250 Stylist II Serger Support Question
Find answers below for this question about Singer 14J250 Stylist II Serger.Need a Singer 14J250 Stylist II Serger manual? We have 1 online manual for this item!
Question posted by SandyWagner on February 27th, 2014
Do It Yourself Repair Manual
My sister gave me her serger. I would like to try to fix it myself. How can I find the repair manual (not user manual) for the 14J250 stylist 2 serger?
Current Answers
Related Singer 14J250 Stylist II Serger Manual Pages
Instruction Manual - Page 2

... machine." "To disconnect, turn switch to electrical/ electronic products. "Always unplug sewing machine from all instructions before using and before carrying out any other user
...
1 "This appliance is intended to install the proper outlet. "Use this manual. All rights reserved.
Return the sewing machine to persons: " 1. Unplug the foot controller of lint, dust, and ...
Instruction Manual - Page 7
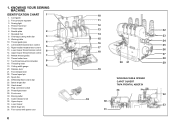
...3. Lower looper thread tension control
6
14. Thread spool pin
23. Hand wheel
27. Front cover
30. Upper looper
33. Stitch finger (A)
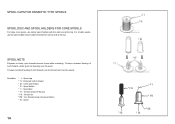
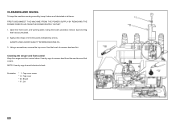
35. 1. KNOWING YOUR SEWING MACHINE
IDENTIFICATION CHART 1
1. Sewing light
4. Needle thread guides
7
16. Two thread convertor instruction
8
18. Release lever
21. Spool disc
24. Differential feed control dial
25. Foot control with...
Instruction Manual - Page 9
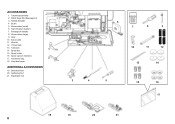
... nets
13. Accessory bag
2
18. Package of needles
8. Extra cutter
11. Two-thread converter
2. Stitch finger (B) (See page 44)
3. Spool disc
1
15. Spool cap (on machine)
17. Vinyl dust cover
ADDITIONAL ACCESSORIES
19. Screw driver (large)
9. Spool holder
16. Blind hem foot 20. Wrench
12. Needle threader
4. Tweezers 14. Screw driver...
Instruction Manual - Page 11
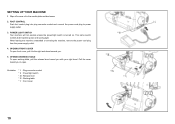
... lever toward you .
5. SETTING UP YOUR MACHINE
1. Illustration
* I : Plug connector socket * II : Power/light switch * III : Release lever ...machine unattended or servicing the machine, remove the power cord plug from the power supply outlet.
4.
POWER/ LIGHT SWITCH Your machine will not operate unless the power/light switch is turned on. This same switch controls both machine power and sewing...
Instruction Manual - Page 13

Illustration * I : Thread guide
* II : Thread guide pole
12 For storage, use the thread guides on the pole to hold thread spools on the spool stand by pushing down on ...
Instruction Manual - Page 15
... spools.
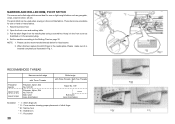
To keep consistent feeding of such threads, use the same rubber spool holders but with the wide end at the top. Illustration
* I : Spool cap * II : Domestic cotton thread * III : Cone type thread * IV : Spool holder * V : Spool disc * VI : Thread comes off the top *VII : Thread net *VIII : Turn thread net...
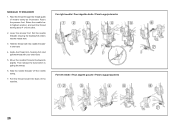
Instruction Manual - Page 17
... needle holes. 3. Loosen needle clamp screw to remove the foot. 2. Illustration
* I : Foot release lever * II : Needle clamp screw * III : Flat side away from you, into the needle bar as far as illustrated. ...remove the needle, and place new needle with flat side away from you.
16
*I
*III
*II
CHANGING PRESSER FEET
Be sure needle is built in the up position. Trim thread near the end...
Instruction Manual - Page 19

..., vous devez faire attention à cette particularité des surjeteuses.
When purchasing thread for sewing, especially if it is very useful for different types of thread as the needles. NEEDLE, ... 50 Cotton No. 60 Polyester No. 60 - 50 Bulk Nylon
NEEDLE
90 (14) for general
sewing 75 (11) for light weight fabrics
* Synthetic threads are recommended for your project.
18
TABLEAU DES ...
Instruction Manual - Page 21

Raise needle to master the correct threading before test sewing. Feed the thread through tension slot. Pass the thread through thread guide as ...from needle eye first, then re-thread the lower looper. STARTING TO SEW
THREADING YOUR MACHINE
Wrong threading may cause skipped stitches, breaking threads, or other problems. Try to its highest point by the
arrow. Open the front cover and...
Instruction Manual - Page 27
... thread into the needle hole.
3. Pull the thread toward the back of needle clamp as illustrated. Feed the thread through the thread guide of the machine. Take the needle threader off the needle clamp.
7. Set the needle threader ensuring the hooking fork enters into hooking fork and pull the thread with...
Instruction Manual - Page 31
... 6 cm) of extra stitches are properly formed.
2. Check thread tensions by test sewing on most fabrics except bulky materials.) Guide the fabric gently as machine automatically feeds the material.
3. Rotate the hand wheel toward
you plan to sew and test sew in test fabric under the presser foot by pushing thread cutter lever down...
Instruction Manual - Page 33

...to use heavy thread.
32
4. Incorrect tension setting causes stitch skipping. SETTING CHART
Number of scrap you sew light or heavy weight fabric. 3.
The following advice can help you use
Left and Right Left
Right... will improve your stitching in the
needle bar (see page 16). Try test-sewing with wooly nylon thread, set the thread tension control dial at ← 2 →.
Instruction Manual - Page 37
... thread use the left needle.
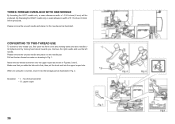
Please remove the unused needle and place it in the needle pad as shown in Fig. 1. Illustration * I : Two-thread converter * II : Upper looper
36 Make sure that you . Attach the two-thread converter onto the upper looper as illustrated. When not using the converter, insert it...
Instruction Manual - Page 39
The picot stitch can be used when sewing on hard or heavy fabrics.
1. NOTE: 1.
Raise the presser foot.
2. When ...nylon (less stretchable)
Illustration
* I : Stitch finger (A) * II : Cross section showing proper placement of stitch finger * III : Narrow hem * IV : Rolled hem * V : Picot stitch
38 Set the machine according to the Setting Chart on light weight fabrics such as illustrated...
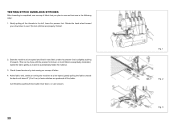
Instruction Manual - Page 45
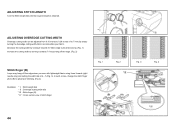
... the Overedge cutting width dial to get proper stitching. (Fig. 4)
Illustration
* I : Stitch length dial * II : Overedge cutting width dial * III : Stitch finger (B) * IV : Cross section view of stitch finger
Fig...off the edge. (Fig. 2)
Stitch finger (B)
Loops may hang off the edge when you sew with lightweight fabric using three threads (right needle only) and setting the width dial at 4...
Instruction Manual - Page 47
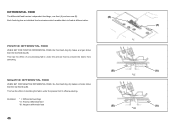
... SET FOR POSITIVE DIFFERENTIAL FEED, the front feed dog (A) makes a longer stroke than the rear feed dog (B). Illustration
* I : Differential feed dogs * II : Positive differential feed *III : Negative differential feed
46
* I
(B)
* II
(B)
* III
(A) (A) (A)
This has the effect of stretching the fabric under the presser foot to feed at different ratios. DIFFERENTIAL FEED
The...
Instruction Manual - Page 49

... settings give the best ratio of fabric can be sewn on this machine. SEWING WITH EXTRA HEAVYWEIGHT FABRIC OR MULTIPLE LAYERS OF FABRIC
A wide range of feeding. Illustration * I : Differential feed control dial * II : Increase *III : Decrease *IV : Tighten * V : Loosen *VI : Cutter release mechanism screw.
48 The adjustment can be made between 0.7 (negative effect...
Instruction Manual - Page 55
... DECORATIVE EFFECTS
In addition to normal overlocking, which is fully described in this instruction book, your machine can also be achieved. using three threads (flat seam) Fold fabric along the edge.
Decorative ... the ends of fabric wrong sides together and overlock along the line to be top-stitched and sew over a cord or braid, holding it carefully with both hands. (See pages 58-59)
NOTE...
Instruction Manual - Page 59
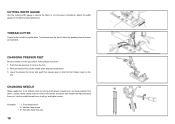
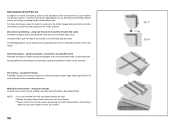
...: You should not need to sew without cutting, open the working table. Remove the stitch finger. 1. CARING FOR YOUR MACHINE
REPLACING THE CUTTER
Replace the Moving...fixed cutter which is made of a special hard alloy material. CHANGING THE LIGHT BULB
Disconnect from power supply before removing face cover. In this position, set the replacement cutter in your accessories.
* I : Screw * II...
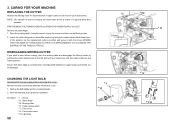
Instruction Manual - Page 61
... * II : Top cover * III : Brush * IV: Oil
60 Use the brush to the points indicated by arrows.
Open the front cover and working table. Use dry rags to avoid electrical shock. Cleaning the serger and foot control
Keep the serger and foot control clean. NOTE: U se dry rags to remove dust from the machine...
Similar Questions


I Get E7 Error Message On My Singer Model 7258 Sewing Machine. There Is No Refe
Error message E7 is up on my Singer Stylist model 7258 sewing machine. It is not working at all. I t...
Error message E7 is up on my Singer Stylist model 7258 sewing machine. It is not working at all. I t...
(Posted by ebellamybellamy9 5 years ago)

Serger Thread Pole Flops All Over, Raises Up But Wiggles All Over, Whats Wrong?
(Posted by jm118114 9 years ago)

Beeping From Singer Sewing Machine Stylist Ii 5625
My sewing machine will beep and stop sewing after three inches of sewing. I have taken it to be repa...
My sewing machine will beep and stop sewing after three inches of sewing. I have taken it to be repa...
(Posted by arusheria 9 years ago)

I Am Trying To Down Load To My Reader But I Have Not Been Able To Do So.
Can I have a manual for the singer stylist II serger 14J250 mail to my home.
Can I have a manual for the singer stylist II serger 14J250 mail to my home.
(Posted by pcriss41 10 years ago)