Singer 14J250 Stylist II Serger Support Question
Singer 14J250 Stylist II Serger Support Question
Find answers below for this question about Singer 14J250 Stylist II Serger.Need a Singer 14J250 Stylist II Serger manual? We have 1 online manual for this item!
Question posted by pcriss41 on November 12th, 2013
I Am Trying To Down Load To My Reader But I Have Not Been Able To Do So.
Can I have a manual for the singer stylist II serger 14J250 mail to my home.
Current Answers
Related Singer 14J250 Stylist II Serger Manual Pages
Instruction Manual - Page 2

... 15 watts." SINGER is required around the sewing machine needle." 14.
Please note that they have been given supervision or instruction concerning use by the manufacturer, its affiliates. "This sewing machine should never be followed, including the following to avoid injury:
- Replace bulb with relevant National legislation relating to break." 17. "Use this manual. "DANGER...
Instruction Manual - Page 7
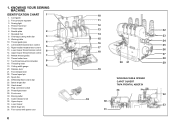
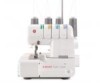
KNOWING YOUR SEWING MACHINE
IDENTIFICATION CHART 1
1. Overedge cutting width dial
3
9. Right needle thread tension control
5
13. Needle thread guides
7
16. Cutting width gauge
9
20. Thread spool pin
23. Differential feed control dial
25. Hand wheel
27. Power/light switch
29. Foot pressure regulator
3. Sewing light
4. Standard foot
8. Left needle thread tension control ...
Instruction Manual - Page 9
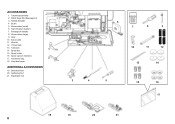
Screw driver (small)
6. Package of needles
8. Extra cutter
11. Tweezers 14. Two-thread converter
2. Spool holder
16. Brush
5. Spool cap (on machine)
17. Gathering foot 21. Elasticator foot
6
7
8
9
3
4
5
10
11
12
13
14
15
16
17
18
19
20
21
8 Tape measure (option)
7. Thread nets
13. Accessory ...
Instruction Manual - Page 11
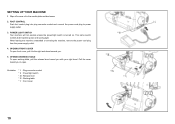
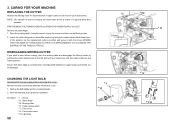
OPENING FRONT COVER To open . Pull the cover toward you .
5. This same switch controls both machine power and sewing light. Illustration
* I : Plug connector socket * II : Power/light switch * III : Release lever * IV: Working table * V : Front cover
10 Wipe off excess oil in the needle plate and bed areas.
2. OPENING WORKING ...
Instruction Manual - Page 13

... lower it click. Then place thread spools on pins on the spool stand and draw thread through thread guides on the pins. Illustration * I : Thread guide
* II : Thread guide pole
12 Place spool discs on the pole from rear to front. PREPARATION FOR THREADING THREAD GUIDE POLE
Pull up thread guide pole...
Instruction Manual - Page 19

...devez faire attention à cette particularité des surjeteuses. NEEDLE, THREAD AND FABRIC CHART
Use SINGER Cat. No. 2022. NOTE : G arder en mémoire que les boucleurs inférieur...threads are recommended for your project.
18
TABLEAU DES FILS ET MATIERES
Utiliser SINGER Cat. When purchasing thread for sewing, especially if it is very useful for different types of thread as the...
Instruction Manual - Page 21

... pull down with right hand firmly. 3.
Raise needle to master the correct threading before test sewing. Pull the lower thread through thread guide as indicated by turning hand wheel towards you, and... thread through tension slot. STARTING TO SEW
THREADING YOUR MACHINE
Wrong threading may cause skipped stitches, breaking threads, or other problems. Try to its highest point by the
arrow.
Instruction Manual - Page 27
NEEDLE THREADER
1. Feed the thread through the thread guide of the machine. Guide the thread into the needle hole.
3. Then release the hand which is pulling the thread.
6.
Raise the needle bar to highest position, and pull ...
Instruction Manual - Page 31
... tensions by test sewing on most fabrics except bulky materials.) Guide the fabric gently as machine automatically feeds the material.
3. Rotate the hand wheel toward
you plan to sew and test sew in test fabric under...down , or use a scrap of fabric. 4. At the fabric end, continue running the machine at low speed and feed in the following order: 1. Gently pulling all the threads to see...
Instruction Manual - Page 33

... → ← 4 → ← 4 → ← 4 →
← 4 → -
← 4 → ← 4 →
← 4 → ← 4 → ← 4 →
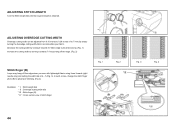
Stitch length control
2.5 - 3.5
2.5 - 3.5
Ref. Try test-sewing with a piece of threads
4
Overedge cutting width dial
← 6 →
6
Needle to use and find the best settings.
* When threading upper looper with...
Instruction Manual - Page 39
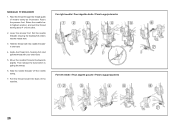
...stitch can be used when sewing on light weight fabrics such as georgette, crepe, crepe de chine, silk etc. Raise the presser foot.
2. Set the machine according to the Setting Chart...Three Threads with Two Threads
Nylon No. 100
Bulk nylon (less stretchable)
Illustration
* I : Stitch finger (A) * II : Cross section showing proper placement of stitch finger * III : Narrow hem * IV : Rolled hem * V :...
Instruction Manual - Page 45
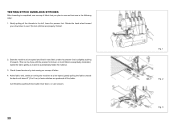
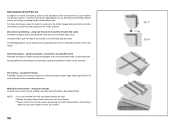
...the Overedge cutting width dial to get proper stitching. (Fig. 4)
Illustration
* I : Stitch length dial * II : Overedge cutting width dial * III : Stitch finger (B) * IV : Cross section view of stitch finger
...hang off the edge. (Fig. 2)
Stitch finger (B)
Loops may hang off the edge when you sew with lightweight fabric using three threads (right needle only) and setting the width dial at 4 - ...
Instruction Manual - Page 49

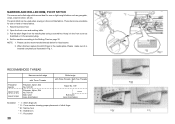
...to adjust it for most ordinary sewing. The machine is necessary, turn the overedge cutting width dial to decrease pressure.
For normal sewing without differential feed, set at ...Illustration * I : Differential feed control dial * II : Increase *III : Decrease *IV : Tighten * V : Loosen *VI : Cutter release mechanism screw.
48
SEWING WITH EXTRA HEAVYWEIGHT FABRIC OR MULTIPLE LAYERS OF FABRIC...
Instruction Manual - Page 51

... the arrow with your right hand (Fig. 3) For outside curves, place fabric under presser foot and sew up to 2 stitches beyond the inside corner. (4)
5.
Fold fabric to meet the folder edge. (2)... the fabric along the new
stitching line for about 1.18 inches (3 cm). Unfold the folded portion and sew the next edge of the fabric. (5)
1
2
3
4
TURNING CURVED EDGES
Apply pressure at point A...
Instruction Manual - Page 53

... the rear of the foot.
3. REMOVING STITCHES FROM SEWN FABRIC
To remove stitches already sewn, snip off needle thread(s) at the rear of the machine spool pin. Your machine is between the left and right needle threads as a crochet cotton, gimp, wool, knitting yarn, or shirring elastic at intervals and pull out...
Instruction Manual - Page 55
...Return cutter to the normal position by using three threads (flat seam) Fold fabric along the line to be top-stitched and sew over a cord or braid, holding it snaps into the "down" position. using two threads of using buttonhole twist or embroidery... - DECORATIVE EFFECTS
In addition to normal overlocking, which is fully described in this instruction book, your machine can be achieved.
Instruction Manual - Page 59
...table and disengage the Moving cutter by turning the cutter release knob toward you want to sew without cutting, open the working table. Illustration
* I
NOTE: You should not need... turn counterclockwise. 2. In this position, set the replacement cutter in your accessories.
* I : Screw * II : Stitch finger * III : Moving cutter * IV : Cutter release knob * V : Face cover * VI : Face cover screw ...
Instruction Manual - Page 61
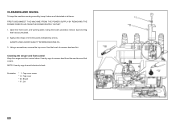
...serger and foot control clean.
Illustration
* I : Top cover screw * II : Top cover * III : Brush * IV: Oil
60 FIRST DISCONNECT THE MACHINE FROM THE POWER SUPPLY BY REMOVING THE POWER CORD PLUG FROM THE POWER SUPPLY OUTLET.
1. Apply a few drops of oil to remove dust from the machine...cover and working table. ALWAYS USE A GOOD QUALITY SEWING MACHINE OIL.
3.
Use dry rags to the points ...
Instruction Manual - Page 63
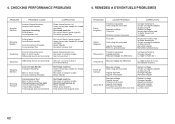
... guide pole not extended
CORRECTION
Reset thread tension (s) Insert correct size needle for thread and fabric Re-insert or replace needle Reset Needle
Re-thread machine Re-insert or replace needle Reset thread tension (s) Reset Needle Reset spool properly Fully extend thread guide pole
PROBLEME Points irréguliers
Casse d'aiguille...
Instruction Manual - Page 65

...; Remove stitch finger as follows:
Left needle: 4 Upper looper: 1 - 2 Lower looper: 7 - 8
SEW: • Remove Standard presser foot. OPTIONAL ACCESSORIES
PIPING FOOT
Prepare a piece of fabric. • Return cutter ... • Take one stitch with the hand wheel to lowest position. See pg. 32
SEW: • Remove Standard presser foot. Place piping between seam edges with Pearl foot. ...
Similar Questions


I Get E7 Error Message On My Singer Model 7258 Sewing Machine. There Is No Refe
Error message E7 is up on my Singer Stylist model 7258 sewing machine. It is not working at all. I t...
Error message E7 is up on my Singer Stylist model 7258 sewing machine. It is not working at all. I t...
(Posted by ebellamybellamy9 5 years ago)

Beeping From Singer Sewing Machine Stylist Ii 5625
My sewing machine will beep and stop sewing after three inches of sewing. I have taken it to be repa...
My sewing machine will beep and stop sewing after three inches of sewing. I have taken it to be repa...
(Posted by arusheria 9 years ago)

Do It Yourself Repair Manual
My sister gave me her serger. I would like to try to fix it myself. How can I find the repair manual...
My sister gave me her serger. I would like to try to fix it myself. How can I find the repair manual...
(Posted by SandyWagner 10 years ago)
