
Sanyo DP55441 Support Question
Sanyo DP55441 Support Question
Find answers below for this question about Sanyo DP55441.Need a Sanyo DP55441 manual? We have 1 online manual for this item!
Question posted by tyerone38 on January 3rd, 2013
Dp55441 The Number 1 Input Is Clear ,the Other Two Are Spotted When I Use Them.
The person who posted this question about this Sanyo product did not include a detailed explanation. Please use the "Request More Information" button to the right if more details would help you to answer this question.
Current Answers
Related Sanyo DP55441 Manual Pages
Owners Manual - Page 3

... prong are provided for choosing SANYO. Protect the power cord from the apparatus.
11. If the LCD TV
is used , use caution when moving the cart/ appliance combination to obtain maximum benefit of the LCD TV cabinet for proper grounding and,...a proper position.
or circuits. When installing an outside antenna system should be taken to the television equipment, be fatal.
6.
Owners Manual - Page 4

...can cause permanent discoloration or dark spots.
• Handling damage is not maintained properly. If this equipment does cause harmful interference to radio or television reception, which the receiver is ...energy efficiency, select default picture mode. Do not use excessive pressure when cleaning the screen; This equipment generates, uses and can be determined by the cabinet only. safety...
Owners Manual - Page 6

..., make sure there is strongly recommended to the TV with this stand should be installed on a flat surface with screw driver.
3 12 4
5 Installing Stand (55")
1 Place the LCD TV on a flat surface place where
2 Secure the stand to use a trained, authorized dealer. Leaving any object under the screen may cause damage on non...
Owners Manual - Page 7

...kit is not supplied. 2.
Do not position the unit in inches.
* Diagonal screen: 54.6 inches
WALL MOUNTING (OPTIONAL)
Use the screws that are in a confined area. Allow adequate space for proper ventilation.
52.3
4
36.5 33.5
3
29... of set weight. English
INSTALLATION POSITIONING THE LCD HDTV
Always use a firm-flat surface when positioning your HDTV to secure it to a wall mounting kit.
Owners Manual - Page 8

...new and old or batteries with marks inside the Remote Control. Please recycle used up batteries.
2 Antenna Connection for Clear QAM Cable channels. (see page 11)
For the best picture, connect ...or batteries to Search for off -air signals from a direct Cable TV connection. Analog or Clear QAM cable channels from an antenna.
This HDTV can receive ANY unscrambled RF signal being broadcast.
...
Owners Manual - Page 9

... Green (Y), Blue (Pb), Red (Pr) jacks, and matching Audio White (L) and Red (R) jacks.
Use for the best picture. COMPONENT VIDEO INPUT VIDEO2 or VIDEO3(YPbPr), PAGE 10 - A digital AV interface that accepts uncompressed video signals for updating the television's firmware and accessing JPEG files.
8
USB PORT, PAGE 25 - Connect digital video equipment to...
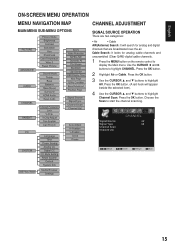
Owners Manual - Page 10

... Number, CC State, Channel Title, Video Resolution, Analog Sound information, and Program Rating. Analog Banner may contain: Channel Number,...menu.
MENU- GUIDE Button- NOTE : The Off Timer will clear all analog channel enabled). Press to exit from the menu, ...Press to switch to display channel information banner.
INPUT Button- Press to select digital channel D6.
...
Owners Manual - Page 11

...INPUT button to provide continued compatibility with Component-Y). VIDEO2 or VIDEO3 (YPbPr)
Connect Digital devices such as VIDEO2 or VIDEO3(YPbPr). Connect an analog device such as shown. NOTES:
• The VIDEO2 with Green video jack, White and Red audio jacks can be used...jacks asVIDEO2 or VIDEO3(YPbPr) on your HDTV to select the input signal as a HD Cable Box, HD Satellite Receiver, DVD ...
Owners Manual - Page 13

... shown. The signal can also include Dolby® Digital or PCM audio when available. 1 Connect the HDMI input and your external
device with this function)
1 Use an adapter (not supplied) to connect a DVI device to a HDMI1 input jack.
DVI TO HDMI
(Only HDMI1 is necessary. (refer to page 20)
2 Connect the audio out...
Owners Manual - Page 14

...in the PC input will not affect other end into the HDTV PC AUDIO INPUT jack. (Stereo Mini-Audio Cable not supplied). Move the image horizontally. Press the OK button.
2 Use the CURSOR &#... one end of a Stereo Mini-Audio cable into the PC Audio Out jack and the other input settings.
MANUAL ADJUSTMENT OPERATION
The Clock, Phase, Horizontal Position, and Vertical Position are set automatically...
Owners Manual - Page 15

... Sports
−− For basketball, boxing programs etc. −− Alive reddish flesh −− Clear announcements, powerful banging sounds
NOTE : When the "SPORTS" button is pushed, an OSD showing the current... sports mode will appear on the lower left of the screen. Once the channel or the input source is changed , the sports mode will automatically be set to "Off", and the "...
Owners Manual - Page 16
...Scan. Press the OK button. (A red hook will search for analog cable channels and
unscrambled (Clear QAM) digital cable channels.
1 Press the MENU button on the remote control to
display the ...Main menu. Press the OK button. Choose the
Scan to highlight CHANNEL. Use the CURSOR ◄ and ►
buttons to start the channel scanning.
Cable Search: It looks...
Owners Manual - Page 17
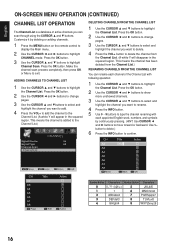
... highlight
the Channel List.
Press the OK button. Press the OK button.
3 Use the CURSOR ▲ and ▼ buttons to highlight
the Channel List.
Use 1-button to delete.)
6 Press the INFO button to confirm. Number Button Characters Number Button Characters
0
0.,?!`-()@/+=
5
JKLjkl5
1
1
6
MNOmno6
2
ABCabc2
7
PQRSpqrs7
3
DEFdef3
8
TUVtuv8
4
GHIghi4
9
WXYZwxyz9
16...
Owners Manual - Page 18

...Press the MENU button and then use the CURSOR
◄ and ► buttons to enter "Confirm" numbers. Lock-
If the password is ... ADJUSTMENT
This SANYO television is correct, it
will automatically return to the PARENT menu. Press the OK button.
4 Use the 0 - ... current displayed channel directly or current source input.
1 Press the MENU button and then use the CURSOR ◄ and ► ...
Owners Manual - Page 21

...HDMI Audio setting will select the audio input signal from the PC AUDIO INPUT port.
1 Press the MENU button on the remote control to display the Main menu.
2 Use the CURSOR ◄ and ►...; buttons to select
Reset or Cancel. During this setting, the audio input signal will appear in Digital. Analog- Press the OK button.
3 Use the CURSOR ▲ and ▼ buttons to highlight
Off, Low ...
Owners Manual - Page 22

...OSD Display Time
1 Press the MENU button on the remote control to display the Main menu.
2 Use the CURSOR ◄ and ► buttons to highlight ADVANCED. signals usually will be boosted or reduced...choices. Press the OK button. NOTE : The remote controls of HD, SD or PC inputs. Press the OK button.
3 Use the CURSOR ▲ and ▼ buttons to select Light Sensor.
NOTE:
• ...
Owners Manual - Page 23

... ◄ and ► buttons to the previous
ADVANCED menu.
Press the OK button. NOTE : Press the MENU button to return to select
month number. Press the OK button.
3 Use the CURSOR ▲ and ▼ buttons to select the Previous Page.
4 Press the OK button can return to select
Eastern, Central, Mountain, Pacific...
Owners Manual - Page 24

turn on TV at your panel.
1 Press the MENU button on the remote control to display the Main menu.
2 Use the CURSOR ◄ and ► buttons to highlight
SYSTEM.
3 Use the CURSOR ▲ and ▼...Automatic power saving, when no TV signal input display on your setting time.
1 Press the MENU button on the remote control to display the Main menu.
2 Use the CURSOR◄ and ► buttons ...
Owners Manual - Page 26
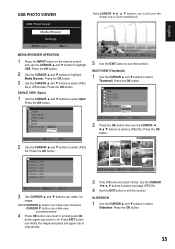
... Open. Press the OK button.
25 Press the OK button.
5 Use the EXIT button to select a JPEG file.
Press the OK button.
2 Press the OK button then use the CURSOR ▲ and ▼ buttons to highlight USB. CURSOR...(x2,x4)
English
MEDIA BROWSER OPERATION
1 Press the INPUT button on the remote control and use the CURSOR ◄
►▲ ▼ buttons to exit this function.
Owners Manual - Page 29

... screen
Pixilation of Digital image
Cannot select or scan some channels
No Cable channels above number 13
• Check if the program is broadcasting a • Press the CAPTION ... Check the external equipment connections.
• Check the external equipment settings.
• Press the INPUT button on the remote control.
• Check the external equipment connections.
• Check the ...
Similar Questions

Sanyo 27 Inch And 32 Inch Tv Set
What retailers in Northern Virginia sell Sanyo 27 in flat screen television set? What retailers in N...
What retailers in Northern Virginia sell Sanyo 27 in flat screen television set? What retailers in N...
(Posted by bbriston 9 years ago)

Can I Connect My Care Sara Hydrophone To My Sanyo Dp46840 Flat Panel Tv
(Posted by freespirittonya 9 years ago)
Can I Connect My Care Sara Hydrophone To My Sanyo Dp46840 Flat Panel Tv And How
(Posted by freespirittonya 9 years ago)

