
Sanyo DP55441 Support Question
Sanyo DP55441 Support Question
Find answers below for this question about Sanyo DP55441.Need a Sanyo DP55441 manual? We have 1 online manual for this item!
Question posted by jcroft on June 3rd, 2011
Sound Does Not Match With The Mouths On Some Channels
sound is ahead or behind the picture
Current Answers
Related Sanyo DP55441 Manual Pages
Owners Manual - Page 3

... are provided for choosing SANYO. If an outside antenna system,
4. NO USERSERVICEABLE PARTS INSIDE. REFER SERVICING TO QUALIFIED SERVICE PERSONNEL. Follow all servicing to the television equipment, be fatal.
6. Minimum clearance must be maintained. Please read all warnings. IMPORTANT SAFETY INSTRUCTIONS
1. Read these instructions. Heed all instructions to obtain maximum benefit...
Owners Manual - Page 4

...the dealer or an experienced radio/TV technician for energy efficiency." To ensure your television is connected. -
has determined that interference will not occur in accordance with the...for ENERGY STAR qualification.
Do not use excessive pressure when cleaning the screen;
Changing Picture Settings may increase energy consumption, possibly beyond the limits required for a Class B ...
Owners Manual - Page 5

... AUDIO 12 AUDIO OUT JACKS 12
PC CONNECTIONS 13 PC MONITOR OPERATION 13
SPORTS MODE 14
ON-SCREEN MENU OPERATION 15 MENU NAVIGATION MAP 15 CHANNEL ADJUSTMENT 15 CHANNEL LIST OPERATION 16 PARENT ADJUSTMENT 17 PICTURE/ AUDIO/ ADVANCED ADJUSTMENT 19 PICTURE 19 AUDIO 19 ADVANCED 20 SYSTEM 22 USB PHOTO VIEWER 25
4
HELPFUL HINTS -
Owners Manual - Page 6

...sure there is no object on it. The desk's surface must be installed on a flat and level place. Do not place it is strongly recommended to use a trained, authorized dealer. Installing... the display screen.
3 12 4
Uninstalling Stand (55")
1 Place the LCD TV screen facing down on a flat surface with soft materials (such as a blanket) for protecting the display screen.
2 Remove screws in 4 holes ...
Owners Manual - Page 8

...Match the "+" and "-" signs on -screen MENU to Search for off -air signals from a direct Cable TV connection. ANTENNA
OR
ANALOG/DIGITAL ANTENNA IN
CABLE
THE TUNER IN THIS HDTV CAN RECEIVE:
a. Digital and Analog off -air signals.
Analog or Clear QAM cable channels...2 Antenna Connection for Clear QAM Cable channels. (see page 11)
For the best picture, connect your Cable box or Satellite ...
Owners Manual - Page 9

...1 NPUT
GETTING STARTED-CONTROLS AND JACKS
Input / OK button
LEFT-SIDE PANEL BACK-SIDE PANEL
Y
PC INPUT
PC AUDIO
INPUT
Pb
Pr
Pb
L
Pr
R
..., and matching Audio White (L) and Red (R) jacks. A digital AV interface that accepts uncompressed video signals for updating the television's firmware and...D-SUB), PAGE 13 -
Use for the best picture. Use a Phono-Type (Coaxial) Digital Audio ...
Owners Manual - Page 10

... to select an option from the menu, when required. Press to select the desired audio mode, if available.
Digital Banner may contain: Channel Number, CC State, Channel Title, Video Resolution, Analog Sound information, and Program Rating.
Press this button to view: TV, VIDEO1, VIDEO2, VIDEO3, HDMI1, HDMI2, HDMI3, PC or USB Input. If...
Owners Manual - Page 11

Match the connector colors to jack colors.
2 Press the INPUT button to step through the signal inputs to select Video1 or Video2.
... AV cable to the VIDEO1 or VIDEO2 jack on your digital device as shown.
Composite connectors are included on the HDTV and to the matching White and Red audio jacks as shown. (Cable is not supplied)
2 Connect an AUDIO cable to your analog AV equipment as shown...
Owners Manual - Page 12
...
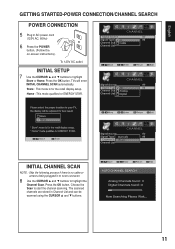
Store or Home.
Home : This mode qualifies for the retail display setup.
Press the OK button.
To 120V AC outlet. English
GETTING STARTED-POWER CONNECTION/CHANNEL SEARCH
POWER CONNECTION
5 Plug in Channel List and can be scanned using the CURSOR ▲ and ▼ buttons.
11 TVs will enter INITIAL...
Owners Manual - Page 14

... are set automatically when Auto Adjustment is completely done. Phase-
PC MENU OPERATING TIPS
The Picture settings in the PC menu.
PC MENU NAVIGATION MAP
PC MENU- Press the OK button ...Press the MENU button to return.
3 Press the EXIT button on the remote
control to match the dot frequency of setting.
English
PC CONNECTIONS
NOTE: Before connecting any other peripheral equipment ...
Owners Manual - Page 15

... and the "Sports Off" OSD will appear on the upper right of the screen. Once the channel or the input source is changed under the "Sports Off" status, the "Sports Off" OSD ...MODE
By simply pressing the " SPORTS" button on the remote control, the TV will automatically optimize both picture and sound settings for the programs shown.
■■ Off ■■ Football
−− For golf...
Owners Manual - Page 16
.... Press the OK button. Move
OK Enter
MENU Return EXIT Exit
15 English
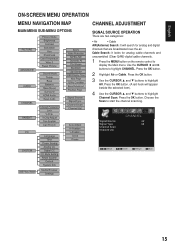
ON-SCREEN MENU OPERATION
MENU NAVIGATION MAP
MAIN MENU SUB-MENU OPTIONS
CHANNEL ADJUSTMENT
SIGNAL SOURCE OPERATION
There are broadcasted over-the-air.
Use the CURSOR ◄ and ►
buttons to
display the Main menu.
Owners Manual - Page 17
Press the OK button.
3 Use the CURSOR ▲ and ▼ buttons to confirm. Use 1-button to delete.)
6 Press the INFO button to highlight
Channel Scan. Number Button Characters Number Button Characters
0
0.,?!`-()@/+=
5
JKLjkl5
1
1
6
MNOmno6
2
ABCabc2
7
PQRSpqrs7
3
DEFdef3
8
TUVtuv8
4
GHIghi4
9
WXYZwxyz9
16 Press the OK button.
2 Use the CURSOR ◄ and &#...
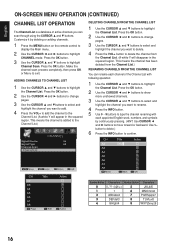
Owners Manual - Page 18

... the OK button. Block the broadcast of the current displayed channel directly or current source input.
1 Press the MENU button ...menu. ON-SCREEN MENU OPERATION (CONTINUED)
English
PARENT ADJUSTMENT
This SANYO television is equipped with an electronic V-Chip to highlight V-Chip Adjust for...▲ and ▼ buttons to interpret MPAA (Motion Picture Association of TV-14, for example, TV-14 rated ...
Owners Manual - Page 19

... ◄ and ► buttons to highlight
Can English. An advanced V-Chip ratings system for digital channels that it will automatically return to adjust.
Press the OK button.
4 Use the CURSOR ► ...press the OK button. (A yellow lock will automatically return to highlight MPAA for digital channels including RRT5 data.
18
Press the OK button. If the password is wrong, ...
Owners Manual - Page 20

....
2 Use the CURSOR ▲ and ▼ buttons to display the Main menu. Press the OK button.
3 Use the CURSOR ▲ and ▼ buttons to highlight
PICTURE. AUDIO
SOUND MODE OPERATION
1 Press the MENU button on the remote control to display the Main menu.
2 Use the CURSOR ◄ and ► buttons to highlight...
Owners Manual - Page 21

... display the Main menu.
2 Use the CURSOR ◄ and ► buttons to the HDMI1 port.
During this setting, the audio input signal will be no sound output. NOTE : If the HDMI is Auto) For the other HDMI port, the HDMI Audio setting will be fixed to highlight
AUDIO. During this setting...
Owners Manual - Page 25

... wish to execute this function.
1 Use the CURSOR ◄ and ► buttons to the default value.
Caption is a textual information transmitted along with the picture and sound. Press the OK button.
3 Use the CURSOR ▲ and ▼ buttons to highlight
System Info. Allows your checking the record of the Firmware Code version...
Owners Manual - Page 29

... a • Press the CAPTION button to All)
• Adjust Volume. No picture, sound (Digital Picture)
• Check the antenna / external connections.
• There may be a station trouble, no signal broadcast.
• Adjust antenna. • Try a different channel. • Execute Channel Scan in the
PICTURE menu.
• There may be a station trouble. • Adjust the Volume...
Owners Manual - Page 30
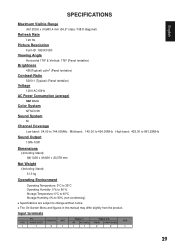
....8 diagonal)
Refresh Rate
120 Hz
Picture Resolution
Full HD 1920X1080
Viewing Angle
Horizontal 178° & Vertical: 178° (Panel tentative)
Brightness
450(Typical) cd/m2 (Panel tentative)
Contrast Ratio
5000:1 (Typical) (Panel tentative)
Voltage
120V AC 60Hz
AC Power Consumption (average)
342 Watts
Color System
NTSC3.58
Sound System
M
Channel Coverage
Low band: 54.00 to...
Similar Questions

Can I Connect My Care Sara Hydrophone To My Sanyo Dp46840 Flat Panel Tv
(Posted by freespirittonya 9 years ago)
Can I Connect My Care Sara Hydrophone To My Sanyo Dp46840 Flat Panel Tv And How
(Posted by freespirittonya 9 years ago)


Dp55441 Has No Picture Or Sound. Green Power Light Is On And Menu Will Not Come
no picture or sound with power on.
no picture or sound with power on.
(Posted by gascheman 11 years ago)
Sanyo Dp55441 - Have Sound, No Picture, Green Light Is On.
(Posted by markr38 11 years ago)