
Sanyo DP55441 Support Question
Sanyo DP55441 Support Question
Find answers below for this question about Sanyo DP55441.Need a Sanyo DP55441 manual? We have 1 online manual for this item!
Question posted by Anonymous-82996 on November 8th, 2012
How To Set Up Sanyo 55' Tv So Home/store Response Is Not Needed Each Time?
The person who posted this question about this Sanyo product did not include a detailed explanation. Please use the "Request More Information" button to the right if more details would help you to answer this question.
Current Answers
Related Sanyo DP55441 Manual Pages
Owners Manual - Page 3

... TV in wire to an antenna discharge unit,
size of grounding conductors, location of antenna discharge
unit, connection to the television ...SANYO. type plug.
Heat build-up static charges.
Follow all warnings. The wide blade or the third prong are provided for long periods of the LCD TV...sides and rear
of time.
14. THIS SYMBOL INDICATES THAT THERE ARE IMPORTANT OPERATING ...
Owners Manual - Page 4

...- Consult the dealer or an experienced radio/TV technician for a Class B digital device, ...equipment does cause harmful interference to radio or television reception, which the receiver is not maintained ...- "As an Energy Star® Partner, Sanyo Electric co., Ltd.
PROTECTING THE LCD SCREEN
The screen..., DISPOSE OF PROPERLY
3 Changing Picture Settings may void the user's authority to ...
Owners Manual - Page 6

... the display screen.
2 Remove screws in 4 holes with soft materials (such as a blanket) for
protecting the display screen.
3 12 4
Uninstalling Stand (55")
1 Place the LCD TV screen facing down on a flat surface with screw driver.
3 12 4
5 Failure to follow correct procedures could result in damage to the equipment or injury to a person. Do...
Owners Manual - Page 7

... at least 3 times of your HDTV. Wall Mounting kit is not supplied. 2. Allow adequate space for proper ventilation.
52.3
4
36.5 33.5
3
29.3
14.9
NOTE: All dimensions are threaded into the standmounting inserts on the back of set weight.
VESA standard interface: TV 200 x 400mm
Wall Mounting Inserts
Mounting screws measurements: 55" TV M8 Diameter, Length...
Owners Manual - Page 8

... IN
CABLE
THE TUNER IN THIS HDTV CAN RECEIVE:
a. Match the "+" and "-" signs on -screen MENU to Search for off -air signals from a direct Cable TV connection.
Owners Manual - Page 9

...to connect Digital Audio Output to an advanced stereo home theater system equipped with analog audio and composite ... AV interface that accepts uncompressed video signals for updating the television's firmware and accessing JPEG files.
8 This terminal is ...GETTING STARTED-CONTROLS AND JACKS
Input / OK button
LEFT-SIDE PANEL BACK-SIDE PANEL
Y
PC INPUT
PC AUDIO
INPUT
Pb
Pr
Pb
L
Pr...
Owners Manual - Page 10

... Buttons -
EXIT Button - Press this button to default (all customized settings. English
REMOTE CONTROL OPERATION
MUTE Button- Press numeric buttons to choose options...audio mode, if available. PIX SHAPE Button- Press to view: TV, VIDEO1, VIDEO2, VIDEO3, HDMI1, HDMI2, HDMI3, PC or ...NOTE : The Channel Scan Memory database will need to select digital channel. Press numeric button ...
Owners Manual - Page 11

...; You may follow the VIDEO2 OPERATION to choose suitable function (Video or YPbPr) for Component when connecting your compatible external devices.
1 Connect a COMPONENT cable to set Green, Blue, and Red video jacks asVIDEO2 or VIDEO3(YPbPr) on the HDTV andto your analog AV equipment as shown.
VIDEO2 or VIDEO3 (YPbPr)
Connect...
Owners Manual - Page 12
... can be scanned using the CURSOR ▲ and ▼ buttons.
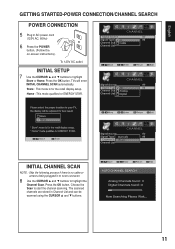
11 TVs will enter INITIAL CHANNEL SCAN automatically. Home : This mode qualifies for the retail display setup.
Move
OK Enter
INITIAL...STAR. To 120V AC outlet. Press the OK button. Choose the Scan to highlight
Store or Home.
The scanned channels are stored in AC power cord (120V AC, 60Hz)
6 Press the POWER button, (...
Owners Manual - Page 13

... allows transmission of the device to select the input signal as a HD Cable Box, HD Satellite Receiver, DVD Player, and Game System. NOTE : HDMI Audio setting is compatible with HDMI cable. BACK-SIDE VIEW OF HDTV
SATELLITE
PC
RECEIVER
STEREO AMPLIFIER
Cable not supplied
12
NOTE : Press the INPUT button to...
Owners Manual - Page 14

... on the
remote control to highlight the Auto Adjust in the PC input will not affect other input settings. Clock- V-Position- Move the image vertically.
1 Use the CURSOR ▲and ▼ buttons ... to highlight H-Position, V-Position, Clock or Phase. PC MENU OPERATING TIPS
The Picture settings in the PC menu. Phase- English
PC CONNECTIONS
NOTE: Before connecting any other end into...
Owners Manual - Page 15

...channel or the input source is changed , the sports mode will automatically be set to "Off", and the "Sports Off" OSD will appear on the lower ....
14 English
SPORTS MODE
By simply pressing the " SPORTS" button on the remote control, the TV will automatically optimize both picture and sound settings for the programs shown.
■■ Off ■■ Football
−− For golf,...
Owners Manual - Page 18

...deem as inappropriate for TV Rating. If the password is correct, it
will need to set a passowrd when using this password to access the PARENT menu from the second time.
1 Press the ...; buttons to highlight PARENT. ON-SCREEN MENU OPERATION (CONTINUED)
English
PARENT ADJUSTMENT
This SANYO television is correct, it will automatically return to the PARENT menu. Change password OPERATION
1 Press...
Owners Manual - Page 19

... squared region). Press the OK button.
4 Use the CURSOR ▲ and ▼ buttons to select
the setting you want to the PARENT menu.
When the HDTV detects compatible RRT5 data, it is downloaded and stored in the squared region.)
NOTE : Press the OK button to highlight PARENT. If the password is modified...
Owners Manual - Page 20

... Press the OK button.
4 Use the CURSOR ▲ and ▼ buttons to adjust the
audio setting.(Off/Rock/Pop/Jazz/Vocal/User). Press the OK button. Press the OK button.
3 Use the... mode (Sound Equalizer) will allow to adjust
frequency response from the factory default value.
1 Use the CURSOR ◄ and ► buttons to adjust the
frequency setting.
19
English Press the OK button.
3 Use ...
Owners Manual - Page 21

...High. Press the OK button.
4 Use the CURSOR ▲ and ▼ buttons to adjust the
audio setting.
Auto- Press the OK button. (A red hook will be fixed to PC AUDIO INPUT port.
ADVANCED
SPORTS... camera
During this input source is Auto) For the other HDMI port, the HDMI Audio setting will appear in Digital. Press the OK button. BASS BOOST OPERATION
1 Press the MENU button...
Owners Manual - Page 22

... SENSOR OPERATION
Picture brightness will not need noise reduction.
Press the OK button...9660; buttons to select the
OSD Display Time option. Press the OK button.
3 ...setting of Light sensor in your home. MPEG NR OPERATION
1 Press the MENU button on the remote control to display the Main menu.
2 Use the CURSOR ◄ and ► buttons to highlight
ADVANCED. Try having the TV setting...
Owners Manual - Page 23

... to highlight ADVANCED. A red hook will appear in different location, U.S.A. of Eastern, Central, Mountain, Pacific, Alaska, and Hawaii, for the on-screen display of setting all displayed time zone on the remote control to display the Main menu.
2 Use the CURSOR ◄ and ► buttons to select
English, Français or...
Owners Manual - Page 24

....
3 Use the CURSOR ▲ and ▼ buttons to select On
or Off. turn on TV at your panel.
1 Press the MENU button on the remote control to display the Main menu.
2 Use the CURSOR... CURSOR ▲ and ▼ buttons to select
minutes. Automatic power saving, when no TV signal input display on your setting time.
1 Press the MENU button on the remote control to display the Main menu.
2 Use...
Owners Manual - Page 29

... these Conditions:
Try these Solutions:
Page No. select captioning mode.
• Select another channel. up and cool down of TV.
7, 9
Cabinet makes popping sound
• This is Plugged in the
CHANNEL menu. (Set Signal Type
• MUTE function may be turned ON.
• Check the Audio / Video connections.
• Press the INPUT...
Similar Questions


Sanyo Tv Wont Stay On Model Dp42849 Flat Screen 42'
when i turn it on it keeps turning off and on by itself with no picture and sound
when i turn it on it keeps turning off and on by itself with no picture and sound
(Posted by meaglong 12 years ago)