
Sanyo DP55441 Support Question
Sanyo DP55441 Support Question
Find answers below for this question about Sanyo DP55441.Need a Sanyo DP55441 manual? We have 1 online manual for this item!
Question posted by navnpa on July 27th, 2014
Sanyo Hdmi Input 3 Wont Work
The person who posted this question about this Sanyo product did not include a detailed explanation. Please use the "Request More Information" button to the right if more details would help you to answer this question.
Current Answers
Related Sanyo DP55441 Manual Pages
Owners Manual - Page 3

... to call the CATV system installer's
attention to grounding electrodes, and requirements
for choosing SANYO. National Electrical Code provides information with the cart, stand, tripod, bracket or table specified... objects have fallen into such power lines
3. extreme care should be
mounted to the television equipment, be placed on the LCD TV. Clean only with the apparatus. power circuits...
Owners Manual - Page 4

... on a circuit different from Dolby Laboratories. "As an Energy Star® Partner, Sanyo Electric co., Ltd.
Do not use excessive pressure when cleaning the screen;
HANDLING PRECAUTIONS... may void the user's authority to
this television meet rigid U.L. HDMI, the HDMI logo and High-Definition Multimedia Interface are trademarks of HDMI Licensing LLC in a residential installation. Do ...
Owners Manual - Page 5

... Solutions .28 SPECIFICATIONS 29 CONFIGURATIONS OF VGA
TERMINALS 30 PC / HDMI SIGNAL MODES 30 CONTENTS
English
IMPORTANT SAFETY INSTRUCTIONS..2
FCC INFORMATION 3 ENERGY...POWER CONNECTION/CHANNEL SEARCH..11
ADVANCED AV CONNECTIONS........... 12 ADVANCED DIGITAL SIGNAL CONNECTIONS-HDMI TO HDMI.......12 DVI TO HDMI 12 DIGITAL AUDIO 12 AUDIO OUT JACKS 12
PC CONNECTIONS 13 PC MONITOR ...
Owners Manual - Page 6

... The LCD TV with 4 screws. Installing Stand (55")
1 Place the LCD TV on a flat surface place where
2 Secure the stand to the TV with this stand should be installed on it....the display screen.
3 12 4
Uninstalling Stand (55")
1 Place the LCD TV screen facing down on a flat surface with screw driver.
3 12 4
5 English
INSTALLING AND UNINSTALLING STAND
CAUTION INSTALLING STAND
• When ...
Owners Manual - Page 7

Wall mounting kit shall be able to a wall mounting kit. English
INSTALLATION POSITIONING THE LCD HDTV
Always use a firm-flat surface when positioning your HDTV to secure it to sustain at least 3 times of your HDTV. Allow adequate space for proper ventilation.
52.3
4
36.5 33.5
3
...
Owners Manual - Page 8

... box or Satellite receiver to moisture or heat such as sunshine. (the size of battery is AAA). Do not expose the Remote or batteries to HDMI or component (VIDEO3) jacks.
English
GETTING STARTED
1 Install batteries in the Remote. Digital and Analog off -air signals.
PReCAUTIONS
Do not use the on the...
Owners Manual - Page 9

... STARTED-CONTROLS AND JACKS
Input / OK button
LEFT-SIDE PANEL BACK-SIDE PANEL
Y
PC INPUT
PC AUDIO
INPUT
Pb
Pr
Pb
L
Pr
R
L
R
DEO3 INPUT V DEO2 INPUT
Y/VIDEO
DV
L
INPUT1
INPUT2
ANT R
COMPOSITE VIDEO INPUT VIDEO1, PAGE 10 - Standard (composite) video and audio inputs while using for PC audio input but also sharing the HDMI audio input for DVI signal connecting.
ANALOG...
Owners Manual - Page 10

...
ECO Button - Press these buttons to default (all customized settings. Press to the last channel or input source. Press to switch to exit from the menu.
1--
NOTE : The Channel Scan Memory database ... min, 150 min and 180 min. NOTE : The Off Timer will clear all analog channel enabled). INPUT Button- PIX SHAPE Button- Press to select Energy saving mode options Off, ECO1, ECO2, and ECO3 ...
Owners Manual - Page 11

Match the connector colors to jack colors.
2 Press the INPUT button to step through the signal inputs to select Video1 or Video2.
3 Press the INPUT button to the matching White and Red audio jacks as ... to your digital device as shown. (Cable is not supplied)
2 Connect an AUDIO cable to select the input signal as a VCR. (Cables are not supplied)
1 Connect an AV cable to the VIDEO1 or VIDEO2 ...
Owners Manual - Page 13

... can also include Dolby® Digital or PCM audio when available. 1 Connect the HDMI input and your external
device with this function)
1 Use an adapter (not supplied) to connect a DVI device to a
multichannel receiver as shown. NOTE : Press the INPUT button to a multichannel
receiver as shown. NOTE: NOTE: Dolby Digital audio signal is...
Owners Manual - Page 14

... frequency to highlight the Auto Adjust in the PC input will not affect other end into the PC Audio Out jack and the other input settings.
Press the MENU button to return.
3 Press... preset your PC's output resolution to adjust the
value of a Stereo Mini-Audio cable into the HDTV PC AUDIO INPUT jack. (Stereo Mini-Audio Cable not supplied). Press the OK button.
2 Use the CURSOR ◄ and ...
Owners Manual - Page 15

If the channel or input source is changed , the sports mode will automatically be set to "Off", and the "Sports Off" OSD will appear on the upper ... pushed, an OSD showing the current sports mode will appear on the upper right of the screen.
14 Once the channel or the input source is changed under the "Sports Off" status, the "Sports Off" OSD will not appear on the lower left of the screen.
Owners Manual - Page 18

... the OK button. Block the broadcast of the current displayed channel directly or current source input.
1 Press the MENU button and then use the CURSOR ◄ and ► ...and TV Parental Guidelines rating codes. ON-SCREEN MENU OPERATION (CONTINUED)
English
PARENT ADJUSTMENT
This SANYO television is equipped with content you deem as inappropriate for your children to view. NOTE : Please...
Owners Manual - Page 21

... button.
3 Use the CURSOR ▲ and ▼ buttons to select
Auto, Digital or Analog option. Press the OK button.
During this input source is selected from HDMI port or PC AUDIO INPUT port automatically (refer to page 13). Then it will analyze HDMI1 signal type (by info frame) to detect if this setting...
Owners Manual - Page 22

... OK button.
4 Use the CURSOR ▲ and ▼ buttons to select Off ,Low ,Middle or High.
NOTE : The remote controls of HD, SD or PC inputs.
Press the OK button.
4 Use the CURSOR ▲ and ▼ buttons to select
Standard, WaterGlass, Zoom1, Full or Zoom2.
Press the OK button.
3 Use the...
Owners Manual - Page 24

...CURSOR ▲ and ▼ buttons to highlight
Power Saving. Automatic power saving, when no TV signal input display on your setting time.
1 Press the MENU button on the remote control to display the Main ...3 Use the CURSOR ▲ and ▼ buttons to highlight
Power Saving. turn on TV at your panel.
1 Press the MENU button on the remote control to display the Main menu.
2 Use the CURSOR ...
Owners Manual - Page 26
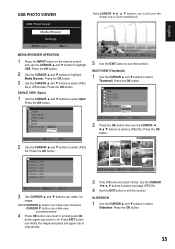
... USB. Press EXIT button can minify the image and press exit again can zoom in Zoom mode(x2,x4)
English
MEDIA BROWSER OPERATION
1 Press the INPUT button on the remote control and use the CURSOR ◄
►▲ ▼ buttons to select JPEG
file. USB PHOTO VIEWER
Note:CURSOR buttons can...
Owners Manual - Page 29

... may be turned ON.
• Check the Audio / Video connections.
• Press the INPUT button on the remote control.
28 No USB Media message appears on screen
• Check the... external equipment connections.
• Check the external equipment settings.
• Press the INPUT button on the remote control.
• Check the external equipment connections.
• Check the ...
Owners Manual - Page 30
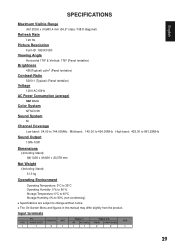
...
Viewing Angle
Horizontal 178° & Vertical: 178° (Panel tentative)
Brightness
450(Typical) cd/m2 (Panel tentative)
Contrast Ratio
5000:1 (Typical) (Panel tentative)
Voltage
120V AC 60Hz
AC Power Consumption (average)
342...manual may differ slightly from the product. Input terminals
VGA 1
PC AUDIO JACK
1
HDMI/DVI 3
ANT 1
Video 1
Video 2/3
USB
AV AV Audio YPbPr YPbPr Audio
1
1
2
2...
Owners Manual - Page 31
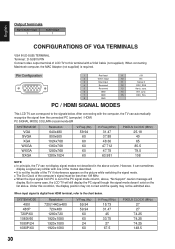
... and the quality may not be less than 108 MHz. ■■ When the input signal from PC is digital from the connected PC (computer) / HDMI. When connecting Macintosh computer, the MAC Adapter (not supplied) is required.
1
Red Input
9
2
Green Input
10
3
Blue Input
11
4
Reserved
12
5
Reserved
13
6
GND
14
7
GND
15
8
GND
PC...
Similar Questions


How Do You Connect A Vcr To The Video 3 Input On A Sanyo T V Model # Dp55441
(Posted by Doabr 10 years ago)

Hdmi Inputs Work Only Sometimes
The HDMI on this model DP52440 Sanyo only work sometimes and sometimes no signal indication. Is this...
The HDMI on this model DP52440 Sanyo only work sometimes and sometimes no signal indication. Is this...
(Posted by tvdoctor33 10 years ago)

None Of My Hdmi Inputs Work, Is There A Fix?
First the sound went out on all 3 inputs. Now they don't work at all.
First the sound went out on all 3 inputs. Now they don't work at all.
(Posted by jh126210 11 years ago)
Hdmi Input
When I turn on the new DP55441 I get a screen that asks me to choose "Home or Store", after I choose...
When I turn on the new DP55441 I get a screen that asks me to choose "Home or Store", after I choose...
(Posted by rbvett 12 years ago)