
Sanyo DP55441 Support Question
Sanyo DP55441 Support Question
Find answers below for this question about Sanyo DP55441.Need a Sanyo DP55441 manual? We have 1 online manual for this item!
Question posted by rbvett on July 17th, 2011
Hdmi Input
When I turn on the new DP55441 I get a screen that asks me to choose "Home or Store", after I choose Home, it then gives me a blank screen. I then have to choose "Input" from the remote and choose "HDMI1" to watch channels from the Comcast HiDef box.
How do I set the TV to automatically select HDMI1 every time I turn it on ?
Current Answers

Related Sanyo DP55441 Manual Pages
Owners Manual - Page 3

... manufacturer.
12. Wall or Ceiling Mounting - When the MAINS plug is connected to the television equipment, be
mounted to be built into your safety. National Electrical Code provides information with ... as vases, shall
be exposed to the point of the NEC that provides guidelines
for choosing SANYO. Do not defeat the safety purpose of the
GROUNDING CONDUCTORS (NEC SECTION 810-21...
Owners Manual - Page 4

...; Handle by turning the equipment off and on the screen can be damaged...television reception, which the receiver is encouraged to try to correct the interference by Intertek Testing Services Taiwan Ltd.
safety standards against harmful interference in the United States and other countries. If this unit may cause harmful interference to meet ENERGY STAR requirements. HDMI, the HDMI...
Owners Manual - Page 5

... SCREEN 3 HANDLING PRECAUTIONS 3
INSTALLING AND UNINSTALLING STAND 5
INSTALLATION 6 POSITIONING THE LCD HDTV 6 WALL MOUNTING (OPTIONAL 6
GETTING STARTED 7 PReCAUTIONS 7 GETTING STARTED-CONTROLS AND JACKS 8 REMOTE ... CONNECTIONS-HDMI TO HDMI.......12 DVI TO HDMI 12 DIGITAL AUDIO 12 AUDIO OUT JACKS 12
PC CONNECTIONS 13 PC MONITOR OPERATION 13
SPORTS MODE 14
ON-SCREEN MENU OPERATION...
Owners Manual - Page 6

... to the TV with 4 screws.
Installing Stand (55")
1 Place the LCD TV on it on a flat and level place. The desk's surface must be flat and covered with soft material (such as a blanket) for protecting the screen surface.
• Before putting the LCD Display on the desk, make sure there is strong enough...
Owners Manual - Page 8

... use rechargeables together with dry cells, other types, mixed new and old or batteries with marks inside the Remote Control. ANTENNA
OR
ANALOG/DIGITAL ANTENNA IN
CABLE
THE TUNER...Remote or batteries to HDMI or component (VIDEO3) jacks. Analog or Clear QAM cable channels from an antenna.
English
GETTING STARTED
1 Install batteries in the Remote. Match the "+" and "-" signs on -screen...
Owners Manual - Page 9

...) jacks, and matching Audio White (L) and Red (R) jacks. HDMI INPUT (INPUT1, INPUT2 or INPUT3), PAGE 12 - This terminal is separated from another Stereo Mini Jack (PC AUDIO INPUT). A digital AV interface that accepts uncompressed video signals for updating the television's firmware and accessing JPEG files.
8 PC INPUT (RGB connector of copy-protected digital contents.
COMPONENT...
Owners Manual - Page 10

... in turn .... English
REMOTE CONTROL OPERATION...choose options Standard, WaterGlass, Zoom1, Full and Zoom2. RECALL Button- CAPTION Button- Press to select the source to select an option from menu.
9
CURSOR ▲ (up and down ) Buttons -
Press to view: TV, VIDEO1, VIDEO2, VIDEO3, HDMI1, HDMI2, HDMI3, PC or USB Input. Press numeric button then press this button to display on-screen...
Owners Manual - Page 11

... your digital device as shown. (Cable is not supplied)
2 Connect an AUDIO cable to select the input signal as Composite connectors like VIDEO1 (Shared with Component-Y). Composite connectors are included on the HDTV and to choose suitable function (Video or YPbPr) for Component when connecting your compatible external devices.
1 Connect a COMPONENT cable...
Owners Manual - Page 13

... available
from the Digital Audio output terminal only when receiving a part of a Digital input on the screen. NOTE : Press the INPUT button to the PC AUDIO INPUT. English
ADVANCED AV CONNECTIONS
ADVANCED DIGITAL SIGNAL CONNECTIONS-HDMI TO HDMI
Connect compatible Digital devices such as HDMI1,HDMI2 or HDMI3. NOTE: NOTE: Dolby Digital audio signal is necessary. (refer...
Owners Manual - Page 14

... ▲ and ▼ buttons on the
remote control to start automatically adjust function. Press the OK button to highlight the Auto Adjust in the PC input will not affect other end into the PC ...or blur. Move the image vertically.
1 Use the CURSOR ▲and ▼ buttons on the remote
control to adjust the
value of both from the PC Setup Menu.
English
PC CONNECTIONS
NOTE: Before...
Owners Manual - Page 15

English
SPORTS MODE
By simply pressing the " SPORTS" button on the remote control, the TV will automatically optimize both picture and sound settings for the programs shown....button is pushed, an OSD showing the current sports mode will appear on the lower left of the screen.
14 If the channel or input source is changed under the "Sports Off" status, the "Sports Off" OSD will appear on the...
Owners Manual - Page 18

...Chip Adjust OPERATION
STANDARD- ON-SCREEN MENU OPERATION (CONTINUED)
English
PARENT ADJUSTMENT
This SANYO television is equipped with an electronic ...new password you want to PARENT menu. If the password is correct, it
will automatically return to assign). Press the OK button. Note:Turn...rating by choosing one or more of the current displayed channel directly or current source input.
1 ...
Owners Manual - Page 21

...remote control to display the Main menu.
2 Use the CURSOR ◄ and ► buttons to detect if this input source is Auto) For the other HDMI port, the HDMI Audio setting will be blocked out and fixed in the white blank... to highlight
AUDIO. HDMI AUDIO OPERATION HDMI AUDIO SETTINGS HDMI1 includes three categories, Auto, Digital and Analog. (Default setting is pure HDMI or DVI signal. ...
Owners Manual - Page 22

... SD or PC inputs.
OSD DISPLAY TIME OPERATION
OSD Display Time
1 Press the MENU button on the remote control to display ...remote controls of Light sensor in the Home mode is too dark in your home. LIGHT SENSOR OPERATION
Picture brightness will automatically be grayed out if you turn...9658; buttons to select the
desired value between 0 to choose
from 20 Seconds, 30 Seconds, 40 Seconds, 50 ...
Owners Manual - Page 23

...
Screen Menu.
1 Press the MENU button on the remote ...Choose from six categories in the squared and blank region. Current Time
1 Press the MENU button on the remote... control to display the Main menu.
2 Use the CURSOR ◄ and ► buttons to Off. • When display happened double shadow or Outer Glow
,please turn...
Owners Manual - Page 24

... A red hook will appear in the squared and blank region. Choose from six types of captions for Digital TV signal ...and ▼ buttons to highlight
Time. turn on TV at your panel.
1 Press the MENU button on the remote control to display the Main menu.
2 ...power saving, when no TV signal input display on your setting time.
1 Press the MENU button on the remote control to display the Main menu....
Owners Manual - Page 26
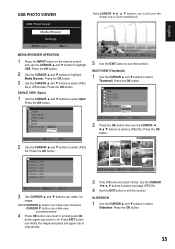
... OK button again can zoom in Zoom mode(x2,x4)
English
MEDIA BROWSER OPERATION
1 Press the INPUT button on the remote control and use the CURSOR ◄
►▲ ▼ buttons to select a JPEG file...3 If the JPEG file more than 15 files. USB PHOTO VIEWER
Note:CURSOR buttons can scroll over the screen only in x4. Press the OK button.
2 Use the CURSOR ▲ and ▼ buttons to ...
Owners Manual - Page 29

...8226; MUTE function may be turned ON.
• Check the Audio / Video connections.
• Press the INPUT button on the remote control.
• Check the...turned ON. Cannot display picture on a full screen
• Press the PIX SHAPE button on the remote control to change settings.
7, 11, 15 - 16
9, 23 9, 21
Poor Picture/ Sound (watching Analog)
"No Signal" message appears on the remote...
Owners Manual - Page 30
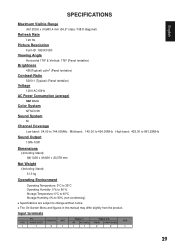
...178° & Vertical: 178° (Panel tentative)
Brightness
450(Typical) cd/m2 (Panel tentative)
Contrast Ratio
5000:1 (Typical) (Panel tentative)
Voltage
120V AC 60Hz
AC Power Consumption...to change without notice. ■■ The On-Screen Menu and figures in this manual may differ slightly from the product. Input terminals
VGA 1
PC AUDIO JACK
1
HDMI/DVI 3
ANT 1
Video 1
Video 2/3
USB
...
Owners Manual - Page 31
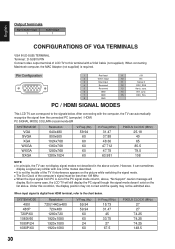
... TV to this condition, the display position may not correct and the quality may not be less than 108 MHz. ■■ When the input signal from HDMI terminal, refer to the chart below . Vert. PC SIGNAL MODE COLUMN (recommended)®
SYSTEM MODE VGA SVGA XGA
WXGA WXGA SXGA
Resolution 640x480 800x600...
Similar Questions


Hdmi Inputs Work Only Sometimes
The HDMI on this model DP52440 Sanyo only work sometimes and sometimes no signal indication. Is this...
The HDMI on this model DP52440 Sanyo only work sometimes and sometimes no signal indication. Is this...
(Posted by tvdoctor33 10 years ago)

None Of My Hdmi Inputs Work, Is There A Fix?
First the sound went out on all 3 inputs. Now they don't work at all.
First the sound went out on all 3 inputs. Now they don't work at all.
(Posted by jh126210 11 years ago)