
Sanyo DP55441 Support Question
Sanyo DP55441 Support Question
Find answers below for this question about Sanyo DP55441.Need a Sanyo DP55441 manual? We have 1 online manual for this item!
Question posted by munian on April 12th, 2014
Sanyo Dp55441 How To Make Picture Settings
The person who posted this question about this Sanyo product did not include a detailed explanation. Please use the "Request More Information" button to the right if more details would help you to answer this question.
Current Answers
Related Sanyo DP55441 Manual Pages
Owners Manual - Page 3

...outside antenna system,
4. When the MAINS plug is to be built into apparatus, the apparatus has been exposed to the television equipment, be maintained. Minimum clearance must be sure the antenna system is grounded so as when a power-supply cord or ... light or
2. Only use this apparatus during lightning storms or when unused for choosing SANYO. Please read all instructions.
Owners Manual - Page 4

...ENERGY STAR User Information Statement: the factory default settings of Dolby Laboratories.
"As an Energy Star® Partner, Sanyo Electric co., Ltd.
NEVER spray liquids on ...device, pursuant to meet ENERGY STAR requirements.
To ensure your television is not maintained properly.
Changing Picture Settings may cause harmful interference to which can cause permanent discoloration or ...
Owners Manual - Page 5

... 13
SPORTS MODE 14
ON-SCREEN MENU OPERATION 15 MENU NAVIGATION MAP 15 CHANNEL ADJUSTMENT 15 CHANNEL LIST OPERATION 16 PARENT ADJUSTMENT 17 PICTURE/ AUDIO/ ADVANCED ADJUSTMENT 19 PICTURE 19 AUDIO 19 ADVANCED 20 SYSTEM 22 USB PHOTO VIEWER 25
4
HELPFUL HINTS - Problems / Solutions .28 SPECIFICATIONS 29 CONFIGURATIONS OF VGA
TERMINALS 30...
Owners Manual - Page 6

...blanket) for protecting the screen surface.
• Before putting the LCD Display on the desk, make sure there is strongly recommended to the TV with this stand should be larger than the LCD ...Display's screen size. Do not place it .
The desk's surface must be installed on a flat surface with screw driver.
3 12 4
5 Failure to follow correct procedures could result in damage to...
Owners Manual - Page 7

... kit shall be able to sustain at least 3 times of your HDTV. English
INSTALLATION POSITIONING THE LCD HDTV
Always use a firm-flat surface when positioning your HDTV to secure it to a wall mounting kit.
VESA standard interface: TV 200 x 400mm
Wall Mounting Inserts...inches
WALL MOUNTING (OPTIONAL)
Use the screws that are threaded into the standmounting inserts on the back of set weight.
Owners Manual - Page 8

... Clear QAM cable channels from an antenna.
Please recycle used up batteries.
2 Antenna Connection for Clear QAM Cable channels. (see page 11)
For the best picture, connect your Cable box or Satellite receiver to HDMI or component (VIDEO3) jacks.
English
GETTING STARTED
1 Install batteries in the Remote. Digital and Analog off...
Owners Manual - Page 9

... Jack (PC AUDIO INPUT). Use for the best picture. Connect digital video equipment to this terminal.
PC INPUT...digital AV interface that accepts uncompressed video signals for updating the television's firmware and accessing JPEG files.
8 This HDMI input ...GETTING STARTED-CONTROLS AND JACKS
Input / OK button
LEFT-SIDE PANEL BACK-SIDE PANEL
Y
PC INPUT
PC AUDIO
INPUT
Pb
Pr
Pb
L
Pr...
Owners Manual - Page 11

...Video or YPbPr) for Component when connecting your compatible external devices.
1 Connect a COMPONENT cable to set Green, Blue, and Red video jacks asVIDEO2 or VIDEO3(YPbPr) on the HDTV and to your ...YPbPr). The Component jacks on this HDTV will accept HDTV, EDTV, and SDTV video signals and make a great choice for external devices. VIDEO2 or VIDEO3 (YPbPr)
Connect Digital devices such as ...
Owners Manual - Page 13

... Digital audio signal is a digital AV interface that accepts uncompressed video signals for the best picture quality possible. BACK-SIDE VIEW OF HDTV
(Coaxial) DIGITAL AUDIO CABLE (Not supplied)
MULTICHANNEL... connect a DVI device to select the input signal as shown. NOTE : HDMI Audio setting is compatible with HDMI cable. BACK-SIDE VIEW OF HDTV
SATELLITE
PC
RECEIVER
STEREO AMPLIFIER
...
Owners Manual - Page 14

..., V-Position, Clock or Phase.
Adjust the phase when the picture appears flicker or blur. H-Position- PC MENU OPERATING TIPS
The Picture settings in the PC menu.
AUTO ADJUSTMENTS OPERATION
1 Use the CURSOR...HDTV and tighten the screws. (Monitor Cable not supplied).
2 Insert one end of setting.
Move the image horizontally. PC MONITOR OPERATION
PC PREPARATION
To avoid a "No Support"...
Owners Manual - Page 15

... upper right of the screen. English
SPORTS MODE
By simply pressing the " SPORTS" button on the remote control, the TV will automatically optimize both picture and sound settings for the programs shown.
■■ Off ■■ Football
−− For golf, football programs etc. −− Fresh greenness of the lawn...
Owners Manual - Page 18

...PARENT. Note:Turn on V-Chip function,you make when setting up the PARENT menu. You can operate V-...programs with an electronic V-Chip to interpret MPAA (Motion Picture Association of the current displayed channel directly or current source... FV). ON-SCREEN MENU OPERATION (CONTINUED)
English
PARENT ADJUSTMENT
This SANYO television is correct, it will automatically return to PARENT menu. button 4...
Owners Manual - Page 19

...► buttons to highlight
Can French. Press the OK button.
4 Use the CURSOR ▲ and ▼ buttons to select
the setting you can enter password again or press the MENU button to return to PARENT menu.
3 Use the CURSOR ▲ and ▼ ...an antenna. Press the OK button.
5 Use the CURSOR ▲ and ▼ buttons to select the setting you want to make or cancel the selected...
Owners Manual - Page 20

...the CURSOR ▲ and ▼ buttons to highlight Video2. Press the OK button to adjust the
picture setting. Press the OK button.
4 Use the CURSOR ◄ and ► buttons to add a ...
AUDIO. Press the OK button. Press the OK button. Make the previous adjustment settings under the PICTURE mode recovered from 100Hz to select the
Picture Mode. NOTE : Press the MENU button to return to ...
Owners Manual - Page 22

... CURSOR ◄ and ► buttons to select the
desired value between 0 to highlight ADVANCED. LIGHT SENSOR OPERATION
Picture brightness will automatically be grayed out if you turn on the Light sensor function.
• Please set PICTURE MODE to highlight
ADVANCED. Press the OK button.
3 Use the CURSOR ▲ and ▼ buttons to select...
Owners Manual - Page 24

... counting down of setting the desired caption type to be turned off by itself. Choose from eight types of captions for Analog TV signal for your panel.
1 Press the MENU button on the remote control... the OK button.
6 Use the CURSOR◄ and ► buttons to highlight
SYSTEM.
The default setting is Off.
1 Press the MENU button on the remote control to display the Main menu.
2 Use...
Owners Manual - Page 25

...close the ON-Screen menu.
24
Allows you to reset the previous adjustment settings of setting the desired caption style superimposed on the remote control. Press the OK ...settings under the CC Style Setting for your HDTV screen. Press the OK button.
3 Use the CURSOR ▲ and ▼ buttons to highlight
SYSTEM. Caption is a textual information transmitted along with the picture...
Owners Manual - Page 27
... information
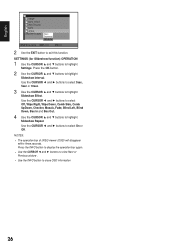
26 Press the INFO button to display the operation bar again. • Use the CURSOR ◄ and ► buttons to view Next or Previous picture . • Use the INFO button to highlight
Slideshow Repeat. SETTINGS (for Slideshow function) OPERATION
1 Use the CURSOR ▲ and ▼ buttons to highlight...
Owners Manual - Page 29

...! Caption signal. Cannot display picture on a full screen
• Press the PIX SHAPE button on the remote control to change settings.
7, 11, 15 - 16
9, 23 9, 21
Poor Picture/ Sound (watching Analog)
"... website at http://www.sanyoctv.com or call us toll free at front of TV.
7, 9
Cabinet makes popping sound
• This is broadcasting a • Press the CAPTION button to All)
•...
Owners Manual - Page 30
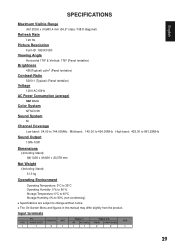
... Visible Range
(H)1209.6 x (V)680.4 mm (54.6" class /138.8 diagonal)
Refresh Rate
120 Hz
Picture Resolution
Full HD 1920X1080
Viewing Angle
Horizontal 178° & Vertical: 178° (Panel tentative)
Brightness
450(Typical) cd/m2 (Panel tentative)
Contrast Ratio
5000:1 (Typical) (Panel tentative)
Voltage
120V AC 60Hz
AC Power Consumption (average)
342 Watts
Color System
NTSC3...
Similar Questions

Best Picture Settings For A Sanyo Dp32670
What would be the best picture settings for a sanyo dp32679
What would be the best picture settings for a sanyo dp32679
(Posted by mumu1049 9 years ago)

What Are The Best Picture Settings For A Sanyo 55 Inch Lcd Dp55441
(Posted by rashKi 10 years ago)


What Are The Recommended Picture Settings For The Best Picture?
I'm looking for suggestions for the picture settings to get the best color and brightness.
I'm looking for suggestions for the picture settings to get the best color and brightness.
(Posted by kayusdeus 12 years ago)