
Sanyo DP42849 Support Question
Sanyo DP42849 Support Question
Find answers below for this question about Sanyo DP42849 - 42" LCD TV.Need a Sanyo DP42849 manual? We have 4 online manuals for this item!
Question posted by ss71601 on October 28th, 2010
Black Screen,no Sound, Power Light Flashes
The person who posted this question about this Sanyo product did not include a detailed explanation. Please use the "Request More Information" button to the right if more details would help you to answer this question.
Current Answers
Related Sanyo DP42849 Manual Pages
Owners Manual - Page 2

... connected to the point of overhead power lines or other electrical light or power circuits, or where it can fall into such power lines or circuits. Protect the power cord from being walked on the ... be taken to the television equipment, be placed on or pinched particularly at plugs, convenience receptacles, and the point where they exit from touching such power lines or circuits as contact...
Owners Manual - Page 3
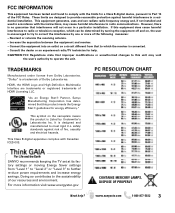
... harmful interference to radio or television reception, which can radiate radio...meets the Energy Star® guidelines for energy efficiency." PC RESOLUTION CHART
SANYO recommends keeping the TV set at its factory settings or moving Energy Saver settings from "Level 1" to "Level 2"...duce power requirements and increase energy savings. This symbol on a circuit different from Dolby ...
Owners Manual - Page 4
... 7 BACK PANEL JACKS 8 AUDIO / VIDEO CONNECTIONS 9 POWER CONNECTION / INITIAL CHANNEL SEARCH . .10
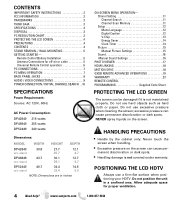
SPECIFICATIONS
Power Requirement:
Source: AC 120V, 60Hz
AC Power Consumption: DP42849 216 watts ... properly.
Do not position the unit in inches
ON-SCREEN MENU OPERATION- POSITIONING THE LCD HDTV
Always use a firm-flat surface when positioning your HDTV. CONTENTS
IMPORTANT SAFETY INSTRUCTIONS...
Owners Manual - Page 5
...to moisture or heat.
• Be sure to protect the screen and finish. www.sanyoctv.com
1-800-877-5032
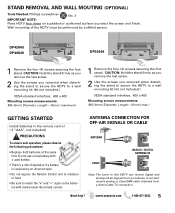
5 Need help...digital and analog off air signals from a direct Cable TV connection.
Do not use a new battery with marks ...the following precautions: • Replace both batteries at the same
time. DP42849 DP46849
DP52449
1 Remove the four (4) screws securing the foot stand. CAUTION...
Owners Manual - Page 6
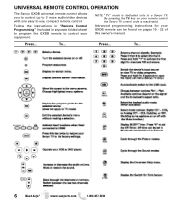
... programming instructions for your GXDB remote can be found on your equipment. Press...
To...
6
Need help? NOTE: "TV" mode is reactivated.
www.sanyoctv.com
1-800-877-5032
By pressing the TV key on pages 19 - 22 of this owner's manual. Follow the instructions in "Remote Control Programming" (included in separate folded sheet...
Owners Manual - Page 7
... included.)
RGB OUTPUT JACK
DVI OUTPUT JACK
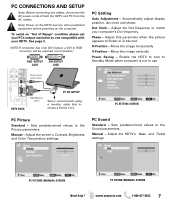
PC Setting
Auto Adjustment - Adjust the screen's Contrast, Brightness and Color Temperature settings.
PC PICTURE (MANUAL) SCREEN
PC SOUND (MANUAL) SCREEN
Need help?
Note: Power on the HDTV and any cables, disconnect the AC power cords of Range" condition please set your PC's output resolution to the Picture parameters...
Owners Manual - Page 8
..., and Component video connections need their appropriate white and red audio connections. High Definition image available from HD signals and HD equipment.
8
Need help?
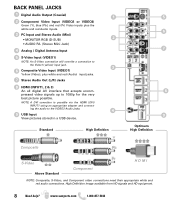
BACK PANEL JACKS
1 Digital Audio Output (Coaxial)
1
2 Component Video Input (VIDEO2 or VIDEO3)
Green (Y), blue (Pb), and red (Pr) Video inputs plus the
white and red Audio...
Owners Manual - Page 10
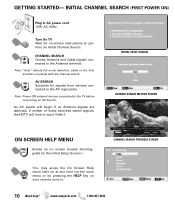
... Air, first, and then proceeds with the channel search. CHANNEL SEARCH PROGRESS SCREEN
10 Need help?
INITIAL SETUP SCREEN CHANNEL SEARCH METHOD SCREEN
ON SCREEN HELP MENU
Access an on screen trouble shooting guide (in AC power cord 120V AC, 60Hz
Turn On TV Wait for signals from devices connected to the AV input jacks. INITIAL CHANNEL...
Owners Manual - Page 11
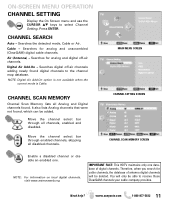
... lists all Analog and Digital channels found. Searches the detected mode, Cable or Air. Searches for analog and unscrambled (ClearQAM) digital cable channels. MAIN MENU SCREEN CHANNEL SETTING SCREEN CHANNEL SCAN MEMORY SCREEN
Enable a disabled channel or disable an enabled one database of antenna digital channels will only be deleted. Need help?
Owners Manual - Page 12
...highlight)
Select / set the current time and on-time with the picture and sound.
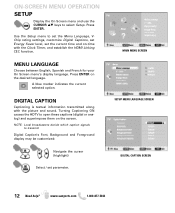
NOTE: Local broadcasters decide which caption signals to open these captions (digital or analog) and superimpose ...them on the desired language. ON-SCREEN MENU OPERATION SETUP
Display the On Screen menu and use the CURSOR LM keys to set the Menu Language, VChip ...
Owners Manual - Page 13
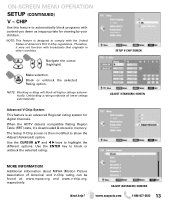
... of America) and V-Chip rating can be found at: www.mpaa.org and www.v-chip.org, respectively. The Setup V-Chip screen is then modified to block or
unblock the selected rating.
ON-SCREEN MENU OPERATION SETUP (CONTINUED)
V - Navigate the cursor (highlight)
Make selection. NOTE: Blocking a rating will block all lower ratings automatically...
Owners Manual - Page 14
... entry.
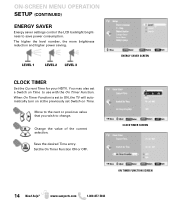
The higher the level number, the more brightness reduction and higher power saving.
Move to the next or previous value that you wish to save power consumption.
ON-SCREEN MENU OPERATION SETUP (CONTINUED)
ENERGY SAVER
Energy saver settings control the LCD backlight brightness to change. When On Timer Function is set to use...
Owners Manual - Page 15
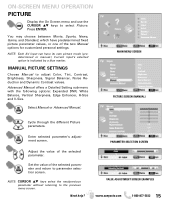
... parameter and return to adjust Color, Tint, Contrast, Brightness, Sharpness, Signal Balancer, Noise Reduction and Dynamic Contrast values. Need help? Press ENTER. MAIN MENU SCREEN PICTURE SCREEN (MANUAL)
Cycle through the different Picture parameters. NOTE: CURSOR LM keys select the next/previous parameter without returning to select Picture.
MANUAL PICTURE SETTINGS
Choose...
Owners Manual - Page 16
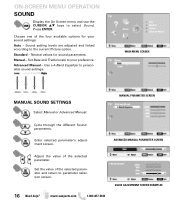
.... Set Bass and Treble levels to select Sound.
MANUAL PARAMETER SCREEN
Cycle through the different Sound parameters. Use a 4-Band Equalizer to the current Picture option. Choose one of the four available options for sound parameters. Standard -
Enter selected parameter's adjustment screen. ON-SCREEN MENU OPERATION SOUND
Display the On Screen menu and use the CURSOR LM keys to...
Owners Manual - Page 17
...from the settings in TV and AV inputs. Picture Setting -
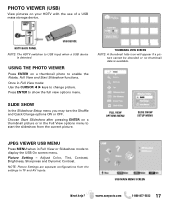
USING THE PHOTO VIEWER
Press ENTER on your HDTV with the use of a USB mass storage device. USB MAIN MENU SCREEN
Need help? PHOTO... Use the CURSOR keys to USB Input when a USB device
is available. USB DEVICE
HDTV BACK PANEL NOTE: The HDTV switches to change picture.
NOTE: Picture Settings are separate configurations from the current...
Owners Manual - Page 18
..." the image on the screen twice as well.
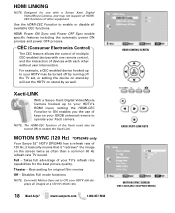
HDMI LINKING
NOTE: Designed for use of keys on your GXDB universal remote to operate your TV's refresh rate capabilities for original film movies
Off - HDMI Power ON Sync and Power OFF Sync enable specific features including the automatic power ON process and power OFF process.
Takes full...
Owners Manual - Page 19
... error has occurred. NOTE: If the red LED displays one long flash instead, either case, the remote cannot learn .
5. Try repeating this...view the first digit of ambient light such as natural sunlight or energy-efficient fluorescent lights. Repeat step 4 for the four...the number. For example, to find out which code is approximately 42 to be in "Searching for Your Code", you have your ...
Owners Manual - Page 21
...9 4. The LED blinks twice. 4. The mode LED blinks twice. Now, regardless of the DEVICE KEYS, POWER, RECORD, or SET as follows: 1. NOTE: Do not use any of what mode you select, the channel... STB, or
AUX).
2. Press the key in the same mode. Repeat steps 1-6 to . (e.g., TV). 6.
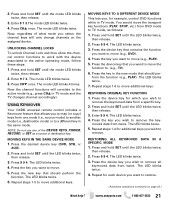
USING KEYMOVER
Your GXDB universal remote control includes a Keymover feature that allows you wish to a ...
Quik 'N Easy Setup Guide - Page 2
...up to an appropriate AV Input on your HDTV and power on.
NOTE: To ensure safe operation please follow the... Cable service channels using your area. Place the HDTV on a flat firm surface and allow adequate space on your HDTV's remote)
NOTE... HDTV's LCD SCREEN
The screen can cause permanent discoloration or dark spots. Do not use excessive pressure when cleaning the screen;
excessive pressure...
GXDB Remote Guide - Page 1

... + to normal TV viewing.
Check Battery Installation information in the menu screens. to decrease
XACTI ... the On-screen Help menu with your HDTV. Power On or power Off your ...sound modes.
Switch back and forth
RECALL between available aspect ratio options Pix1 thru Pix7 and Pix-Auto (for PIX SHAPE digital channels) to enable or disable image stretch.
Exit the the current on -screen...
Similar Questions

Power And Black Screen.
I turned my TV in this morning and only hit a black screen. The green indication light cashne in but...
I turned my TV in this morning and only hit a black screen. The green indication light cashne in but...
(Posted by fredericka08 3 years ago)

Tv Power Light Goes Off When Tv Is On And On When Tv Off
(Posted by stiran 9 years ago)


How To Find The Back Light Of Sanyo Lcd Tv Dp42849
(Posted by ivalan 10 years ago)

Has Sound With Black Screen
i have an 18.5" sanyo dp19640 hdtv lcd. it has sound but a black screen. i have tried unolugging the...
i have an 18.5" sanyo dp19640 hdtv lcd. it has sound but a black screen. i have tried unolugging the...
(Posted by tiggah87 11 years ago)