
Reebok V 8.90 Treadmill Support Question
Reebok V 8.90 Treadmill Support Question
Find answers below for this question about Reebok V 8.90 Treadmill.Need a Reebok V 8.90 Treadmill manual? We have 1 online manual for this item!
Question posted by RICHARDBELASQUEZ on January 29th, 2014
Will Not Start V 8.90
My V 8.90 Will Not Start. I Press The On & Off Button And I Canhear A Noise At The Console, After Many Tries The Mill Will Then Start
Current Answers
Related Reebok V 8.90 Treadmill Manual Pages
User Manual - Page 2
... size.
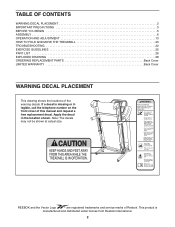
TABLE OF CONTENTS
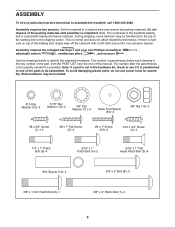
WARNING DECAL PLACEMENT 2 IMPORTANT PRECAUTIONS 3 BEFORE YOU BEGIN 5 ASSEMBLY 6 OPERATION AND ADJUSTMENT 13 HOW TO FOLD AND MOVE THE TREADMILL 20 TROUBLESHOOTING 22 EXERCISE GUIDELINES 25 PART LIST 26 EXPLODED DRAWING 28 ORDERING REPLACEMENT PARTS Back Cover LIMITED WARRANTY Back Cover
WARNING DECAL PLACEMENT
This drawing shows the...
User Manual - Page 3
... sustained by persons weighing 350 lbs. (159 kg) or less.
9. Use the treadmill only as an exercise aid in determining heart rate trends in small increments to ensure that meets all of ... the treadmill at least 8 ft. (2.4 m) of the treadmill. Place the treadmill on each side. Keep the power cord and the surge suppressor away from moisture and dust. Never start the treadmill while you...
User Manual - Page 4
... it is not in a commercial, rental, or institutional setting.
27. Over exercising may result in the storage position.
23. Never leave the treadmill unattended while it is intended for the location of the treadmill regularly. vice representative. When folding or moving the treadmill, make sure that the storage latch is holding the frame securely...
User Manual - Page 5
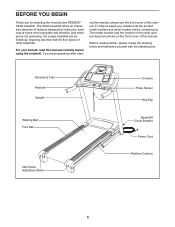
... REEBOK® V8.90 treadmill. ing this manual, please see the front cover of other treadmills.
If you ʼre not exercising, the unique treadmill can be folded up...treadmill. Before reading further, please review the drawing below and familiarize yourself with the labeled parts. To help us . Accessory Tray Handrail Upright
Walking Belt Foot Rail
Idler Roller Adjustment Bolts
Console...
User Manual - Page 6
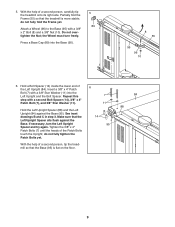
.... Note: The underside of the walking belt or the shipping carton. If there is coated with a soft cloth and a mild, non-abrasive cleaner.
Set the treadmill in the hardware kit, check to see if it is not in a cleared area and remove all packing materials. Note: If a part is preattached to...
User Manual - Page 7

... Upright Wire (87) to pull the Upright Wire out of a second person, carefully tip the treadmill onto its left side. the Wheel must turn freely. Plastic Tie
Press a Base Cap (89) into the Base (95). 8
Hole 90
5 95
90 5
89
95
96 10
Plastic Tie Cut
87
7 Then, attach the other two Base Feet...
User Manual - Page 8
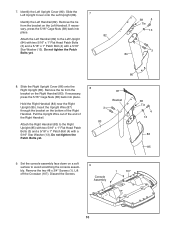
... Spacer on the Base (95).
See inset drawing A. Be careful not to pinch the Upright Wire (87). If necessary, turn the Right Upright Spacer and try again. Identify the Right Upright (85) and the Right Upright Spacer (91), which are marked with "Right" stickers. 3. Hold a Bolt Spacer (14) inside the lower...
User Manual - Page 9
...and a 3/8" Nut (10). With the help of a second person, tip the treadmill so that the
14
Left Upright Spacer sits flush against the Base (95). Tighten...Upright (84). Partially fold the
5
Frame (55) so that the treadmill is flat on the floor.
9 do not fully tighten the
Patch ...Upright (84) against the
Base. If necessary, turn freely. Press a Base Cap (89) into the
Left Upright and the...
User Manual - Page 10
...press the 5/16" Cage Nuts (38) back into place.
82
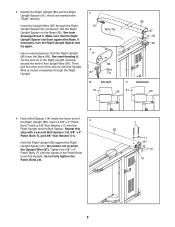
Attach the Left Handrail (82) to the Left Upright (84) with two 5/16" x 1" Flat Head Patch Bolts (3) and a 5/16" x 1" Patch Bolt (4) with a 5/16" Star Washer (13). Discard the Screws.
9
Console...
80
8. Attach the Right Handrail (83) to avoid scratching the console assembly. Remove the tie from the bracket on the Right Handrail (83...
User Manual - Page 12

...) into the Right Handrail. Start all parts are properly tightened before tightening any wires. Attach the Left Upright Cover (80) to the Crossbar (107) with four #8 x 1" Screws (53).
12
Console Assembly
87
105 53
107... HOW TO LOWER THE TREADMILL FOR USE on the treadmill decals, remove the plastic. To protect the floor or carpet, place a mat under the treadmill. Be careful not to...
User Manual - Page 13
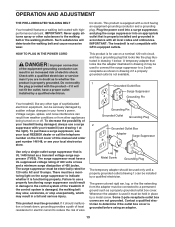
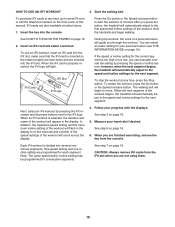
...treadmill (see your treadmill being turned on the front cover of the treadmill. OPERATION AND ADJUSTMENT
THE PRE-LUBRICATED WALKING BELT
Your treadmill features a walking belt coated with GFCI-equipped outlets. Such substances will not fit...for 120 volts AC and 15 amps.
Voltage surges, spikes, and noise interference can be grounded. Lug Metal Screw
Grounding Plug
The temporary ...
User Manual - Page 14
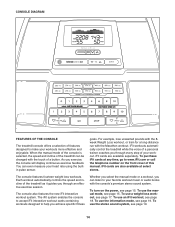
...console is selected, the speed and incline of a personal trainer coaches you achieve specific fitness
goals. iFit workouts automatically control the treadmill while the voice of the treadmill can even measure your heart rate using the builtin pulse sensor. To turn on the front cover of a button..., you exercise, the console will display continuous exercise feedback. To use...
User Manual - Page 15
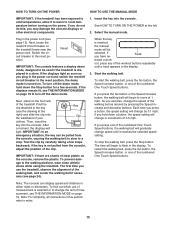
...kilometers. If you press the Go button or the Speed increase button, the walking belt will
light.
To start the walking belt, press the Go button, the Speed increase button, or one of...exercise, change by 0.1 mph; Start the walking belt. Each time you may damage the console displays or other electrical components.
1.
The time will change the speed of clear plastic on the treadmill...
User Manual - Page 16
... time your hands are finished exercising, remove the key from the console and put it may take a moment for at the lowest setting or you may wear prematurely.
16 walking belt, and your pace in minutes per mile, and the incline of the treadmill, press the Incline increase and decrease buttons or one or two...
User Manual - Page 17
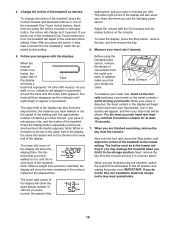
... the displays. To select one of the fourteen weight loss workouts, press one incline setting are finished exercising, remove the key from the console. Current Segment
The flashing
segment of
the profile represents the current segment of the Weight Loss Workout Center buttons. The workout will continue in this way until the last segment...
User Manual - Page 18
... the console.
Next, select an iFit workout by pressing the speed or incline buttons;
You can manually override the setting by pressing the iFit increase and decrease buttons next to start the ...logo will guide you press the button, the treadmill will automatically adjust to the first speed and incline settings of the workout begins, the treadmill will automatically adjust to ...
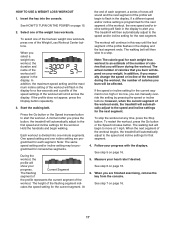
User Manual - Page 25
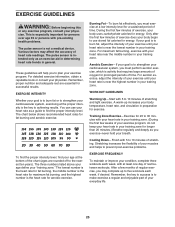
... is to burn fat or to strengthen your training zone.
WORKOUT GUIDELINES
Warming Up-Start with your heart rate near the middle number in your cardiovascular system, exercising at a low intensity level for prolonged periods of stretching and light exercise. Remember, proper nutrition and adequate rest are rounded off to 30 minutes with...
User Manual - Page 26

... 1 65 1 66 1 67 1 68 1 69 1 70 1 71 1 72 1 73 1 74 1 75 1 76 3 77 8 78 2 79 4 80 1 81 2 82 1 83 1 84 1 85 1 86 1 87 1 88 1 89 2 90 4 91 1 92 2 93 1 94 2 95 1 96 2 97 1 98 1 99 1 100 2
Description
Storage Latch Latch Knob #8 x 1" Screw Right Foot Rail Frame Roller Bracket Roller Ground Wire...
User Manual - Page 30
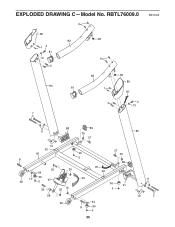
EXPLODED DRAWING C-Model No. RBTL76009.0
9
80
82
38
14 81
13
9
3
83
38
84
81
86
1 87
3
4
13
7
R0110A
88
89
11
35
27
14 92
95
90
8
5
25 94
96
10
90 5
97
35 93
26
35 10
87 92
27 35
89
90
91
5
98
96
94
8
90
5
30
85
11
14
7
User Manual - Page 32
... the terms set forth above is in lieu of any implied warranties of merchantability or fitness for a minimal handling charge. No other warranties, and any and all other warranty beyond... you , be prepared to provide the following information when contacting us assist you . ICON Health & Fitness, Inc., 1500 S. 1000 W., Logan, UT 84321-9813
Part No. 292810 R0110A
Printed in connection ...
Similar Questions

Tread Mill Noise-clicking Sound
Few days ago, i noticed that there was clicking sound coming out of the back roller when it is runni...
Few days ago, i noticed that there was clicking sound coming out of the back roller when it is runni...
(Posted by rajinibabu420 3 years ago)

Treadmill Won't Run
I turn on my treadmill, everything lights up but it won't go. what can I do?I turned off in back, un...
I turn on my treadmill, everything lights up but it won't go. what can I do?I turned off in back, un...
(Posted by barbbowls 8 years ago)

Console Display Screen Is Cracked
Where can I get a replacement for my console display for my Reebok V8.90?
Where can I get a replacement for my console display for my Reebok V8.90?
(Posted by jovalusky 8 years ago)

Where Does The Power Cord Plug Into The Reebok Rl725 Elleptical? Thanks
(Posted by fivetsports 8 years ago)

Reebok V7.90 Won't Turn On
Reebok V7.90 that's been in storage for a couple years will not turn on. Given to me and I know noth...
Reebok V7.90 that's been in storage for a couple years will not turn on. Given to me and I know noth...
(Posted by Vonboder 9 years ago)