
ProForm 400 Zlt Treadmill Support Question
ProForm 400 Zlt Treadmill Support Question
Find answers below for this question about ProForm 400 Zlt Treadmill.Need a ProForm 400 Zlt Treadmill manual? We have 7 online manuals for this item!
Question posted by stapletotn33 on June 4th, 2013
Routine Maintenance
I read somewhere that the treadmill needs to be routinely lubricated every 6 months.
Is this right ...and where/how do I lubricate my treadmill.?
Thanks
Current Answers
Related ProForm 400 Zlt Treadmill Manual Pages
Uk Manual - Page 1
...WF10 5QJ UK
AUSTRALIA Call: 1-800-237-173 E-mail: [email protected]
CAUTION
Read all precautions and instructions in the space above for future reference.
Save this equipment....: 053 92 36102 Website: www.iconsupport.eu E-mail: [email protected] Write: ICON Health & Fitness, Ltd. PETL49910.0 Serial No.
USER'S MANUAL
www.iconeurope.com Model No. Serial Number Decal
QUESTIONS...
Uk Manual - Page 2

... size. TABLE OF CONTENTS
WARNING DECAL PLACEMENT 2 IMPORTANT PRECAUTIONS 3 BEFORE YOU BEGIN 5 ASSEMBLY 6 OPERATION AND ADJUSTMENT 12 HOW TO FOLD AND MOVE THE TREADMILL 18 TROUBLESHOOTING 19 EXERCISE GUIDELINES 22 PART LIST 23 EXPLODED DRAWING 24 ORDERING REPLACEMENT PARTS Back Cover RECYCLING INFORMATION Back Cover
WARNING DECAL PLACEMENT
This drawing shows the...
Uk Manual - Page 3

.... Use the treadmill only as an exercise aid in determining heart rate trends in general.
3 When connecting the power cord (see HOW TO TURN ON THE POWER on page 14).
16. Keep the treadmill indoors, away from heated surfaces.
14. Read, understand, and test the emergency stop procedure before using your treadmill. Place the treadmill on...
Uk Manual - Page 4

... frame securely in use , before cleaning
the treadmill, and before performing the
maintenance and adjustment procedures de- Always unplug the power
cord immediately after use . (See the drawing on the treadmill. Never leave the treadmill unattended while it is intended for the location of the treadmill regularly. 19. Over exercising may result in a commercial, rental, or...
Uk Manual - Page 5
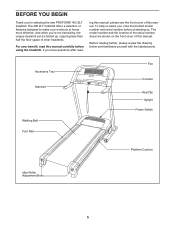
... of this manual carefully before contacting us assist you have questions after read this manual. BEFORE YOU BEGIN
Thank you ʼre not exercising, the unique treadmill can be folded up, requiring less than half the floor space of features designed to make your benefit, read - And when you for selecting the new PROFORM® 400 ZLT treadmill.
Uk Manual - Page 6

...Right Upright (36) as shown. 1
Identify the Right Upright (36), which has a square hole near the end of the walking belt or the shipping carton. Note: The underside of the treadmill walking belt is the key number of the walking belt, simply wipe off the lubricant... after the parentheses is normal and does not affect treadmill performance. If there is completed. Assembly requires the ...
Uk Manual - Page 7
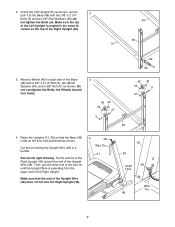
... Spacers (44), and a 3/8" Nut (47) as the top of the Right Upright. Tie the wire tie in the same di- rection as shown. See the far right drawing.
Then, pull the other end of the wire tie until the Upright ...Wire is extending from the upper end of the Right Upright (36).
36
48 31
39 39 5
3. the Wheels should turn freely.
3
45 44 ...
Uk Manual - Page 10
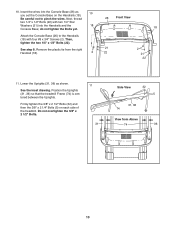
... with four #8 x 3/4" Screws (2). See step 8. Position the Uprights (31, 36) so that the treadmill Frame (74) is centered between the Uprights. Do not overtighten the 3/8" x 2 1/2" Bolts.
11 31
Side View...
32 5
31, 36 74
View from the right
Handrail (18).
2
26
Front View
18
21
2
22
21
22
11. 10. Firmly tighten the 3/8" x ...
Uk Manual - Page 11
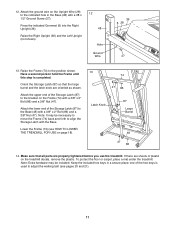
... parts are properly tightened before you use the treadmill.
If there are oriented as shown. 12. Raise the Frame (74...treadmill. one of the Storage Latch (87) to the indicated hole in a secure place; Attach the lower end of the hex keys is completed. Lower the Frame (74) (see pages 20 and 21).
11 Note: Extra hardware may be included. Press the indicated Grommet (6) into the Right...
Uk Manual - Page 12
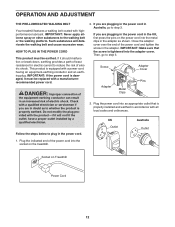
Such substances will not fit the outlet, have a proper outlet installed by a qualified electrician. DANGER: Improper connection ... Close the adapter cover over the end of electric shock. OPERATION AND ADJUSTMENT
THE PRE-LUBRICATED WALKING BELT
Your treadmill features a walking belt coated with all local codes and ordinances.
Screw
Adapter Cover
Pins
Adapter
Metal Clips
3.
...
Uk Manual - Page 13
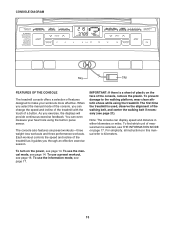
... built-in either kilometers or miles. You can change the speed and incline of the treadmill with the touch of the console, remove the plastic. When you select the manual mode of the console, you exercise, the displays will provide continuous exercise feedback.
IMPORTANT: If there is used, observe the alignment of the...
Uk Manual - Page 14
...as desired.
1. Next, stand on page 13) and slide the clip onto the waistband of the treadmill, press the Incline increase and decrease buttons. IMPORTANT: In an emergency situation, the key can be... press the Start button, the Speed increase button, or one of 0.5 Km/H.
Each time you exercise, change by pressing the Speed increase and decrease buttons. To stop . Change the incline of the ...
Uk Manual - Page 15

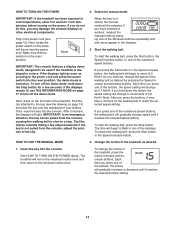
...treadmill when you are finished exercising, remove the key from the console and put it to turn off the fan. Turn on when the walking belt stops, the fan will show the speed of the walking belt and the approximate number of the treadmill to hold the
contacts- 5. The lower right display-The lower right...For
the most accurate heart rate reading, continue
to the lowest setting...
Uk Manual - Page 16

... next segment,
6. HOW TO USE A PRESET WORKOUT
1. Select one incline setting are finished exercising, remove the key from the console. however, when the next segment of the six preset ...across the display. Follow your
progress. The flashing
segment of the profile
represents the current segment of the treadmill as desired. See step 7 on page 15.
16 See step 8 on page 15.
8. Insert...
Uk Manual - Page 17
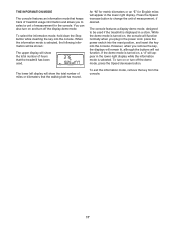
... console.
The console features a display demo mode, designed to be used if the treadmill is selected, the following information will be shown:
The upper display will show the ...an information mode that keeps track of treadmill usage information and allows you to select a unit of measurement for English miles will appear in the lower right display. When the information mode is displayed...
Uk Manual - Page 18
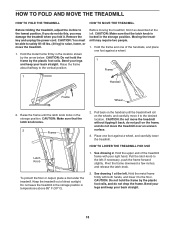
...right hand. Hold the metal frame firmly in temperatures above 85° F (30° C).
2. Raise the frame until the treadmill will roll on the wheels, and carefully move the treadmill without tipping it to raise, lower, or move the treadmill...Frame
Latch Knob
To protect the floor or carpet, place a mat under the treadmill. Hold the upper end of direct sunlight. Bend your legs and keep your...
Uk Manual - Page 19

...If the displays are still lit, see THE INFORMATION MODE on . If an extension cord is needed, use
SOLUTION: a. Check the power switch (see the front cover of this manual.
c.... the switch has tripped, wait for five minutes and then press the switch back in. b. d. If the treadmill still will not run, see the drawing above). PROBLEM: The displays of this manual. Next, remove the two...
Uk Manual - Page 20

...on
the left side of the Incline buttons. After a few minutes. If an extension cord is needed, use only a 3-conductor, 14-gauge (1 mm2) cord that the gap between the Magnet ... ft. (1.5 m). Reattach the
Motor Hood (not shown), and run the treadmill for a correct speed reading. The treadmill will recalibrate the incline system. Repeat until the
Magnet is properly tightened. With ...
Uk Manual - Page 21
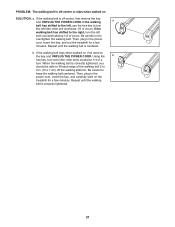
...walked on
SOLUTION: a. Then, plug in the
power cord, insert the key, and carefully walk on the
treadmill for a few minutes. If the walking
a
belt has shifted to the left, use the hex key ...1/2 of a turn; If the walking belt is properly tightened.
21 Then, plug in . (5 to the right, turn the left idler roller bolt clockwise 1/2 of a turn . Repeat until the walking
belt is off -...
Uk Manual - Page 22
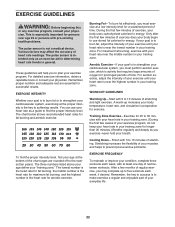
...in your everyday life.
22 After a few minutes of regular exercise, you to use your training zone. During the first few months of exercise, your condition, complete three workouts each week, if desired. If...increases your cardiovascular system, you must exercise at the bottom of heart rate readings.
To find the proper intensity level, find the proper intensity level.
Similar Questions

Treadmill Proform 400 C Model No.petl30506.1 Circuit Diagram
Can you send circuit diagram for Treadmill PROFORM 400 C MODEL No.PETL30506.1.Thank you .Best Regard...
Can you send circuit diagram for Treadmill PROFORM 400 C MODEL No.PETL30506.1.Thank you .Best Regard...
(Posted by birkasistvan56 5 years ago)

How Do I Find A High Performance Lubricant For The Pro-form 370e Crosswalk Walki
how do I find a high performance lubricant for the Pro-Form
how do I find a high performance lubricant for the Pro-Form
(Posted by Anonymous-138832 9 years ago)

I Get An Error On The Screen: E1 What Does It Mean?
(Posted by Ron818777 10 years ago)

Which Is Better Quality Treadmill Zt4 Or 400?
(Posted by annerosslillyon 10 years ago)

My Pf8.5 Personal Fitness Trainer Is Just Beeping And Console Reads Zero
What do I do to make it work again
What do I do to make it work again
(Posted by Dykie29 10 years ago)