
Pioneer VSX-831 Support Question
Pioneer VSX-831 Support Question
Find answers below for this question about Pioneer VSX-831.Need a Pioneer VSX-831 manual? We have 1 online manual for this item!
Question posted by Heechyesg on June 16th, 2016
Fm Channels Setup
How do I setup the FM receiver stations?
Current Answers
Answer #1: Posted by waelsaidani1 on June 16th, 2016 10:42 AM
waelsaidani1

Member since:
May 12th, 2013 Points: 19,501,797

Member since:
May 12th, 2013 Points: 19,501,797
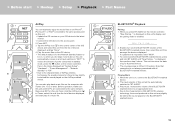
Listening To the Radio
1. Press TUNER (a) on the remote controller repeatedly to select either
"AM" or "FM" on the display.
2. Press MODE (c) on the remote controller, so that the "TunMode: Auto" is
displayed on the display.
3. When you press the / cursor (b) buttons on the remote controller,
automatic tuning starts, and searching stops when a station is found.
When tuned into a radio station, the "TUNED" indicator on the display
lights.
You can preset up to 40 stations.
1. Tune into the AM/FM radio station you want to register.
2. Press +Fav (d) on the remote controller or +FAVORITE on the main unit
so that the preset number on the display flashes.
3. While the preset number is flashing (about 8 seconds), repeatedly press
the / cursor (b) buttons on the remote controller to select a number
between 1 and 40.
4. Press +Fav (d) again on the remote controller or +FAVORITE on the
main unit to register the station. When registered, the preset number
stops flashing. To select a preset radio station, press the / cursor (b)
buttons on the remote controller.
0 To delete a preset station, press the / cursor (b) buttons on the
remote controller to select the preset number you want to delete, press
+Fav (d) on the remote controller or +FAVORITE on the main unit and
then press CLEAR (e) while the preset number is flashing. When
deleted, the number on the display goes off.
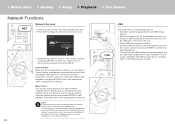
Internet Radio
When this unit is connected to a network, you can listen to
TuneIn or other preregistered Internet radio services. After
selecting the desired service, follow the on-screen
instructions, using the cursors to select radio stations and
programs, then press ENTER to play. Play starts when
100% is displayed for buffering.
Related Pioneer VSX-831 Manual Pages
Basic Manual - Page 1
> Before start > Hookup > Setup > Playback > Part Names
Basic Manual
VSX-831
AV Receiver
Hookup Step1: Connect the Speakers 3 Step2: Connect the TV 5 Step3: Connect the AV Components 7 Step4: Connect Other Cables 10 Setup Step5: Power On & Initial Setup 11 HDMI Setup 12 Playback Basic Playback 13 Network Functions 14 Others 16 Part Names Front Panel 18 Rear Panel 19...
Basic Manual - Page 2
...standard, switching audio output and volume using...per channel plus other companies. Speaker setup microphone ×1
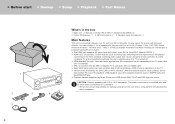
Main features
This unit is connected between your TV and your AV components. ...FM radio and BLUETOOTH® play , select the source with one HDMI cable $ Easy Initial Setup using the remote controller of speakers to 16 Ω impedance. > Before start > Hookup > Setup...
Basic Manual - Page 3
... playing music. 0 The front speakers, center speaker, and surround speakers are counted as
5 channels, and the powered subwoofer is counted as dialogs and vocals. > Before start > Hookup > Setup > Playback > Part Names
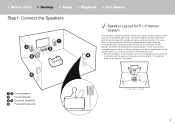
Step1: Connect the Speakers
Speaker Layout for 5.1-Channel System
Front speakers output front stereo sound and a center speaker outputs center sound such...
Basic Manual - Page 4
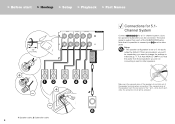
... - wires touch each of the SUBWOOFER jacks. Setup 0 The speaker configuration is possible to 5.1ch audio output by default. If the exposed wires of the speaker terminals when connecting.
> Before start > Hookup > Setup > Playback > Part Names
1/2˝ (12 mm)
1
Connections for 5.1Channel System
Connect 123456 for a 5.1-channel system.
If there are not connecting is...
Basic Manual - Page 5

... and setup for directions on the TV that supports the ARC (Audio Return Channel) feature. > Before start > Hookup > Setup > Playback...Setup. 0 Please refer to the TV's operation manual for the TV.
1
HDMI IN (ARC)
TV
1 HDMI cable
5 Shown here are required to the TV, but you can not only output the video input to this unit to use the ARC function. If you connect two or more AV components...
Basic Manual - Page 6
...selector. This describes the connections for a TV that is connected between your TV and AV components. By connecting with a digital optical cable is not necessary
if you will watch TV through... the TV and the audio output from the TV through a device such as a cable set-top box (that does not support the ARC (Audio Return Channel) feature. > Before start > Hookup > Setup > Playback > Part ...
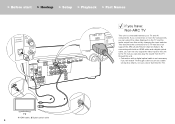
Basic Manual - Page 7

...Setup > Playback > Part Names
Step3: Connect the AV Components
if you to play 4K or 1080p video, use a high speed HDMI
cable. Make settings after all connections are complete. 0 To enjoy digital surround sound including Dolby Digital, audio... output should be set to an AV component that conforms with the CEC (Consumer Electronics ...
Basic Manual - Page 8
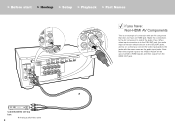
> Before start > Hookup > Setup > Playback > Part Names
if you connect the video input jacks to the jacks with an AV component that does not have : Non-HDMI AV Components
This is an example of connection with the same name as the audio input jacks. Note that video signals input to the VIDEO IN jack will...
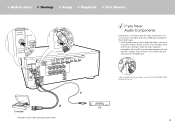
Basic Manual - Page 9
...
to the SIGNAL GND terminal of a connection with an audio component. You can connect a turntable that has an MM-type cartridge to the PHONO jack. 0 If the turntable has a built-in audio equalizer, connect it to another AUDIO IN jack. > Before start > Hookup > Setup > Playback > Part Names
if you have: Audio Components
Example of this unit.
1
CD 9
Basic Manual - Page 10
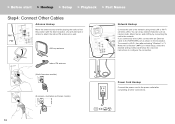
...to the power outlet after selecting "Wireless" in the illustration. > Before start > Hookup > Setup > Playback > Part Names
Step4: Connect Other Cables
Antenna Hookup
Move the antenna around while playing...
AM
similar to attach the indoor FM antenna to the network using wired LAN or Wi-Fi (wireless LAN).
Network Connection" ( P12) in Initial Setup, select the desired setting method and...
Basic Manual - Page 11
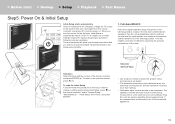
... halfway.
0 Calibration takes several minutes to turn off the household appliances.
11 Initial Setup
Language Select
English Deutsch Français Español Italiano Nederlands Svenska
a b
...the item with the cursors of the room. To redo the Initial Setup If you to place the speaker setup microphone at high volume during measurement.
This also enables correction of distortion ...
Basic Manual - Page 12
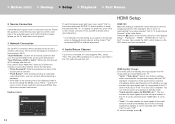
... "Off". 0 "Last": You can transmit the input signals from this unit is set "System Setup" - Audio Return Channel
If you can transmit the input signals from AV components are a further two choices of connection method. This is in "4. Audio Return Channel" in the screen listing the SSIDs, select "Other..." Find out the SSID of the access...
Basic Manual - Page 13
..., SURR, and STEREO buttons. > Before start > Hookup > Setup > Playback > Part Names
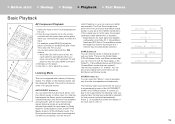
Basic Playback
a f
b e d c
AV Component Playback
1. You can select the "Stereo" mode to playback only from the front speakers and subwoofer, and for multi-channel input signals listening modes are the Dolby Digital, DTS-HD Master Audio, and Stereo modes that you connected the...
Basic Manual - Page 14
...a b
14
3.
Select the server with USB storage devices using the cursors to select radio stations and
programs, then press ENTER to the unit. 2. Play starts when 100% is also ...the cursors, select the desired music file and press ENTER to confirm and start > Hookup > Setup > Playback > Part Names
Network Functions
Network Services
1. Notes: 0 Network services become unavailable in ...
Basic Manual - Page 15
...icon in iTunes, select this unit from the list of devices displayed, and start > Hookup > Setup > Playback > Part Names
J1IPOF 74999999
AirPlay
You can wirelessly enjoy the music files on ... status is requested, enter "0000".
0 To connect another BLUETOOTH enabled device, press and hold BT AUDIO until "Now Pairing..." Enable (turn on this unit.
Connect the iOS device to the access point....
Basic Manual - Page 16

... controller to register the station.
"AM/FM Frequency Step" or "AM Frequency Step" and select the frequency step for compressed audio.
16 Note that there is "CD", "TV", "PHONO", "FM", or "AM", so...up to the previous screen, press
. "Tuner" - > Before start > Hookup > Setup > Playback > Part Names
Others
a b
c d e
Listening To the Radio
1. Press +Fav (d) again on the...
Basic Manual - Page 17
... speakers automatically or make settings in the various menus. If you reset the unit status, your selection. > Before start > Hookup > Setup > Playback > Part Names
Home
When you press on the remote controller, the Home is operating erratically (Resetting this unit)
Restarting the unit may solve the ...
Basic Manual - Page 18
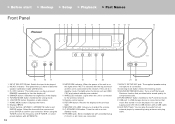
HOME MENU button: Displays the Home. 8. MCACC SETUP MIC jack: The supplied speaker setup microphone is in it can play the audio from an external player by connecting using the TUNER, select the frequency with TUNE , or select preset stations with MCACC. 3. USB port: A USB storage device is connected so that provides better sound quality...
Basic Manual - Page 19
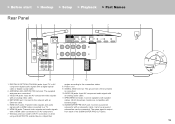
...FM 75Ω terminal: The supplied antennas are compatible with banana plugs.) 12.SUBWOOFER PRE OUT jack: Connect a powered subwoofer with a HDMI cable connected to an AV component.
7. HDMI OUT jacks: Transmit video signals and audio...
is connected. 10.AUDIO IN jacks: Input AV component audio signal with an Ethernet cable.
5. Power cord 9. > Before start > Hookup > Setup > Playback > Part...
Basic Manual - Page 20
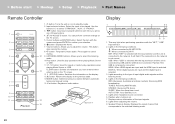
...: When digital signals are connected. 6. > Before start > Hookup > Setup > Playback > Part Names
Remote Controller
1. Í button: Turns the unit on . 7. Use the
buttons in the following conditions. : When connected by BLUETOOTH. : When connected by USB and the USB device is set. STEREO: Receiving FM stereo. Lights when headphones are input and the digital...
Similar Questions

Vsx-70 Pioneer Elite Receiver Update
How do you update your Pioneer Elite VSX-70 Receiver
How do you update your Pioneer Elite VSX-70 Receiver
(Posted by ryanwheeler2 11 months ago)

Error Message Ng:lcrslsr
hello, i ve got a message when power on NG:LCRSLSR, and nothing can be done
hello, i ve got a message when power on NG:LCRSLSR, and nothing can be done
(Posted by gregoryger 2 years ago)

Receiver Pioneer Vsx-830-k Main Receiver Bottom Not Work
after making making the receiver up-date via internet the main receiver bottom on remote control bec...
after making making the receiver up-date via internet the main receiver bottom on remote control bec...
(Posted by juanky20111 8 years ago)

How To Connect Pioneer Vsx 522 With Satellite Receiver
(Posted by fonarg 10 years ago)

Can't See Network Home Menu On Pioneer Vsx-822-k Av Receiver
(Posted by frkalfred 10 years ago)