Miele PT 7136 Support Question
Miele PT 7136 Support Question
Find answers below for this question about Miele PT 7136.Need a Miele PT 7136 manual? We have 1 online manual for this item!
Question posted by wilfredoguzman2000 on February 20th, 2014
Dryer Parts
do you have a part# for fluff filter
Current Answers
Related Miele PT 7136 Manual Pages
Operating and Installation manual - Page 1
Operating and Installation manual
Vented Dryer PT 7136 Plus
To prevent accidents and machine damage read these instructions before installation or use. en -
US
M.-Nr. 06 975 240
Operating and Installation manual - Page 2
...the dryer 7 Control panel 7
Display function 8 Before using for the first time 10 Use 11 Fabric care labels 11 Drying tips 11 Coin mechanism 15 Canceling a program 15 Adding/removing laundry during ...a drying program 15 Program guide 16 Timer 19 Favorites 20
Selecting/Changing a Favorite 20 Low temp 22 Saving a Favorite 22 Cleaning and Care 23 Cleaning the lint filter...
Operating and Installation manual - Page 4

...cleaning
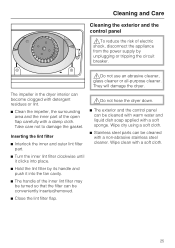
and care disconnect the dryer from the electrical supply pulling the plug or tripping the circuit breaker.
~ Do not allow children to the user.
~ Clean the lint filter before using this appliance. Read... weather.
~ Do not tamper
with the controls.
~ Do not repair or replace any part of the machine and
exhaust duct should only be held responsible for
drying fabrics washed in the...
Operating and Installation manual - Page 5
... been previously cleaned, washed, soaked or spotted with the risk of igniting in doubt, wash the items several times.
~ Warning: Do not switch the tumble
dryer off before removing the laundry.
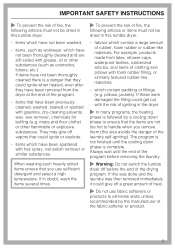
IMPORTANT SAFETY INSTRUCTIONS
~ To prevent the risk of fire, the
following articles or items must not be dried in this tumble...
Operating and Installation manual - Page 7
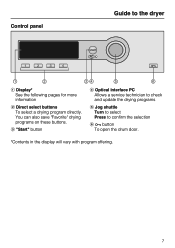
... program offering.
7
c "Start" button
d Optical interface PC Allows a service technician to check and update the drying programs
e Jog shuttle Turn to select Press to the dryer
a Display* See the following pages for more information
b Direct select buttons To select a drying program directly. You can also save "Favorite" drying programs on these...
Operating and Installation manual - Page 8
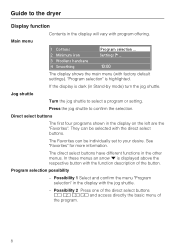
... ...
They can be selected with program offering. In these menus an arrow H is displayed above the respective button with factory default settings). Guide to the dryer
Display function
Contents in the display on the left are the "Favorites".
Settings F ...
10:00
The display shows the main menu (with the function description...
Operating and Installation manual - Page 9
...
Settings J
Duration 1:16 h
Low temp.
The selected component is turned the highlighter moves up or down. E.
- The "Settings J" menu allows you to adjust the dryer to the dryer
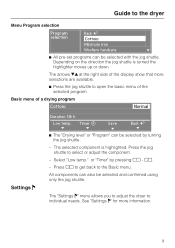
Menu Program selection
Program selection
Back A Cottons
Minimum iron
Woollens handcare
H
^ All pre-set programs can be selected with the jog shuttle. H
Timer Y H
Save...
Operating and Installation manual - Page 10
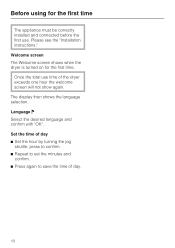
Welcome screen The Welcome screen shows when the dryer is turned on for the first time
The appliance must be correctly installed and connected before the first use time of day...turning the jog shuttle, press to confirm. ^ Repeat to set the minutes and confirm. ^ Press again to save the time of the dryer exceeds one hour the welcome screen will not show again. Before using for the first time.
Operating and Installation manual - Page 11
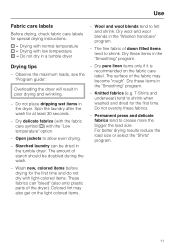
...guide". Dry these fabrics.
- Knitted fabrics (e.g. Starched laundry can "bleed" (also onto plastic parts of down filled items tend to shrink. Dry pure ...linen items only if it is recommended on the light colored items.
11 The fine fabric of the dryer).
Overloading the dryer will result in a tumble dryer
- Spin the laundry...
Operating and Installation manual - Page 12
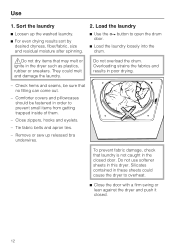
... that no filling can come out.
- Close zippers, hooks and eyelets.
- Overloading strains the fabrics and results in this dryer. Silicates contained in the dryer such as plastics, rubber or sneakers. Sort the laundry
^ Loosen up released bra underwires. Check hems and seams, be fastened in the closed .
12 They could cause the...
Operating and Installation manual - Page 14
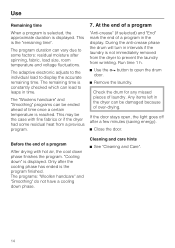
At the end of a program
"Anti-crease" (if selected) and "End" mark the end of a program in the dryer can lead to prevent the laundry from wrinkling. Only after a few minutes (saving energy).
^ Close the door. Cleaning and care hints ^ See "Cleaning and Care".
14 This may be ended ahead ...
Operating and Installation manual - Page 18
...
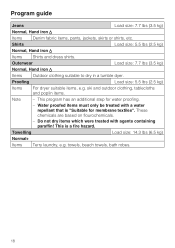
Items Shirts and dress shirts. Towelling
Load size: 14.3 lbs (6.5 kg)
Normal+
Items Terry laundry, e.g.
ski and outdoor clothing, tablecloths and poplin items.
Note
- Water proofed items must only... suitable to dry in a tumble dyer. Proofing
Load size: 5.5 lbs (2.5 kg)
Items
For dryer suitable items, e.g. This is "Suitable for water proofing.
- Do not dry items which were ...
Operating and Installation manual - Page 20

... like to adjust: program ("Cottons") or the drying level ("Normal").
^ Press the jog shuttle to this level. Selecting/Changing a Favorite
^ Close the door. Favorites
The dryer has the option to save the most used drying programs on the direct select buttons.
Main menu
1 Cottons 2 Minimum iron 3 Woollens handcare 4 Smoothing
^ Press the...
Operating and Installation manual - Page 23
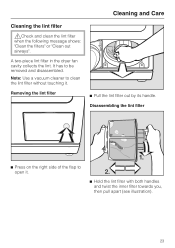
A two-piece lint filter in the dryer fan cavity collects the lint.
Note: Use a vacuum cleaner to clean the lint filter without touching it .
^ Hold the lint filter with both handles and twist the inner filter towards you, then pull apart (see illustration).
23 Removing the lint filter
^ Pull the lint filter out by its handle.
Cleaning and...
Operating and Installation manual - Page 24

...The dryer efficiency can be affected by wet lint filters.
^ Turn the knobs, a, of the left and right covers until they click.
24
wet
Rinse the lint filters only if clogged.
,Let the lint filters air...
^ Holding by the knobs, pull the covers up, b, and clean.
^ Use a vacuum to clean the lint filter. ^ Insert the covers and lock them . Clean only if heavily soiled.
^ Open the door.
^ Remove the ...
Operating and Installation manual - Page 25
... damage the dryer. Inserting the lint filter
^ Interlock the inner and outer lint filter part.
^ Turn the inner lint filter clockwise until it clicks into the fan cavity.
^ The handle of the inner lint filter may be turned so that the filter can be conveniently inserted/removed.
^ Close the lint filter flap.
,Do not hose the dryer down.
^ The...
Operating and Installation manual - Page 27
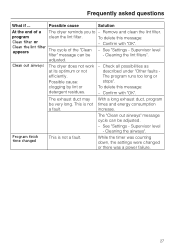
... "OK".
- This is not a fault.
- While the timer was a power failure.
27 Supervisor level -
increase. Supervisor level - Remove and clean the lint filter.
adjusted. Clean out airways
The dryer does not work at its optimum or not efficiently. Possible cause: clogging by lint or detergent residues.
- Check all possibilities as described under...
Operating and Installation manual - Page 28
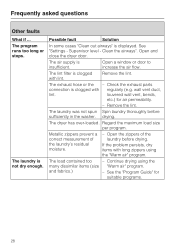
...,
lint. See "Settings -
The lint filter is clogged with regularly (e.g.
The program runs too long or stops.
The exhaust hose or the - Regard the maximum load size per program. Open the zippers of the laundry's residual moisture.
-
The air supply is not dry enough. Check the exhaust parts
connection is displayed.
louvered wall...
Operating and Installation manual - Page 29

...
effects on the lifetime of the
condensed water in the
caused by
research institutes, that
dryers have static cling after drying. Lint has built up. Frequently asked questions
What if ......are prone to minimize the static cling during drying.
has been established by items being worn lint filters and can be installed with a non-return flap to a collective exhaust duct.
-
Check ...
Operating and Installation manual - Page 37

An appropriate "stacking kit" available from Miele is required. Side view
Top view
Installation
Rear view
Washer/ Dryer Stack
a Lid over hang with transport grips (arrow)
b Stand (optional accessory)
The Miele dryer can be installed as part of the stacking kit must be completed by a Miele Service Technician.
37 Installation of a washer-dryer stack in combination with a Miele washer.
Similar Questions


T8003 Stopped Heating
suddenly my T8003 stopped heating. Drum turns and air blows but no heat
suddenly my T8003 stopped heating. Drum turns and air blows but no heat
(Posted by fobes2003 2 years ago)
Hi My Dryer Is Not Heating Up. What Can The Problem Be ?
Hi my dryer is not heating up. What can the problem be ?
Hi my dryer is not heating up. What can the problem be ?
(Posted by Payalkedia 6 years ago)