Operating and Installation manual
Page 1
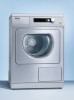
en - US M.-Nr. 06 975 240 Operating and Installation manual Vented Dryer PT 7136 Plus To prevent accidents and machine damage read these instructions before installation or use.
en - US M.-Nr. 06 975 240 Operating and Installation manual Vented Dryer PT 7136 Plus To prevent accidents and machine damage read these instructions before installation or use.
Operating and Installation manual
Page 2
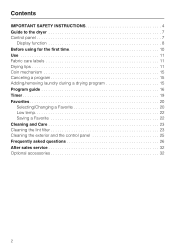
Contents IMPORTANT SAFETY INSTRUCTIONS 4 Guide to the dryer 7 Control panel 7 Display function 8 Before using for the first time 10 Use 11 Fabric care labels 11 Drying tips 11 Coin mechanism 15 Canceling a program 15 Adding/removing laundry during a drying program 15 Program guide 16 Timer 19 Favorites 20 Selecting/Changing a Favorite 20 Low temp 22 Saving a Favorite 22 Cleaning and Care 23 Cleaning the lint filter 23 Cleaning the exterior and the control panel 25 Frequently asked questions 26 After sales service 32 Optional accessories 32 2
Contents IMPORTANT SAFETY INSTRUCTIONS 4 Guide to the dryer 7 Control panel 7 Display function 8 Before using for the first time 10 Use 11 Fabric care labels 11 Drying tips 11 Coin mechanism 15 Canceling a program 15 Adding/removing laundry during a drying program 15 Program guide 16 Timer 19 Favorites 20 Selecting/Changing a Favorite 20 Low temp 22 Saving a Favorite 22 Cleaning and Care 23 Cleaning the lint filter 23 Cleaning the exterior and the control panel 25 Frequently asked questions 26 After sales service 32 Optional accessories 32 2

Operating and Installation manual
Page 3
Supervisor level 57 3 Contents INSTALLATION INSTRUCTIONS 33 IMPORTANT SAFETY INSTRUCTIONS 34 Installation 36 Electrical connection 40 Installation of exhaust venting 41 General notes 41 How to calculate the effective duct length 42 Determining the position of the exhaust connection 46 Exhaust connection with a flexible exhaust hose or rigid pipe 47 Technical Data 51 Caring for the environment 52 Settings J 53 Opening the menu Settings 54 Language J 55 Settings -
Supervisor level 57 3 Contents INSTALLATION INSTRUCTIONS 33 IMPORTANT SAFETY INSTRUCTIONS 34 Installation 36 Electrical connection 40 Installation of exhaust venting 41 General notes 41 How to calculate the effective duct length 42 Determining the position of the exhaust connection 46 Exhaust connection with a flexible exhaust hose or rigid pipe 47 Technical Data 51 Caring for the environment 52 Settings J 53 Opening the menu Settings 54 Language J 55 Settings -

Operating and Installation manual
Page 4
... use genuine Miele accessories and replacement parts. Repairs to electrical appliances should be exposed to play on or in the drum. The manufacturer cannot be machine dried. ~ Before maintenance, or cleaning and care disconnect the dryer from the electrical supply pulling the plug or tripping the circuit breaker. ~ Do not allow children to the weather. ~ Do not tamper with the controls. ~ Do not repair or replace any part of these operating instructions. Check...
... use genuine Miele accessories and replacement parts. Repairs to electrical appliances should be exposed to play on or in the drum. The manufacturer cannot be machine dried. ~ Before maintenance, or cleaning and care disconnect the dryer from the electrical supply pulling the plug or tripping the circuit breaker. ~ Do not allow children to the weather. ~ Do not tamper with the controls. ~ Do not repair or replace any part of these operating instructions. Check...
Operating and Installation manual
Page 6
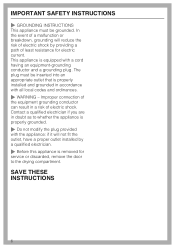
... by a qualified electrician. ~ Before this appliance is removed for electric current. This appliance is equipped with all local codes and ordinances. ~ WARNING - The plug must be inserted into an appropriate outlet that is properly installed and grounded in accordance with a cord having an equipment-grounding conductor and a grounding plug. SAVE THESE INSTRUCTIONS 6 In the event of a malfunction or breakdown...
... by a qualified electrician. ~ Before this appliance is removed for electric current. This appliance is equipped with all local codes and ordinances. ~ WARNING - The plug must be inserted into an appropriate outlet that is properly installed and grounded in accordance with a cord having an equipment-grounding conductor and a grounding plug. SAVE THESE INSTRUCTIONS 6 In the event of a malfunction or breakdown...
Operating and Installation manual
Page 7
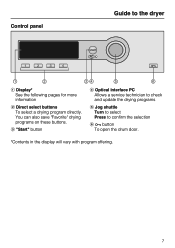
c "Start" button d Optical interface PC Allows a service technician to check and update the drying programs e Jog shuttle Turn to select Press to the dryer a Display* See the following pages for more information b Direct select buttons To select a drying program directly. You can also save "Favorite" drying programs on these buttons. Control panel Guide to confirm the selection f a button To open the drum door. *Contents in the display will vary with program offering. 7
c "Start" button d Optical interface PC Allows a service technician to check and update the drying programs e Jog shuttle Turn to select Press to the dryer a Display* See the following pages for more information b Direct select buttons To select a drying program directly. You can also save "Favorite" drying programs on these buttons. Control panel Guide to confirm the selection f a button To open the drum door. *Contents in the display will vary with program offering. 7
Operating and Installation manual
Page 12
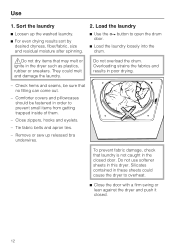
... use softener sheets in the dryer such as plastics, rubber or sneakers. Do not overload the drum. To prevent fabric damage, check that no filling can come out. - Tie fabric belts and apron ties. - Use 1. Overloading strains the fabrics and results in the closed . 12 Comforter covers and pillowcases should be sure that laundry is not caught in poor drying. - Remove...
... use softener sheets in the dryer such as plastics, rubber or sneakers. Do not overload the drum. To prevent fabric damage, check that no filling can come out. - Tie fabric belts and apron ties. - Use 1. Overloading strains the fabrics and results in the closed . 12 Comforter covers and pillowcases should be sure that laundry is not caught in poor drying. - Remove...

Operating and Installation manual
Page 13
..." The currently running program. and/or "Timer" - Button E "Timer" The time of the following buttons during the running program: - "Start" flashes when the program can be started or if the program is canceled the credit is displayed. - and/or "Timer" from the "Program selection" menu by turning the jog shuttle. 4. If the door is opened after the program has started . ^ Press the "Start" button. The drying levels are...
..." The currently running program. and/or "Timer" - Button E "Timer" The time of the following buttons during the running program: - "Start" flashes when the program can be started or if the program is canceled the credit is displayed. - and/or "Timer" from the "Program selection" menu by turning the jog shuttle. 4. If the door is opened after the program has started . ^ Press the "Start" button. The drying levels are...
Operating and Installation manual
Page 14
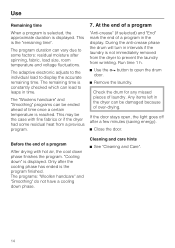
... residual heat from wrinkling. Check the drum for any missed pieces of over-drying. Any items left in the dryer can be damaged because of laundry. If the door stays open the drum door. ^ Remove the laundry. "Cooling down" is the "remaining time". Cleaning and care hints ^ See "Cleaning and Care". 14 This is displayed. The "Woolens handcare" and "Smoothing" programs can be the case with hot air, the cool...
... residual heat from wrinkling. Check the drum for any missed pieces of over-drying. Any items left in the dryer can be damaged because of laundry. If the door stays open the drum door. ^ Remove the laundry. "Cooling down" is the "remaining time". Cleaning and care hints ^ See "Cleaning and Care". 14 This is displayed. The "Woolens handcare" and "Smoothing" programs can be the case with hot air, the cool...
Operating and Installation manual
Page 15
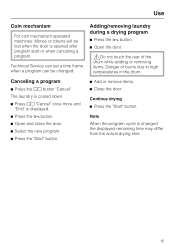
... high temperatures in the drum. ^ Add or remove items. ^ Close the door. Continue drying ^ Press the "Start" button. Note When the program cycle is changed . Use Coin mechanism For coin mechanism operated machines: Money or tokens will be changed the displayed remaining time may differ from the actual drying time. 15 Technical Service can set a time frame when a program can be lost when the door is displayed. ^ Press the a button. ^ Open and...
... high temperatures in the drum. ^ Add or remove items. ^ Close the door. Continue drying ^ Press the "Start" button. Note When the program cycle is changed . Use Coin mechanism For coin mechanism operated machines: Money or tokens will be changed the displayed remaining time may differ from the actual drying time. 15 Technical Service can set a time frame when a program can be lost when the door is displayed. ^ Press the a button. ^ Open and...

Operating and Installation manual
Page 24
... the lint filters air dry before inserting them in place by turning the knobs until they click. 24 The dryer efficiency can be affected by wet lint filters. ^ Turn the knobs, a, of the left and right covers until they click. ^ Holding by the knobs, pull the covers up, b, and clean. ^ Use a vacuum to clean the lint filter. ^ Insert the covers and lock them . Cleaning and Care Clean the lint filters - dry Cleaning the fan cavity Check the...
... the lint filters air dry before inserting them in place by turning the knobs until they click. 24 The dryer efficiency can be affected by wet lint filters. ^ Turn the knobs, a, of the left and right covers until they click. ^ Holding by the knobs, pull the covers up, b, and clean. ^ Use a vacuum to clean the lint filter. ^ Insert the covers and lock them . Cleaning and Care Clean the lint filters - dry Cleaning the fan cavity Check the...
Operating and Installation manual
Page 25
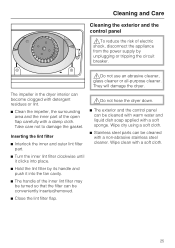
... lint filter ^ Interlock the inner and outer lint filter part. ^ Turn the inner lint filter clockwise until it clicks into place. ^ Hold the lint filter by unplugging or tripping the circuit breaker. ,Do not use an abrasive cleaner, glass cleaner or all-purpose cleaner. Wipe dry using a soft cloth. ^ Stainless steel parts can be cleaned with a damp cloth. Cleaning and Care Cleaning the exterior and the control panel ,To reduce the risk of the open...
... lint filter ^ Interlock the inner and outer lint filter part. ^ Turn the inner lint filter clockwise until it clicks into place. ^ Hold the lint filter by unplugging or tripping the circuit breaker. ,Do not use an abrasive cleaner, glass cleaner or all-purpose cleaner. Wipe dry using a soft cloth. ^ Stainless steel parts can be cleaned with a damp cloth. Cleaning and Care Cleaning the exterior and the control panel ,To reduce the risk of the open...
Operating and Installation manual
Page 27
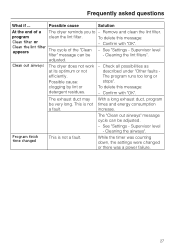
... What if ... adjusted. While the timer was counting down, the settings were changed This is not times and energy consumption a fault. Clean out airways The dryer does not work at its optimum or not efficiently. See "Settings - Confirm with "OK". - The exhaust duct may With a long exhaust duct, program be adjusted. Clean filter or Clean the lint filter appears The cycle of a The dryer reminds you to - program clean the lint filter. Remove and clean the lint filter.
... What if ... adjusted. While the timer was counting down, the settings were changed This is not times and energy consumption a fault. Clean out airways The dryer does not work at its optimum or not efficiently. See "Settings - Confirm with "OK". - The exhaust duct may With a long exhaust duct, program be adjusted. Clean filter or Clean the lint filter appears The cycle of a The dryer reminds you to - program clean the lint filter. Remove and clean the lint filter.
Operating and Installation manual
Page 28
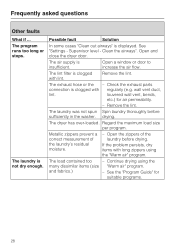
... runs too long or stops. See "Settings - Check the exhaust parts connection is insufficient. louvered wall vent, bends, etc.) for suitable programs. 28 The laundry was not spun Spin laundry thoroughly before drying. The dryer has over-loaded. If the problem persists, dry items with long zippers using the many dissimilar items (size "Warm air" program. See the "Program Guide" for air permeability. - Clean the airways". The air supply is clogged with lint...
... runs too long or stops. See "Settings - Check the exhaust parts connection is insufficient. louvered wall vent, bends, etc.) for suitable programs. 28 The laundry was not spun Spin laundry thoroughly before drying. The dryer has over-loaded. If the problem persists, dry items with long zippers using the many dissimilar items (size "Warm air" program. See the "Program Guide" for air permeability. - Clean the airways". The air supply is clogged with lint...

Operating and Installation manual
Page 29
... items being worn lint filters and can be installed with a non-return flap to a collective exhaust duct. - Possible fault Solution What if there is cleaned (see "Cleaning and loosened during drying. Use liquid fabric softener in the last rinse of friction The lint is collected in dryers' collective exhaust the drum? It Care"). Check the non-return flap regularly for damages and replace if necessary. Synthetics...
... items being worn lint filters and can be installed with a non-return flap to a collective exhaust duct. - Possible fault Solution What if there is cleaned (see "Cleaning and loosened during drying. Use liquid fabric softener in the last rinse of friction The lint is collected in dryers' collective exhaust the drum? It Care"). Check the non-return flap regularly for damages and replace if necessary. Synthetics...
Operating and Installation manual
Page 30
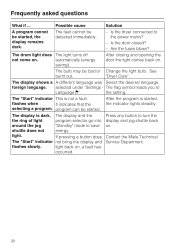
... back on . automatically (energy saving). "Dryer Care". The bulb may be started, the display remains dark. program can be detected immediately. - If pressing a button does The "Start" indicator not bring the display and flashes slowly. selected under "Settings - The fault cannot be started , flashes when It indicates that the the indicator lights steadily. After closing and opening the door the light comes back on . The display...
... back on . automatically (energy saving). "Dryer Care". The bulb may be started, the display remains dark. program can be detected immediately. - If pressing a button does The "Start" indicator not bring the display and flashes slowly. selected under "Settings - The fault cannot be started , flashes when It indicates that the the indicator lights steadily. After closing and opening the door the light comes back on . The display...

Operating and Installation manual
Page 31
... place. ,Make sure the bulb cover is located along the upper rim of electric shock, disconnect the appliance from Miele. 31 Frequently asked questions Changing the light bulb To reduce the risk of the drum opening. The light bulb must not exceed the maximum wattage listed on the data plate. ^ Replace the light bulb with a temperature proof bulb available from the power supply by unplugging or tripping the circuit breaker. ^ Open the door.
... place. ,Make sure the bulb cover is located along the upper rim of electric shock, disconnect the appliance from Miele. 31 Frequently asked questions Changing the light bulb To reduce the risk of the drum opening. The light bulb must not exceed the maximum wattage listed on the data plate. ^ Replace the light bulb with a temperature proof bulb available from the power supply by unplugging or tripping the circuit breaker. ^ Open the door.
Operating and Installation manual
Page 34
... a grounding plug. These conditions will not fit the outlet, have a proper outlet installed by a qualified installer. ~ Install the clothes dryer according to collapse, be easily crushed, and trap lint. Do not use with a qualified electrician, service representative or personnel if you are known to the manufacturer's instructions and local codes. ~ Check the packaging, the dryer and accessories for use a damaged appliance. ~ Repair and maintenance work should not be used, it must...
... a grounding plug. These conditions will not fit the outlet, have a proper outlet installed by a qualified installer. ~ Install the clothes dryer according to collapse, be easily crushed, and trap lint. Do not use with a qualified electrician, service representative or personnel if you are known to the manufacturer's instructions and local codes. ~ Check the packaging, the dryer and accessories for use a damaged appliance. ~ Repair and maintenance work should not be used, it must...

Operating and Installation manual
Page 35
... any doubt concerning installation, contact Miele's Technical Service Department. ships) must be performed by a qualified installer or service agency, in strict accordance with national and local safety regulations and standards. ~ Do not install the machine in non stationary locations (e.g. SAVE THESE INSTRUCTIONS 35 IMPORTANT SAFETY INSTRUCTIONS ~ When installing multiple dryers to one collective exhaust duct, a non-return flap per dryer must be installed directly to the collective...
... any doubt concerning installation, contact Miele's Technical Service Department. ships) must be performed by a qualified installer or service agency, in strict accordance with national and local safety regulations and standards. ~ Do not install the machine in non stationary locations (e.g. SAVE THESE INSTRUCTIONS 35 IMPORTANT SAFETY INSTRUCTIONS ~ When installing multiple dryers to one collective exhaust duct, a non-return flap per dryer must be installed directly to the collective...

Operating and Installation manual
Page 53
Supervisor level"). all users (Menu "Settings J") or - Contact Miele Technical Service. Depending on default settings: - some settings are visible and can be changed by all setting are locked in the "Supervisor level" by a code (Menu "Settings - Menu Settings J to adjust standard settings The dryer controls can be adjusted to changing demands through the settings.
Supervisor level"). all users (Menu "Settings J") or - Contact Miele Technical Service. Depending on default settings: - some settings are visible and can be changed by all setting are locked in the "Supervisor level" by a code (Menu "Settings - Menu Settings J to adjust standard settings The dryer controls can be adjusted to changing demands through the settings.


