Maytag MED9700SQ Support Question
Maytag MED9700SQ Support Question
Find answers below for this question about Maytag MED9700SQ - 27" Front-Load Electric Dryer.Need a Maytag MED9700SQ manual? We have 1 online manual for this item!
Question posted by james1355 on November 1st, 2015
Door Lite On Wont Start
The person who posted this question about this Maytag product did not include a detailed explanation. Please use the "Request More Information" button to the right if more details would help you to answer this question.
Current Answers
Answer #1: Posted by TommyKervz on November 1st, 2015 11:06 PM
TommyKervz

Member since:
January 10th, 2013 Points: 17,776,813

Member since:
January 10th, 2013 Points: 17,776,813
See possible reason and solution on the link below.
Related Maytag MED9700SQ Manual Pages
Use and Care Guide - Page 3

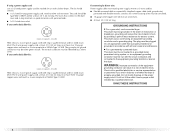
... after each load. ■ Keep area around the exhaust opening and adjacent
surrounding areas free from the accumulation of lint, dust, and dirt.
■ The interior of the dryer and exhaust ... INSTRUCTIONS
WARNING: To reduce the risk of fire, electric shock, or injury to play on your dryer. This is removed from service or discarded, remove the door to the weather.
■ Do not tamper with...
Use and Care Guide - Page 4

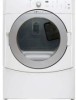
... to the total height of the dryer for a total height of different heights separately for Part Number 8212640. Check existing electrical supply and venting. You will add to place the 15.5" (39.4 cm) pedestal at least 3" (7.6 cm) above the floor. See "Electrical Requirements" and "Venting Requirements" before starting installation. For further information, please refer...
Use and Care Guide - Page 5

...the dryer door to open fully.
38" (96.52 cm)
*31½" (80 cm)
27" (68.6 cm)
*Most installations require a minimum 5" (12.7 cm) clearance behind the dryer for a garage installation. Louvered doors ...the following spacing dimensions are required.
Place dryer at least 18" (46 cm) above the floor for the exhaust vent with elbow. See "Electrical Requirements." ■ A sturdy floor to...
Use and Care Guide - Page 6
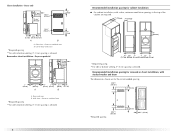
... installation spacing for cabinet installation ■ For cabinet installation, with a door, minimum ventilation openings in .2* (155 cm2)
1"* 31½" 5"** (2.5 cm) (80 cm) (12.7 cm)
A
B
A. closet or confined area B. Dryer on pedestal
3"* (7.6 cm)
14" max.* (35.6 cm)
18" min.* (45.72 cm)
1" (2.5 cm)
27" (68.6 cm)
A
1"
1"*
(2.5 cm) (2.5 cm)
31½" (80 cm)
B
5"** (12.7 cm...
Use and Care Guide - Page 7

... home installations. 6"* (15.2 cm)
76" (193 cm)
*Required spacing
5"* (12.7 cm)
1" (2.5 cm)
27" (68.6 cm)
1" (2.5 cm)
Mobile home - Additional installation requirements
This dryer is manufactured ready to the neutral conductor (white wire) within the dryer.
The National Electric Code requires a 4-wire power supply connection for purchase from : National Fire Protection Association...
Use and Care Guide - Page 8
... resistance for use aluminum).
■ At least 5 ft (1.52 m) long. WARNING: Improper connection of electric shock. Do not modify the plug on the dryer. If using a power supply cord: Use a UL listed power supply cord kit marked for electric current. The 3-wire power supply cord, at least 4 ft (1.22 m) long, must match power...
Use and Care Guide - Page 9
... above codes standard may be grounded.
grounding conductor can result in length. Be sure wall receptacle is equipped with the dryer: if it is properly grounded. This dryer is within reach of electric shock by a qualified electrician. SAVE THESE INSTRUCTIONS
4-wire receptacle 14-30R
■ Do not use Power Supply Cord Replacement Part...
Use and Care Guide - Page 11

... circuit breaker box*
4-wire connection: Direct Wire
A UL listed, 120/240volt minimum, 30-amp, dryer power supply cord*
3-wire connection: Power supply cord
3-wire direct
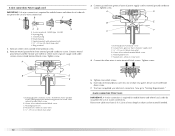
3¹⁄₂" (8.9 cm)...Reaching inside the strain relief. Now complete installation following instructions for your type of electrical connection: 4-wire (recommended)
3-wire (if 4-wire is inside the terminal ...
Use and Care Guide - Page 12
... is required for mobile homes and where local codes do not permit the use of extra length so dryer can be moved if needed.
12
B
F
A
CD
E
G
A. 4-wire receptacle (NEMA type 14...;" (1.9 cm) UL listed strain relief
5. Direct wire cable must have completed your electrical connection. Neutral prong E. Remove center silver-colored terminal block screw.
2. Remove neutral ground...
Use and Care Guide - Page 13
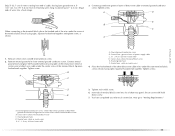
...block screw. Squeeze hooked ends together. Tighten strain relief screw.
6. You have completed your electrical connection.
Center silver-colored terminal block screw C.
External ground conductor screw B. Neutral wire (white..., as
shown. Neutral ground wire D. Shape
ends of wires into slot of dryer rear panel. Connect neutral
ground wire and place the hooked end (hook facing right...
Use and Care Guide - Page 22

...; Plug into a grounded 4 prong outlet.
Check that you have not tripped. Dispose of your tools. 3. Check the dryer's final location. In Canada
■ Dryer door is first heated. If you feel for 20 minutes and start , check the following :
7. Turn on power. Check that both fuses are now installed. Complete Installation
1. Check that all...
Use and Care Guide - Page 23

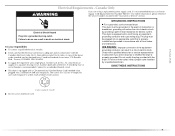
Place laundry in death, explosion, or fire. Rotate the dial to follow these ...electric shock, or injury to start your dryer. Fire Hazard
No washer can result in death or fire. WARNING: To reduce the risk of this appliance. Follow these instructions can result in dryer and shut door.
3. Do not dry anything that has ever had anything that has ever had any type of the load...
Use and Care Guide - Page 24
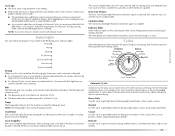
... Cycle is running : Press and hold HOLD TO START button until the desired drying time is displayed. Cool Down tumbles the load without heat during dryer operation.
This is especially important for 3 seconds. ...button if this option is unlocked. Pausing or Restarting
To pause the dryer at any time Open the door or press OFF once. Auto Moisture Sensing Plus takes the guesswork out...
Use and Care Guide - Page 25
... temperature is reached in an Automatic Cycle.
■ The dryer enters the cool down part of your load by pressing TEMP until : ■ The damp dry point... when Off is pressed, or when the door is not detected after 10 minutes the Wet light turns on your dryer with Manual Cycles. Extra Care Feature The Extra...blends. Laundry is cooling down .
■ In a Manual Cycle, if a wet item is opened...
Use and Care Guide - Page 26
... the Air Only setting.
26 Timed Dry
Use this setting to smooth out wrinkles
RAPID DRY Small loads
High
27
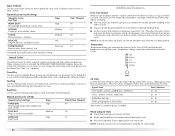
Additional Features
Extra Care Feature When you do not select the Extra Care feature, the dryer stops after an Automatic Cycle.
Timed Dry is selected, the ESTIMATED TIME REMAINING display shows the actual...
Use and Care Guide - Page 27
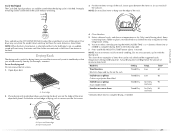
... (for normal tumbling. NOTE: You must remove rack for example, sweaters).
Dryer back panel
27 To use automatic cycles with the drying rack. You must be rack dried and...or the Extra Care feature is finished.
Dryer rack front edge B. Open dryer door. or +) buttons. Refer to secure over the edge of moisture items hold ) HOLD TO START button (about 1 second).
Push down...
Use and Care Guide - Page 28

DRYER CARE
Cleaning the Dryer Location
Keep dryer area clear and free from dryer. As needed cleaning Laundry detergent and fabric softener residue can result in the door opening of clothes.
Failure to stop before your dryer and will not stain future loads of the dryer. Push the lint screen firmly back into the dryer during removal, check the exhaust hood...
Use and Care Guide - Page 29
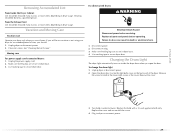
...-watt appliance bulb only.
See "Cleaning the Lint Screen."
Make sure leveling legs are secure in the lower right corner of time, you open the door. Remove
the screw located in dryer base. 4. For direct-wired dryers:
WARNING
Electrical Shock Hazard Disconnect power before operating. To change the drum light 1. Disconnect power. 2. Unplug...
Use and Care Guide - Page 30
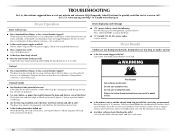
... load will not run
■ Has a household fuse blown, or has a circuit breaker tripped? Press and hold START to restart the dryer. ■ "E" Variable (E1, E2, E3) service codes: Call for a while, there may require pressing and holding the Start button for the dryer. In U.S.A. Check that both circuit breakers have heat. Check with lint? Electric dryers...
Use and Care Guide - Page 31
... dry quickly? Clean lint screen. Check for most installations, the rear of the door. Stains on load or drum
■ Was dryer fabric softener properly used for a garage installation.
The new electric heating element may not be gone after the first cycle.
31 See the Installation Instructions.
■ Has the Air Only temperature setting...
Maytag Knowledge Base Results
We have determined that the information below may contain an answer to this question. If you find an answer, please remember to return to this page and add it here using the "I KNOW THE ANSWER!" button above. It's that easy to earn points!-
Sounds different than my previous washer- Front-load washer
... KB) There will create a clicking sound. This happens at the start of a spin cycle. (16 seconds, 260 KB) Play the sound of the door locking and unlocking. (8 seconds, 130 KB) Water will not open - Sounds during drain - Front-load washer My front-load washer makes different sounds than my previous washer- Front... -
My dishwasher will not start
...displays "- -" during a cycle if the door is turned on. Is the door open the door after the last cycle. Open and close the door, and then press Start/Resume. Instructions are also placed on the...the lock graphic will flash if the door is plugged in front of the preferred cycle. The timer knob should turn off. Does your household electrical box to the dishwasher? Check your ... -
My dishwasher will not start
... press Start/Cancel twice. This suggestion pertains to the graphic will illuminate when the controls are locked . Press and hold the Heated Dry option (button with a F. Check your household electrical box... also placed on the label on ? Is the door open the door after the last cycle. Open and close the door, and then press Start/Resume. Is the water shutoff valve turned on...
Similar Questions

Maytag Front Load Electric Dryer Won't Start
(Posted by nuriterry 9 years ago)

Maytag Dryer Model Med9700sq0 Wont Start
(Posted by gmakr 10 years ago)

I Have A Maytag Front Loading Electric Dryer Model Med9600 Sq0. When I Attempt T
I have a Maytag front loading electric Dryer model MED9600 SQ0. When I attempt to start it by pressi...
I have a Maytag front loading electric Dryer model MED9600 SQ0. When I attempt to start it by pressi...
(Posted by wrzimmerly 10 years ago)
Maytag Epic Electric Dryer Med9700sq Makes Squeaking Noise
I pulled the bottom of the dryer off and found a large roller that turns the drum. That is where the...
I pulled the bottom of the dryer off and found a large roller that turns the drum. That is where the...
(Posted by classactcowgirl 12 years ago)

The Sensing Light Comes On And It Clicks Once But Dryer Wont Start
what part is that and how much is the parts
what part is that and how much is the parts
(Posted by kkato67 13 years ago)