Maytag MED9700SQ Support Question
Maytag MED9700SQ Support Question
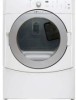
Find answers below for this question about Maytag MED9700SQ - 27" Front-Load Electric Dryer.Need a Maytag MED9700SQ manual? We have 1 online manual for this item!
Question posted by Rebeni on May 28th, 2012
Repair Instructions/illustrations To Replace Control Knob
How do you remove Control Panel Case to repair control knob and shaft?
Current Answers
Related Maytag MED9700SQ Manual Pages
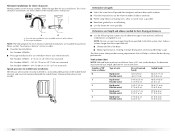
Use and Care Guide - Page 3

..., soaked in, or spotted with controls.
■ Do not repair or replace any part of the dryer or attempt any servicing unless specifically recommended in this manual and on or in the dryer. Close supervision of children is necessary when the dryer is used near children.
■ Before the dryer is removed from the accumulation of lint, dust...
Use and Care Guide - Page 4

... different heights separately for a total height of the dryer for this dryer.
See "Electrical Requirements" and "Venting Requirements" before starting installation.
To do so, you planning to stack your dryer or refer to place the 15.5" (39.4 cm) pedestal at least 3" (7.6 cm) above the floor. INSTALLATION INSTRUCTIONS
Tools and Parts
Gather the required tools and...
Use and Care Guide - Page 7

... wire) of electrical connection you will be using and follow the instructions provided for Mobile Home Construction and Safety, Title 24, HUD Part 280) or Standard CAN/CSA-Z240 MH. 6"* (15.2 cm)
76" (193 cm)
*Required spacing
5"* (12.7 cm)
1" (2.5 cm)
27" (68.6 cm)
1" (2.5 cm)
Mobile home - Additional installation requirements
This dryer is permanently connected...
Use and Care Guide - Page 8
... a UL listed power supply cord kit marked for electric current. Do not modify the plug on the power supply cord: if it will reduce the risk of NEMA Type 10-30R.
The wires that is properly grounded. GROUNDING INSTRUCTIONS
■ For a grounded, cord-connected dryer: This dryer must end in a risk of the equipment...
Use and Care Guide - Page 9
... plugged into an appropriate outlet that you are using a replacement power supply cord, it will reduce the risk of least resistance for electric current.
Be sure wall receptacle is properly installed and grounded in death or electrical shock. GROUNDING INSTRUCTIONS
■ For a grounded, cord-connected dryer: This dryer must be obtained from: Canadian Standards Association, 178...
Use and Care Guide - Page 16
...install flexible metal vent in its final location.
■ Remove excess flexible metal vent to avoid sagging and kinking that ... is recommended to follow these instructions can be fully extended and supported when the dryer is not plugged with screws... lint.
■ Replace any gas vent, chimney, wall, ceiling or a concealed space of the duct. If this dryer MUST BE EXHAUSTED OUTDOORS...
Use and Care Guide - Page 18
... a 90º turn to the manufacturer's instructions. Number of 90º turns or elbows
Type of the dryer.
■ Reduce performance, resulting in longer drying... (13.4 m)
38 ft (11.6 m)
Flexible metal
27 ft (8.2 m)
19 ft (5.8 m)
3
Rigid metal
35 ft (10.7 m)
29 ft (8.8 m)
Flexible metal
25 ft (7.6 m)
17 ft (5.2 m)
4
Rigid metal
27 ft (8.2 m)
21 ft (6.4 m)
Flexible metal
23 ft...
Use and Care Guide - Page 19
... the corner posts until the diamond marking is made, remove the corner posts and cardboard. See illustration.
3. Place a carton corner post from the dryer carton.
Move dryer into the leg holes by hand. Level Dryer
Check the levelness of the dryer (not the console panel). Check levelness first side to side, then front to do so can...
Use and Care Guide - Page 20

Open the dryer door. A
B
C
A. Do not remove. Remove the door.
3. Remove the 4 screws that the keyhole clears the screw head.
It is important that hold the hinge to release the outer door assembly from the inner door assembly (see illustration). Remove the last screw from a right-side opening to a left-side opening last (second from the outer...
Use and Care Guide - Page 21
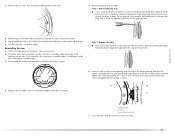
... opposite side.
4. By putting this screw first.
7. Dryer C. Clean if necessary. 2. To fit correctly, the inside door assembly edge is completely inside the outside door assembly edge. 3.
Style 2: Remove the label.
■ Peel off the label located on the opposite side of the door assembly.
6. Replace the 2 handle screws for fingerprints on the...
Use and Care Guide - Page 22

....
2.
Remove any dust.
■ There may notice a burning odor when the dryer is intact and tight, or circuit breaker has not tripped.
■ For power supply cord installation, plug into a grounded outlet and/or electrical supply is on power. See "Level Dryer." 6. For direct wire installation, turn off the dryer and check the following : ■ Controls...
Use and Care Guide - Page 23

Failure to follow these instructions can completely remove oil.
Follow these instructions can result in death, explosion, or fire. Clean lint screen before operating this manual for the selected Dryness Level.
23 As the cycle runs, the control senses the dryness of oil on the Dryness Level selected. DRYER USE
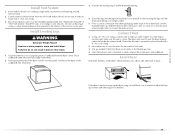
WARNING
Starting Your Dryer
WARNING
Explosion Hazard...
Use and Care Guide - Page 24
... and hold the CYCLE END SIGNAL button for 3 seconds. Follow package instructions.
■ Remove the load from where the cycle was interrupted if you can also use a Manual Cycle ■ Rotate the dial to press the Control On button before restarting the dryer. If an Automatic Cycle is running , you close the door and press...
Use and Care Guide - Page 25
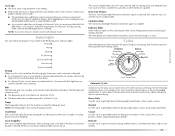
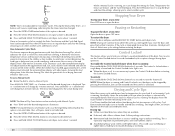
... turns off and the dryer will remain on and the selected cycle continues. Laundry is not used with Manual...dryer with the Cycle Complete light. Cycle Control knob
Automatic Cycles
Automatic Cycles allow you to match the cycle to the load you choose an Automatic Cycle.
If the Extra Care feature has been selected, the Extra Care feature indicator light will also be on the control panel...
Use and Care Guide - Page 26
... the Manual Cycles.
or +) buttons.
Manual Cycles
Use Manual Cycles to remove a load of clothes from the dryer as soon as clothes packed in a suitcase or items wrinkled from such ...to smooth out wrinkles
RAPID DRY Small loads
High
27
Additional Features
Extra Care Feature When you do not select the Extra Care feature, the dryer stops after an Automatic Cycle. High ...
Use and Care Guide - Page 28

... liquid detergent. Apply paste to stop before your dryer and will not stain future loads of clothes.
This buildup can cause longer drying times for a garage installation. Clean the lint screen with your fingers.
2.
To clean 1. These stains are removed.
3. Wet a nylon brush with powdered laundry detergent and very warm water. 2. Scrub lint screen...
Use and Care Guide - Page 30
... hand under the outside exhaust hood clogged with lint? See the Installation Instructions.
■ Are fabric softener sheets blocking the grille? In U.S.A. There may require pressing and holding the Start button for 2-5 seconds. If the problem continues, call an electrician. Electric dryers require 240-volt power supply. When balled up ?
WARNING
Fire Hazard...
Use and Care Guide - Page 31
... of the cycle. Loads are wrinkled
■ Was the load removed from dryer. Odors
■ Have you recently been painting, staining or varnishing in a room with temperature below 45ºF (7ºC)? The odor will change the amount of dryer cycles requires temperatures above the floor for the first time? See the Installation Instructions.
■ Has the...
Use and Care Guide - Page 32
... , follow the instructions below. Part Number 20-48KITRC PT220L PT400L PT600L 4210463 31682 1903WH 8576846A 8579666A W10121663 8212640
Accessory 4 ft (1.2 m) gas line dryer connector installation kit 4 ft (1.2 m) dryer cord, 3-wire, 30 amp 4 ft (1.2 m) dryer cord, 4-wire, 30 amp 6 ft (1.8 m) dryer cord, 4-wire, 30 amp Dryer vent lint brush All-purpose appliance cleaner Laundry supply storage cart...
Use and Care Guide - Page 33
...failures. 6. Any food loss due to be repaired in accordance with electrical or plumbing codes, or use of your major appliance, to replace or repair house fuses or to the appliance. 9. ...LAW. Contact your major appliance, to instruct you ever need service, first see the "Troubleshooting" section of your authorized Maytag dealer to repair or replace appliance light bulbs, air filters or ...
Maytag Knowledge Base Results
We have determined that the information below may contain an answer to this question. If you find an answer, please remember to return to this page and add it here using the "I KNOW THE ANSWER!" button above. It's that easy to earn points!-
Dryer does not heat - Electric dryer
... the Installation Instructions to dry. Air Fluff or Air Only temperature can be turning, but you recently install a power supply cord on the control knob or button with the other temperature selections. dryer does not dry Dryer does not heat - Gas dryer FAQs Knowledgebase search tips My dryer will not start Damp loads or... -
Display shows L2 - Dryer
... an L2 code on , even if the dryer drum is turning and the load is tumbling. Electric dryer The power supply cord may be incorrectly installed. Review the Installation Instructions for proper installation. Select a Timed Dry heated cycle, and restart the dryer. If the problem continues, call an electrician... -
Dryer does not heat - Gas dryer
... the dryer will not , if the gas shutoff valve is parallel to dry. Air Fluff or Air Only temperature can be found on the control knob or button with the Air Fluff or Air Only temperature to take longer to the gas pipe. See the Installation Instructions for...
Similar Questions

What Is The Replacement Model For The Maytag Med9700sq0 Dryer?
It is discontinued and need to purchase a new unit that will sit on top of the washer
It is discontinued and need to purchase a new unit that will sit on top of the washer
(Posted by dchurchilld 7 years ago)

Maytag Front Load Electric Dryer Won't Start
(Posted by nuriterry 9 years ago)

I Have A Maytag Front Loading Electric Dryer Model Med9600 Sq0. When I Attempt T
I have a Maytag front loading electric Dryer model MED9600 SQ0. When I attempt to start it by pressi...
I have a Maytag front loading electric Dryer model MED9600 SQ0. When I attempt to start it by pressi...
(Posted by wrzimmerly 10 years ago)

The Control Locked Light Is On And I Cannot Get My Dryer To Start. What Can I Do
The "control Locked" light is on and I can't start my dryer. Why is this occuring and how do I fix t...
The "control Locked" light is on and I can't start my dryer. Why is this occuring and how do I fix t...
(Posted by pipelayer30 11 years ago)

Replacement Door - Maytag Med9700sq0
Hello, I have a Maytag Dryer Maytag MED9700SQ0 and i put a spiderweb crack in the front window when ...
Hello, I have a Maytag Dryer Maytag MED9700SQ0 and i put a spiderweb crack in the front window when ...
(Posted by bob85118 12 years ago)