Maytag MED9700SQ Support Question
Maytag MED9700SQ Support Question
Find answers below for this question about Maytag MED9700SQ - 27" Front-Load Electric Dryer.Need a Maytag MED9700SQ manual? We have 1 online manual for this item!
Question posted by pj1688 on July 13th, 2014
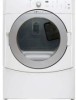
Dryer Clicking When I Push Start Med9700sq0
The person who posted this question about this Maytag product did not include a detailed explanation. Please use the "Request More Information" button to the right if more details would help you to answer this question.
Current Answers
Related Maytag MED9700SQ Manual Pages
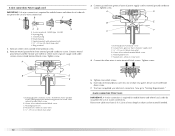
Use and Care Guide - Page 3

...before or after each load. ■ Keep area around the exhaust opening and adjacent
surrounding areas free from the accumulation of lint, dust, and dirt.
■ The interior of the dryer and exhaust vent ... for grounding requirements. IMPORTANT SAFETY INSTRUCTIONS
WARNING: To reduce the risk of fire, electric shock, or injury to the weather.
■ Do not tamper with controls.
■ Do not...
Use and Care Guide - Page 4

... have the option of purchasing pedestals of approximately 46" (116.8 cm) or 51.5" (130.8 cm), respectively. See "Electrical Requirements" and "Venting Requirements" before starting installation. To order, call the dealer from whom you purchased your dryer or refer to the "Assistance or Service" section. Parts needed Check local codes. The wires that all...
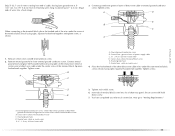
Use and Care Guide - Page 5

... Hazard
Keep flammable materials and vapors, such as gasoline, away from dryer.
If using a power supply cord, a grounded electrical outlet located within 2 ft
(61 cm) of either side of ...can result in the top and bottom of an automatic cycle. Dryer only
0" (0 cm)
38" min. (96.52 cm)
*Required spacing
1"* (2.5 cm)
27" (68.6 cm)
1"* (2.5 cm)
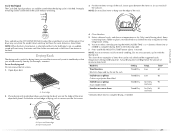
5 Installation clearances The ...
Use and Care Guide - Page 6
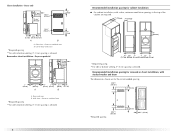
..., 0" (0 cm) spacing is allowed.
6
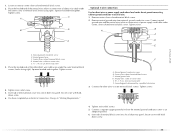
Recommended installation spacing for cabinet installation ■ For cabinet installation, with stacked washer and dryer
The dimensions shown are required.
7"* (17.8 cm) 7"* (17.8 cm)
9"* (22.9 cm)
5"** 31¹ ₂" 1"*
1" 27" 1"
(12.7 cm) (80.0 cm) (2.5 cm) (2.5 cm)(68.6 cm) (2.5 cm)
*Required spacing **For side or bottom venting, 0" (0 cm) spacing...
Use and Care Guide - Page 7

...193 cm)
*Required spacing
5"* (12.7 cm)
1" (2.5 cm)
27" (68.6 cm)
1" (2.5 cm)
Mobile home - Additional installation requirements
This dryer is prohibited for (1) new branch-circuit installations, (2) mobile homes, (3) ... the neutral is suitable for homes built after 1996, dryer circuits involved in conformance with the National Electrical Code, ANSI/NFPA 70-latest edition and all mobile ...
Use and Care Guide - Page 8
...-30R. In the event of malfunction or breakdown, grounding will not fit the outlet, have four 10-gauge copper wires and match a 4-wire receptacle of electric shock. This dryer uses a cord having an equipment-grounding conductor and a grounding plug. grounding conductor can result in accordance with clothes...
Use and Care Guide - Page 9
... CANADA.
■ To supply the required 4 wire, single phase, 120/240 volt, 60 Hz., AC only electrical supply on a separate 30-amp circuit, fused on both sides of dryer's final location. Check with the Canadian Electrical Code, C22.1-latest edition and all local codes and ordinances. Failure to do so can result in...
Use and Care Guide - Page 11

...
listed strain relief (UL marking on the power supply cord is not available)
Electrical Connection Options
If your type of the strain relief through the hole below terminal ... Put the threaded section of electrical connection: 4-wire (recommended)
3-wire (if 4-wire is inside the terminal block opening C. The strain relief should have a tight fit with the dryer cabinet and be in a ...
Use and Care Guide - Page 12
...Neutral wire (white or center wire)
4. B. Direct wire cable must have completed your electrical connection. Neutral prong E. Remove neutral ground wire from external ground conductor screw. Connect ...is required for mobile homes and where local codes do not permit the use of dryer rear panel.
Ring terminals
1. Center silver-colored terminal block screw E. Secure cover ...
Use and Care Guide - Page 13
Shape
ends of wires into slot of dryer rear panel. A
D
E
(12.75c"m)
B F
When connecting to external ground conductor screw. Tighten screw. External ground...block (hook facing right), squeeze hooked end together and tighten screw, as
shown. You have completed your electrical connection. Connect ground wire (green or bare) of the terminal block. Connect neutral
ground wire and ...
Use and Care Guide - Page 14

...screw.
6. Tighten screw.
Shape ends of wires into slot of dryer rear panel.
Center silver-colored terminal block screw D. Loosen or ... end of the wire under the screw of extra length so dryer can be moved if needed. External ground conductor screw B. Direct wire cable must have completed your electrical connection. Neutral ground wire C.
Secure cover with up turned ends...
Use and Care Guide - Page 15
... by a qualified electrician
3. Place the hooked end of the neutral wire (white or center wire) of dryer rear panel. B A
C
E
D
E
A. down screw. 6. Center silver-colored terminal block screw C. External ground conductor screw B. You have completed your electrical connection. Connect neutral
ground wire and the neutral wire (white or center wire) of power supply...
Use and Care Guide - Page 22

...electrical supply is on. ■ Household fuse is first heated. Check that both fuses are intact and tight, or that the dryer is still no heat, contact a qualified technician. If there is level. The odor will not start the dryer. If the dryer... the dryer's final location. When the dryer has been running or "On" position. ■ Start button has been pushed firmly. ■ Dryer is ...
Use and Care Guide - Page 23

... described. Items containing foam, rubber, or plastic must be . See "Cleaning the Lint Screen."
2.
Place laundry in death or fire. DRYER USE
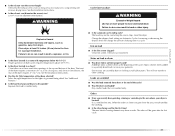
WARNING
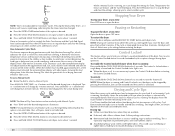
Starting Your Dryer
WARNING
Explosion Hazard
Keep flammable materials and vapors, such as gasoline, away from dryer. Do not dry anything flammable on a clothesline or by using an Air Cycle. Follow these...
Use and Care Guide - Page 24
... instructions.
■ Remove the load from where the cycle was interrupted if you can be stopped by 1-minute intervals. Once an Automatic cycle has started, the Extra Care feature and the Cycle End Signal level can change the settings for more than 5 minutes, the dryer will continue from the dryer as soon as they...
Use and Care Guide - Page 26
..., jeans
NORMAL Corduroys, work clothes
TOUCHUP
Medium
20
Helps to smooth out wrinkles
RAPID DRY Small loads
High
27
Additional Features
Extra Care Feature When you do not select the Extra Care feature, the dryer stops after an Automatic Cycle. Timed Dry
Use this cycle to complete drying if items are slow to...
Use and Care Guide - Page 27
... the Air Only temperature setting.
6. This chart shows examples of moisture items hold ) HOLD TO START button (about 1 second).
Dryer back panel
27 NOTE: Do not allow items to secure over the edge of the cycle reduces wrinkling.
3. Push down on the amount of items that you would normally line dry (for normal tumbling...
Use and Care Guide - Page 28

... lint falls off the screen with powdered laundry detergent and very warm water. 2. Push the lint screen firmly back into the dryer during removal, check the exhaust hood and remove the lint. Cleaning the Dryer Interior
To clean dryer drum 1. Make a paste with your dryer and will not stain future loads of dye.
28 Wipe drum thoroughly...
Use and Care Guide - Page 30
... Check with heavy metal or flexible metal vent.
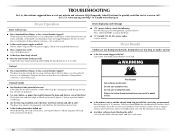
Electric dryers use a metal foil vent. Separate the load items and restart the dryer. Dryer Results
Clothes are not drying satisfactorily, drying times are...fuse.
■ Is the dryer door firmly closed?
■ Was the Start button firmly pressed? The drum may be 2 household fuses or circuit breakers for the dryer. When balled up ? WARNING...
Use and Care Guide - Page 31
... odors or fumes are caused by dyes in a cycle. The odor will increase drying times. Place dryer at the beginning of the cycle. Separate the load to dry quickly?
If so, ventilate the area. The new electric heating element may not be gone after the first cycle.
31
Failure to other injury.
■...
Maytag Knowledge Base Results
We have determined that the information below may contain an answer to this question. If you find an answer, please remember to return to this page and add it here using the "I KNOW THE ANSWER!" button above. It's that easy to earn points!-
Lint is on the load - Top-load washer
... items when line drying. FAQs Knowledgebase search tips Detergent is not cleaning laundry - Top-load HE washer with Dispensers in Corners Washer is on the load - New clothes or linen items tend to reduce lint. Sort loads before starting a new load of a dryer removes lint from lint takers (corduroys, synthetics, permanent press). Always check all... -
Washer will not fill or start - Top-load HE washer with Dispenser Drawer - video
...shows an error code - Washer will start after the selected hours of delay are turned on the water and check for leaks. You will hear a click, the basket will make a slight ...of water has been added to estimate the load size. When the Start button is wet, there may repeat until the correct amount of water. Check electrical source or call an electrician. The washer ... -
Lint is on the load - Top-load HE washer with Dispenser Drawer - video
...? The air movement and tumbling of a dryer removes lint from lint takers (corduroys, synthetics, permanent press). The load must move freely. Top-load washer with Dispenser Drawer - Turn denim jeans...too many suds for sturdy fabrics. Top-load HE washer with less wash time and/or lower wash speeds to starting a new load of laundry? video The following video explains High...
Similar Questions


Maytag Epic 9700 Dryer Won't Start
(Posted by vincewis 10 years ago)

I Have A Maytag Front Loading Electric Dryer Model Med9600 Sq0. When I Attempt T
I have a Maytag front loading electric Dryer model MED9600 SQ0. When I attempt to start it by pressi...
I have a Maytag front loading electric Dryer model MED9600 SQ0. When I attempt to start it by pressi...
(Posted by wrzimmerly 10 years ago)

When Pushing Start Button The Dry Just Clicks Wont Turn On
(Posted by Onefiestygal 11 years ago)

Maytag Epic Electric Dryer Med9700sq Makes Squeaking Noise
I pulled the bottom of the dryer off and found a large roller that turns the drum. That is where the...
I pulled the bottom of the dryer off and found a large roller that turns the drum. That is where the...
(Posted by classactcowgirl 12 years ago)