
MSI MS-1722 Support Question
MSI MS-1722 Support Question
Find answers below for this question about MSI MS-1722 - Whitebook ID1 - 17.Need a MSI MS-1722 manual? We have 1 online manual for this item!
Question posted by nokontrol05 on October 30th, 2010
Unable To Enter Bios Setup
Hi i have a ms1722 barebone. After installing the hardware i am unable to enter the bios setup. I have a duo core CPU p8700 2.53ghz with 4gig memory installed. It stops at
Press f12 key for lan boot
press f11 key for bott menu
initializing usb controllers...done.
4096mb ok.
amibios 2006 american megatrends inc
bios version a1722ig6 ver1.0H
Current Answers
Related MSI MS-1722 Manual Pages
User Guide - Page 1

GX720 (MS-1722)Disassemble SOP
■ 1、Battery Pack ■ 2、BOTTOM DOOR ASSY ■ 3、THERMAL-KIT And CPU Module ■ 4、RAM、WLAN And TUNER Module ■ 5、HDD Module ASSY ■ 6、ODD Module ASSY ■ 7、HINGE COVER ASSY ■ 8、UP CASE ASSY ■ 9、LOWER CASE ASSY ■ 10、LCD MODULE ASSY
User Guide - Page 2
Part Name
Part No.
GX720(MS-1722)Disassemble SOP
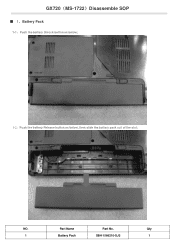
■ 1、Battery Pack
1-1:Push the battery Unlock button as below;
1-2:Push the battery Release button as below, then slide the battery pack out of the slot; Qty
1
Battery Pack
S9N-1566210-SJ3
1
NO.
User Guide - Page 3

Part Name
Part No. Qty
1
Screw
E43-I250551-H29
5
2
BOTTOM DOOR ASSY
307-721J211-Y31
1 NO.
GX720(MS-1722)Disassemble SOP
■ 2、BOTTOM DOOR ASSY
2-1:Remove the following 5pcs M2.5*5mm screws with Screw Driver. Note:Screw driver torque is 2.0~2.5kgf.cm
2-2:Remove Bottom Door Assy as below;
User Guide - Page 4

GX720(MS-1722)Disassemble SOP
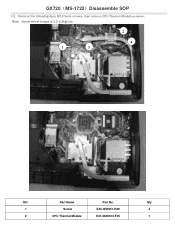
■ 3、THERMAL-KIT And CPU Module
3-1:Remove 4pcs M2.5*5mm screws, CPU Fan sink Cable and CPU Fan. Note:Screw driver torque is 2.0~2.5kgf.cm
Cable
3 2
1 4
NO. Part Name
Part No. Qty
1
Screw
E43-I250551-H29
4
2
CPU FAN
E33-0800050-F05
1
User Guide - Page 5
Note:Screw driver torque is 2.0~2.5kgf.cm
2
4
1
3
NO. Qty
1
Screw
E43-I250551-H29
4
2
CPU Thermal Module
E31-0800610-F05
1 Part Name
Part No. GX720(MS-1722)Disassemble SOP
3-2:Remove the following 4pcs M2.5*5mm screws, then remove CPU Thermal Module as below;
User Guide - Page 6
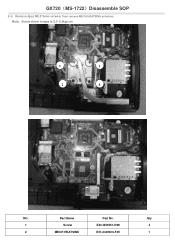
Note:Screw driver torque is 2.0~2.5kgf.cm
3
1
2
4
NO. GX720(MS-1722)Disassemble SOP
3-3:Remove 4pcs M2.5*5mm screws, Then remove MECH HEATSINK as below; Qty
1
Screw
E43-I250551-H29
4
2
MECH HEATSINK
E31-0403610-F05
1 Part Name
Part No.
User Guide - Page 7
NO. Qty
1
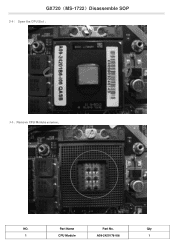
CPU Module
A09-2420176-I06
1 Part Name
Part No. GX720(MS-1722)Disassemble SOP
3-4: Open the CPU Slot ;
3-5:Remove CPU Module as below;
User Guide - Page 8
Part Name
Part No. Note:Screw driver torque is 2.0~2.5kgf.cm
NO.
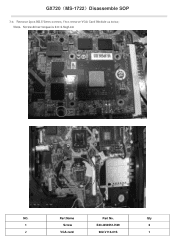
GX720(MS-1722)Disassemble SOP
3-6:Remove 2pcs M2.5*5mm screws, Then remove VGA Card Module as below; Qty
1
Screw
E43-I250551-H29
2
2
VGA card
602-V114-01S
1
User Guide - Page 9
Part Name
Part No. GX720(MS-1722)Disassemble SOP
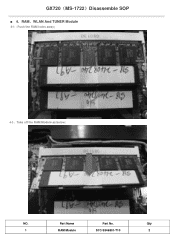
■ 4、RAM、WLAN And TUNER Module
4-1:Push the RAM locks away;
4-2:Take off the RAM Module as below:
NO.
Qty
1
RAM Module
S7C-S346801-T10
2
User Guide - Page 10

Note:Screw driver torque is 1.0~1.5kgf.cm
1
4-4:Remove WIRELESS CARD as below ; NO. Qty
1
Screw
E43-1303501-H29
1
2
WIRELESS CARD
S57-0800180-I06
1
Part Name
Part No. GX720(MS-1722)Disassemble SOP
4-3: Remove 1pcs M2*3mm screw, and then remove ANTENNA/HIGH-TEK/R-L as below ;
User Guide - Page 11

GX720(MS-1722)Disassemble SOP
4-5:Pull out Tuner Antenna, then remove 1pcs M2*3mm Screw as below ; Qty
1
Screw
E43-1303501-H29
1
2
DVB-T MINI-PCIE CARD
S36-0000610-K45
1 Note:Screw driver torque is 1.0~1.5kgf.cm
1
4-6:Remove DVB-T MINI-PCIE CARD as below ;
Part Name
Part No.
NO.
User Guide - Page 12

Note:Screw driver torque is 2.0~2.5kgf.cm
5-2:Remove HDD DOOR ASSY as below ; Part Name
Part No. GX720(MS-1722)Disassemble SOP
■ 5、HDD Module ASSY
5-1:Remove 2pcs M2.5*5mm Screws , then remove HDD Door Assy as below ; NO. Qty
1
Screw
E43-I250551-H29
2
2
HDD DOOR ASSY
307-721K211-Y31
1
User Guide - Page 13

GX720(MS-1722)Disassemble SOP
5-3:Remove 2pcs M3*3.5mm Screws, then remove HDD Bracket as below; Note:Screw driver torque is 1.5~2.0kgf.cm
NO.
Qty
1
Screw
E43-1303501-H29
2
2
HDD Bracket Assy
E2M-2211511-Y28
1
3
HDD MODULE ASSY
S71-2408505-W36
1 Part Name
Part No.
User Guide - Page 16

Qty
1
Screw
E43-1203003-H29
2
2
ODD Side Bracket
E2M-2211611-Y28
1
3
ODD MODULE ASSY
S7D-2270001-SI4
1 GX720(MS-1722)Disassemble SOP
6-3:Remove 2pcs M2*3mm Screws, Then remove ODD Bracket as below; Note:Screw driver torque is 1.5~1.8kgf.cm
NO.
Part Name
Part No.
User Guide - Page 18
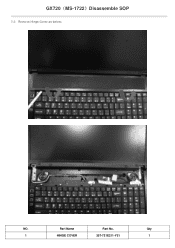
GX720(MS-1722)Disassemble SOP
7-2:Remove Hinge Cover as below;
Part Name
Part No.
NO. Qty
1
HINGE COVER
307-721E211-Y31
1
User Guide - Page 19

Part Name
Part No.
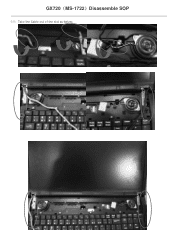
NO. GX720(MS-1722)Disassemble SOP
7-3:Pull out LCD LVDS Cable, Then remove MICROPHONE Cable as below;
7-4:Pull out CMOS CABLE as below; Qty
1
LCD LVDS Cable
K19-3036005-H39
1
2
MICROPHONE
S34-2100620-N44
1
3
CMOS CABLE
K10-3004055-H58
1
User Guide - Page 20
GX720(MS-1722)Disassemble SOP
7-5:Take the Cable out of the slot as below;
User Guide - Page 21

Note:Screw driver torque is 2.0~2.5kgf.cm
NO.
Qty
1
Screw
E43-I250551-H29
6 Part Name
Part No. Note:Screw driver torque is 2.0~2.5kgf.cm
7-7:Remove 3pcs M2.5*5mm Screws as below ;
GX720(MS-1722)Disassemble SOP
7-6:Remove 3pcs M2.5*5mm Screws as below ;
User Guide - Page 22

Part Name
Part No.
Qty
1
Screw
E43-1203003-H29
5
2
Screw
E43-I250551-H29
1
Keyboard
S1N-3UTC131-C54
1
NO. GX720(MS-1722)Disassemble SOP
■ 8、UPCASE ASSY
8-1:Remove 5pcs M2*3mm Screws、Remove1pcs M2.5*5mm Screw, Then remove Keyboard as below ; Note:...
User Guide - Page 23

Part Name
Part No. Note:Screw driver torque is 2.0~2.5kgf.cm
NO. GX720(MS-1722)Disassemble SOP
8-3:Remove16pcs M2.5*5mm Screws as below;
Qty
1
Screws
E43-1250551-H29
16
Similar Questions

Bios
hello , i have msi ms-163k with bios version 1.09 , where can i find bios update file since msi dont...
hello , i have msi ms-163k with bios version 1.09 , where can i find bios update file since msi dont...
(Posted by mdkaawar 6 years ago)


Mpp File Looks Not Working
I have an MPP file created in Microsoft Project 2010. It either hangs or causes Project 2010 to cras...
I have an MPP file created in Microsoft Project 2010. It either hangs or causes Project 2010 to cras...
(Posted by HunorBalazs 7 years ago)

System Crashing. Need To Update Bios?
Hi, I have a DIY PC that uses MSI motherboard. The model is MSI G31TM-P35 (MS-7529), with BIOS vers...
Hi, I have a DIY PC that uses MSI motherboard. The model is MSI G31TM-P35 (MS-7529), with BIOS vers...
(Posted by bretlaisy 11 years ago)
