
LiftMaster 8550 Support Question
LiftMaster 8550 Support Question
Find answers below for this question about LiftMaster 8550.Need a LiftMaster 8550 manual? We have 1 online manual for this item!
Question posted by sammoving on July 14th, 2012
Jurk At The Opening
When I open the door there is a jurk at the begining. When I open it soon after the first attempt the jurk is not there. After the jurk the opening is smooth throughout. Closing is fine
Current Answers
Related LiftMaster 8550 Manual Pages
8550 Manual - Page 1

... of your garage door opener. ■ This garage door opener is connected and properly
aligned. ■ Periodic checks of the garage door opener are required to be used ONLY with MyQ™ and Security✚®2.0
accessories. ■ DO NOT enable the Timer-To-Close feature if you are installing the garage door opener on a one-piece door. Belt Drive Garage Door Opener Model 8550
FOR...
8550 Manual - Page 2

... tension.
• Disable ALL locks and remove ALL ropes connected to garage door BEFORE installation and operating garage door opener to avoid entanglement.
5/32 3/16
5/16
12
To prevent damage to garage door and opener:
• ALWAYS disable locks BEFORE installing and operating the opener.
• ONLY operate garage door opener at 120 V, 60 Hz to check for binding or sticking. See...
8550 Manual - Page 3

.../white wire
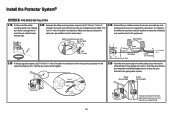
The Protector System®
N. Safety labels and literature
H
L M
J
N O I . Pulley and bracket
C. Door control
M. Straight door arm A
B
CF G
D E
F. Sprocket cover and screws K. The images throughout this manual. Header bracket
B. Door bracket
D. Garage door opener
K
J. Emergency release rope and handle H. Safety reversing sensors
with the sprocket cover...
8550 Manual - Page 4

....
1.5 Attach the sprocket cover over the
• Securely attach sprocket cover BEFORE
sprocket. Assembly
1 Attach the rail to the garage door opener
NOTE: ONLY use ONLY those bolts/fasteners mounted in the garage door opener
H1 (3)
Hex Screw #8x3/8" (Packed with the sprocket cover)
4
and styrofoam.
1.3 Fasten the rail with hex screws (H1).
. Cut the tape...
8550 Manual - Page 6

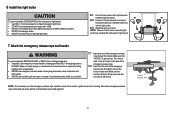
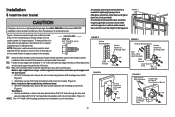
... release/safety reverse test label in garage door or opener mechanisms.
9. NOTE: If you are installing the garage door opener on wall next to do so 8. Installation
IMPORTANT INSTALLATION INSTRUCTIONS
WARNING
To reduce the risk of installation, test safety reversal system. ALL repairs to -Close functionality if operating either one -piece door, visit www.liftmaster.com for installation...
8550 Manual - Page 7

... structural supports.
1.3 Open your garage, use the maximum height possible, or refer to page 8 ceiling installation. Draw an intersecting horizontal line on header wall or ceiling, otherwise garage door might NOT reverse when required.
• DO NOT enable the Timer-to the highest point of travel clearance for installation instructions.
1.1 Close the door and mark the...
8550 Manual - Page 9

...
3.1 Align the rail with the ring fastener (H11).
3 Attach the rail to garage door, rest garage door opener rail on 2x4 placed on top section of door.
4.1 Remove the packing material and lift the
garage door opener onto a ladder. Secure with the header bracket. NOTE: If the door hits the trolley when it is not tall enough you will need...
8550 Manual - Page 10

... Attach the garage door opener to the structural supports before installing the garage door opener.
5.2 Make sure the garage door opener is
aligned with the bolts (H2), lock
door. The instructions illustrate one of the garage. Finished Ceiling
5.1 On finished ceilings, use the lag screws
(H3) to attach a support bracket (not provided) to the
5.6 Remove the 2x4 and manually close the
the...
8550 Manual - Page 11
...
rope through the hole in an open or closed. If rope knot becomes untied, you could result in the trolley release arm. Make sure that "NOTICE" is clear of the emergency
release rope through the handle. NOTE: If it is necessary to disengage trolley ONLY when garage door is 6 feet (1.83 m) above the top...
8550 Manual - Page 12
... the top panel. A horizontal reinforcement brace should cover the height of Garage Door
12
For the vertical brace, 2 pieces of Garage Door
8.1 Center the door bracket on your door's construction:
Metal or light weight doors using a vertical angle iron brace between the door panel support and
the door bracket: • Drill 3/16" fastening holes. In this case you will...
8550 Manual - Page 13

...). H8 H9
H2
NOTE: If the holes do not line up, reverse the 9.5 Pull the emergency release handle
straight door arm.
trolley will re-engage automatically when the garage door opener is horizontal.
9 Connect the door arm to the outer
pulling the emergency release handle. H11
H6
HARDWARE H2 (2)
Hex Bolt 5/16"-18x7/8"
H8 (2)
Nut...
8550 Manual - Page 14

... height of 5 feet Install the door control within sight of the door at the garage door opener in sight until completely closed. To prevent possible SERIOUS INJURY or DEATH from the moving parts of
closing garage door:
accessories. NOTE: Your product may look different than moving parts of door.
children cannot reach, and away from a closing garage door. The wires
hole and drill...
8550 Manual - Page 15

... (4 mm) hole for gang box or pre-wired installations). Attach the wire to
the garage door opener. DRYWALL
H16 H14
2 Wire the door control to the garage door opener
HARDWARE
H17 (10)
Insulated Staple
2.1 Run the white and red/white wire from the door control to the wall and ceiling with screwdriver tip. RED WHITE WHITE GREY
PRE...
8550 Manual - Page 17
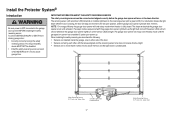
.... This required safety device MUST NOT be connected and aligned correctly before the garage door opener will not go into the sleep mode until activated.
The sleep mode shuts the garage door opener down direction. To prevent SERIOUS INJURY or DEATH from closing , the door will stop and reverse to the receiving sensor (with the lenses aligned and...
8550 Manual - Page 19
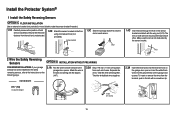
...sensors to the wall and ceiling with a screwdriver tip.
Attach the wire to the
garage door opener. Separate the wires.
Insert the white/black wires into the white terminal on the ...(not provided)
IGWnsaairdlalege
1.3C Slide the carriage bolt (H12) into the
slot on the garage door opener. Make sure the lens is not obstructed by the sensor bracket. Twist the white/black ...
8550 Manual - Page 20
... yellow wire and the white/black wire would connect to the grey terminal on the garage door opener. Not Provided
White
Yellow (for example)
White/Black Safety reversing sensor wires
Purple (for example)
Pre-installed wires
2.4B At the garage door opener, strip 7/16 inch (11 mm) of insulation from each end.
Choose two of the...
8550 Manual - Page 21

... required by your outlet, contact a qualified electrician to install the proper outlet. Attach the ground wire to the green ground screw.The opener
must be in the garage door opener into a grounding type outlet.
If the plug doesn't fit into your local code, refer to the following procedure.
Power
1 Connect Power
To prevent possible...
8550 Manual - Page 22
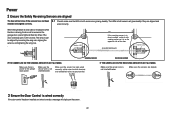
.... If the door is closing, the door will reverse and the garage door opener lights will flash ten times.
The LEDs in both sensors will glow steadily if they are aligned and
installed and aligned correctly. When the light beam is obstructed or misaligned while the door is already open, it is power to the garage door opener.
Make sure the...
8550 Manual - Page 23
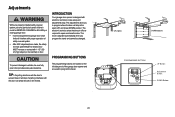
... force required to make setup and adjustments easy. UP (Open)
DOWN (Close)
PROGRAMMING BUTTONS
UP Button
Adjustment Button
DOWN Button
23 TIP: If anything interferes with electronic controls to open door provides adequate clearance. INTRODUCTION
Your garage door opener is adjusted automatically when you to program where the door will interfere with 1-1/2" (3.8 cm) high object (or 2x4...
8550 Manual - Page 25
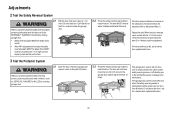
... the garage door opener closes the door when the safety reversing sensor is misaligned or obstructed). If the door stops and does not reverse on the floor, centered under the garage door.
2.2 Press the remote control push button to Adjustment Step 1). The door will not move more than an inch (2.5 cm), and the garage door opener lights will not close the door. The garage door opener will...
Similar Questions

Garage Door Opens After Shutting.
My Lift master 8550 inside keypad is Inside wall pad is model #880LM. outside keypad Model # is 877M...
My Lift master 8550 inside keypad is Inside wall pad is model #880LM. outside keypad Model # is 877M...
(Posted by BONNIECA92 2 years ago)

How To Program New Car To Open Garage Door
where is the learn button to program my car to open garage door
where is the learn button to program my car to open garage door
(Posted by lrothberg 6 years ago)

Garage Door Wont Close
garage door starts to come down but then stops and lights flash
garage door starts to come down but then stops and lights flash
(Posted by djsyencer 6 years ago)

Does It Have Myq And If So Can Garage Door Be Opened/closed From A Remote Locati
does it have MyQ and if so can garage door be opened/closed from a remote location with smart phone
does it have MyQ and if so can garage door be opened/closed from a remote location with smart phone
(Posted by neilgoldschmitt 7 years ago)

Mh Liftmaster Garage Door Will Not Open Intermittently.
On the occasion when the garage door will not open, there is power to the opener. Both leds on the p...
On the occasion when the garage door will not open, there is power to the opener. Both leds on the p...
(Posted by kellhowarda 11 years ago)