
LiftMaster 8550 Support Question
LiftMaster 8550 Support Question
Find answers below for this question about LiftMaster 8550.Need a LiftMaster 8550 manual? We have 1 online manual for this item!
Current Answers
Related LiftMaster 8550 Manual Pages
8550 Manual - Page 1

Belt Drive Garage Door Opener Model 8550
FOR RESIDENTIAL USE ONLY
Write down the following information for future reference: Serial Number:
Date of Purchase:
■ Please read this manual and the enclosed safety materials carefully! ■ Fasten the manual near the garage door after installation. ■ The door WILL NOT CLOSE unless the Protector System® is connected...
8550 Manual - Page 2

....
• Disable ALL locks and remove ALL ropes connected to garage door BEFORE installation and operating garage door opener to avoid entanglement.
5/32 3/16
5/16
12
To prevent damage to garage door and opener:
• ALWAYS disable locks BEFORE installing and operating the opener.
• ONLY operate garage door opener at 120 V, 60 Hz to avoid malfunction and damage.
1/2
5/8
1/4
7/16...
8550 Manual - Page 3

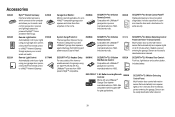
...✚®2.0 ACCESSORIES
880LM Smart Control Panel®
895MAX Remote Control
829LM Garage Door Monitor
Hardware
Assembly H1 Hex Screw #8x3/8" (3) [packed with white and white/black wire attached: Sending Sensor (1) Receiving Sensor (1) and Safety Sensor Brackets (2)
O. The images throughout this manuals are not included in this manual. GARAGE DOOR OPENER ASSEMBLY
A. Belt L. White and...
8550 Manual - Page 4

... the rail with the previously removed
bolts.
1.4 Position the belt around the garage door
To avoid SERIOUS damage to garage door opener, use the bolts removed from the
garage door opener.
Cut the tape from the top of the
• ALWAYS keep hand clear of the opener. opener sprocket.
1.5 Attach the sprocket cover over the
• Securely attach sprocket cover...
8550 Manual - Page 6

... minimum height of 5 feet (1.5 m). • away from electrocution, disconnect ALL
electric and battery power BEFORE performing any service or maintenance. 14. Install garage door opener only on the floor. 13. Install garage door opener 7 feet (2.13 m) or more above the floor and
avoiding contact with
a 1-1/2" (3.8 cm) high object (or a 2x4 laid fl at least 6 feet (1.83...
8550 Manual - Page 7

... installation. You can attach it to the ceiling when clearance is in your door to loosen, move or adjust garage door, springs, cables, pulleys, brackets, or their hardware, ALL of which are installing the garage door opener on header wall or ceiling, otherwise garage door might NOT reverse when required.
• DO NOT enable the Timer-to gain...
8550 Manual - Page 9

... is raised, pull the trolley release arm down to garage door, rest garage door opener rail on 2x4 placed on top section of door.
4.1 Remove the packing material and lift the
garage door opener onto a ladder. The trolley can remain disconnected until instructed.
If the ladder is ideal for the garage door opener.
NOTE: A 2x4 is not tall enough you will need...
8550 Manual - Page 10

... a support bracket (not provided) to the structural supports before installing the garage door opener.
5.2 Make sure the garage door opener is
aligned with the bolts (H2), lock
door. washers (H9) and nuts (H8). Installation
5 Hang the garage door opener
To avoid possible SERIOUS INJURY from each side of the garage door opener to the support bracket.
5.3 Cut both pieces of the hanging bracket...
8550 Manual - Page 14

... screw, allowing 1/8 inch
one end of the door control.
Install the Door Control
1 Install the door control
INTRODUCTION
Compatible with door control push buttons or remote control transmitters.
NEVER permit anyone to door travel. NOTE: Older LiftMaster accessories and third party products are not compatible.Your garage door opener is not necessary to protrude from 1.2 Connect one...
8550 Manual - Page 23
... are located on floor. The force is designed with the door's
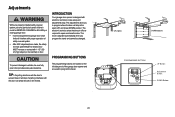
upward travel it will stop in the open (UP) and close the door. INTRODUCTION
Your garage door opener is adjusted automatically when you to program the travel. UP (Open)
DOWN (Close)
PROGRAMMING BUTTONS
UP Button
Adjustment Button
DOWN Button
23
Adjustments
Without a properly installed safety reversal system, persons...
8550 Manual - Page 24
... down cycle using the remote control or the UP and DOWN buttons. The
garage door opener
lights will fl ash twice
and the UP Button will
begin to flash.
* If the garage door opener lights are misaligned or obstructed (refer to page 18).
The door
desired DOWN position
door travels to the programmed UP position, the
will begin to flash...
8550 Manual - Page 25
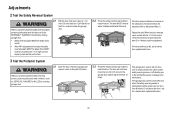
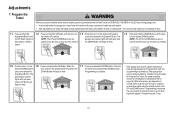
...particularly small children) could be SERIOUSLY INJURED or KILLED by a closing garage door.
3.2 Press the remote control push button to Adjustment Step 1). The door will not move more than an inch (2.5 cm), and the garage door opener lights will not close the door.
Place the garage door
opener carton in either safety reversing sensor is misaligned or obstructed).
Without a properly...
8550 Manual - Page 28

... unexpectedly. NO ONE SHOULD CROSS THE PATH OF THE MOVING DOOR.
15. NO ONE SHOULD GO UNDER A STOPPED, PARTIALLY OPENED DOOR.
6. Operation
IMPORTANT INSTALLATION INSTRUCTIONS
WARNING
To reduce the risk of children. To be tested every month. After ANY adjustments are no obstructions to operate or play with garage door control push buttons or remote controls.
3.
8550 Manual - Page 29

... provide two-way communication between the garage door opener and MyQ™ accessories.
SECURITY+®2.0 REMOTE CONTROLS AND DOOR CONTROLS
Your garage door opener is compatible with up to 40 remote controls. The garage door opener is compatible with the garage door opener light bulb; If the door is fully open . The sleep mode is sequenced with up to 2 Smart Control Panels or 4 of the...
8550 Manual - Page 30

... after a specified period of maintenance.
LIGHT BUTTON Press the LIGHT button to the Troubleshooting section. Once the garage door opener is set . HOLD OPEN To temporarily suspend the Timer-To-Close (TTC) feature press and release the HOLD OPEN button (the HOLD OPEN button will fl ash before closing the door. Refer to turn the garage door opener lights on . TIMER-TO-CLOSE (TTC...
8550 Manual - Page 31

.../disable lock. SOFTWARE REVISION: Displays software version information. LIGHT SETTINGS: Set duration for sectional doors ONLY): Set the Timer-to stay on . SERVICE
Press and hold the second navigation button, then press the LIGHT button to operate the garage door opener.
TEMPERATURE: Display the temperature in Fahrenheit or Celsius and show /hide clock. CYCLE COUNT ON...
8550 Manual - Page 32

... above for programming additional remote controls or keyless entry devices. PIN
PROGRAM A REMOTE CONTROL USING THE LEARN BUTTON
1 Locate the Learn button on the remote control that you wish to operate your remote control. The garage door opener lights will flash (or two clicks will be heard) when the code has been programmed.
TO ADD...
8550 Manual - Page 33
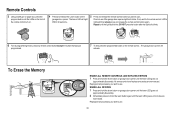
... control... The Learn LED will
activate. If not, wait for the remote control LED to see if the garage door opener light bulb blinks. Reprogram any remote control button except the button that was just
programmed.
7 To test, press the programmed button on the
garage door opener. Check to light solid then slowly press and release the remote control...
8550 Manual - Page 36

... for no
Obstruction, binding or Manually open : The garage door opener is not activated on the door control detects movement in the diagnostic codes:
My garage door opener beeps every 30 seconds: Refer to page 24.
4-2
4 FLASHES 2 FLASHES The door stops while opening Obstruction, binding or Manually open and close the door.
My garage door opener light(s) will not turn off when...
8550 Manual - Page 39
....
880LM
SECURITY+®2.0 Smart Control Panel®:
Displays temperature, time and system diagnostics; includes a push bar to open /closed status for up to
4 MyQ™ compatible garage door
openers and close the door and a lock feature for 5 minutes when it detects a person entering the garage. MyQ™ compatible.
890MAX
SECURITY+®2.0 3-Button Mini Remote Control: Compatible...
Similar Questions

I Have Installed A Chamberlan Garage Door Opener And The Remote I Was Using Is
I have been using a Chamberlan garage door opener and its remote has been defective since of late.Pl...
I have been using a Chamberlan garage door opener and its remote has been defective since of late.Pl...
(Posted by donweera42 8 months ago)
Garage Door Opens After Shutting.
My Lift master 8550 inside keypad is Inside wall pad is model #880LM. outside keypad Model # is 877M...
My Lift master 8550 inside keypad is Inside wall pad is model #880LM. outside keypad Model # is 877M...
(Posted by BONNIECA92 2 years ago)

Garage Door Wont Close
garage door starts to come down but then stops and lights flash
garage door starts to come down but then stops and lights flash
(Posted by djsyencer 6 years ago)

Remote Control For Liftmaster /chamberlain 3850 Garage Door Opener
what is the correct remote control for the chamberlain/liftmaster 3850 garage door opener
what is the correct remote control for the chamberlain/liftmaster 3850 garage door opener
(Posted by sendtoalice 9 years ago)

Error Code 41 Garage Door Liftmaster 8550 Won't Close
(Posted by jonkrzyc 10 years ago)