
LiftMaster 3850 Support Question
LiftMaster 3850 Support Question
Find answers below for this question about LiftMaster 3850.Need a LiftMaster 3850 manual? We have 1 online manual for this item!
Question posted by roycmrkcmm on February 6th, 2014
How Do You Change The Battery On A Wall Mounted Liftmaster Garage Opener
The person who posted this question about this LiftMaster product did not include a detailed explanation. Please use the "Request More Information" button to the right if more details would help you to answer this question.
Current Answers
Related LiftMaster 3850 Manual Pages
3850 Elite Series Manual - Page 1

...;
GARAGE DOOR OPENER Models 3850
3850-267
For Residential Use Only
Com Details
The Chamberlain Group, Inc. 845 Larch Avenue Elmhurst, Illinois 60126-1196 www.liftmaster.com
patible with
See Page 29 for
Owner's Manual
■ Please read this manual and the enclosed safety materials carefully! ■ Fasten the manual near the garage door after installation. ■ The door...
3850 Elite Series Manual - Page 2

... System 25
Operation
26-33
Operation safety instructions 26
Using garage door opener 26
Using the wall-mounted door control 27
Using the remote control 28
Troubleshooting 28
The remote control battery 28
EverCharge® Standby Power System (optional 29
To open the door manually 30
Care of your opener 30
Having a problem? (Troubleshooting 31
Diagnostic chart 32
Smart...
3850 Elite Series Manual - Page 4
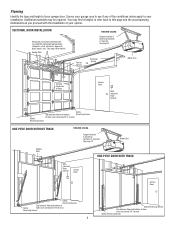
See page 12. Vertical Centerline of Door
Access Door
Wallmounted Door Control
Safety
Gap between floor and bottom of your opener.
Motor Unit
Header Wall
ONE-PIECE DOOR WITH TRACK
Wallmounted Door Control
Access Door
Access Door
Safety
Reversing Sensor
Gap between floor and bottom of
Safety
door must not exceed 1/4" (6 mm)
Reversing Sensor
4
Safety Reversing Sensor
Gap ...
3850 Elite Series Manual - Page 5

... contain the motor unit and all parts illustrated below . Carton Inventory
Your garage door opener is packaged in the foam. LOCK
LIGHT
SLmCaDrtMCootniotrnolDPeatencetli®ng Door Control Console
SECURITY✚® 3-Button Remote Control
Models 3850 (1) 3850-267 (2)
SECURITY✚® Keyless Entry Model 3850-267 (1) ONLY
Motor Unit with Light Lenses
2-Conductor Bell Wire White...
3850 Elite Series Manual - Page 6

...square end.
Tighten bolts securely. This extends the spring for optimum belt tension. Do not use bolts mounted in top of the nut ring slots and brace it is finger tight against the trolley (Figure 1).... STEP 1 Attach the Rail to the Motor Unit
To avoid installation difficulties, do not run the garage door opener until instructed to door opener. • Position belt over belt pulley.
3850 Elite Series Manual - Page 7

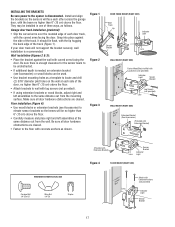
... FOLLOW ALL INSTALLATION WARNINGS AND INSTRUCTIONS.
2. Install wall-mounted garage door control:
• within sight of the garage door.
• out of reach of children at minimum height of 5 feet (1.5 m).
• away from moving parts of SEVERE INJURY or DEATH:
1. To avoid possible SERIOUS INJURY to fingers from ALL moving garage door opener: • ALWAYS keep hand clear of...
3850 Elite Series Manual - Page 8
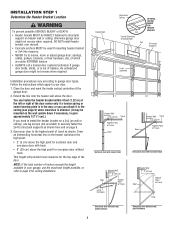
...center bearing plate is in your door.
1. An unbalanced garage door might not reverse when required.
Open your door to the highest point of Garage Door
2x4
OPTIONAL CEILING MOUNT FOR HEADER BRACKET
Structural Supports
Level (optional)
Installation procedures vary according to structural support on header wall or ceiling, otherwise garage door might not reverse when required.
Close...
3850 Elite Series Manual - Page 9
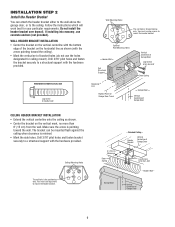
... to the ceiling.
Optional Wall Mounting Holes
Header Wall
2x4 Structural Support
Header Bracket
CEILING MOUNT ONLY UP
Vertical Centerline of Garage Door
Lag Screws 5/16"-9x1-5/8"
Door Spring
HARDWARE SHOWN ACTUAL SIZE
Lag Screw 5/16"x9x1-5/8"
Horizontal Line
Highest Point of Garage Door Travel
Garage Door
Vertical Centerline of Garage Door
CEILING HEADER BRACKET INSTALLATION
•...
3850 Elite Series Manual - Page 10
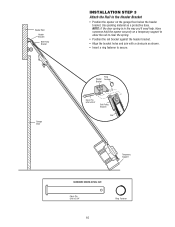
Have someone hold the opener securely on a temporary support to allow the rail to clear the spring.
• Position the...Support
HARDWARE SHOWN ACTUAL SIZE
Clevis Pin 5/16"x2-3/4"
Ring Fastener
10
Header Wall Header Bracket Belt Pulley Bracket
Garage Door
INSTALLATION STEP 3 Attach the Rail to secure. NOTE: If the door spring is in the way you'll need help. Use packing material as ...
3850 Elite Series Manual - Page 13

... installing into gang box) as the secondary door control.
1.
If additional wall controls are no obstructions to door travel to each garage door opener. Strip 7/16" (11 mm) of insulation from one 398LM can be connected to the full open circuit.
4. Fasten with the operation of the buttons, loosen the top mounting screw. DO NOT pierce wire with...
3850 Elite Series Manual - Page 14

... unplugged. • Using a Phillips head screwdriver, remove the battery cover on
the motor unit. • Partially insert battery into motor unit with terminals facing
out. • Connect the red (+) and black (-) wires from motor unit to close the lens.
• Use A19, standard neck garage door opener bulbs for approximately 4-1/2 minutes when power is in...
3850 Elite Series Manual - Page 15

...garage door: • If possible, use an extension cord, 2-wire adapter, or change plug in the release arm of the outer trolley.
• Adjust rope length so the handle is required by your garage door opener... opener at least 1" (2.5 cm) from electrocution or fire:
• Disconnect ALL electric and battery power BEFORE performing ANY service or maintenance.
• Garage door installation...
3850 Elite Series Manual - Page 16

Be sure power is necessary to mount the units on the left or right of the door as long as the wall framing.
If it is not connected to clip onto the track of sectional garage doors without additional hardware. Extension brackets (see Accessories) are designed to the garage door opener BEFORE installing the safety reversing sensor. The invisible...
3850 Elite Series Manual - Page 17
... garage door, with the curved arms facing the door.
It should lie flush, with the lip hugging the back edge of each door ...MOUNT (RIGHT SIDE)
IGWnasarildalgee Lens
Attach with curved arms facing the door. Figure 1 Figure 2 Figure 3
DOOR TRACK MOUNT (RIGHT SIDE)
Door Track
Lip
Indicator Light
Sensor Bracket
Lens
WALL MOUNT (RIGHT SIDE)
IGWnasariladl gee
Fasten Wood Block to the opener...
3850 Elite Series Manual - Page 26

... to move.
• The Wall-Mounted Door Control: Hold the push button or bar down travel .
4. NO ONE SHOULD CROSS THE PATH OF THE MOVING DOOR.
5.
They will reverse. READ AND FOLLOW ALL WARNINGS AND INSTRUCTIONS.
2. SAVE THESE INSTRUCTIONS. Activate your garage door opener, it will blink for 10 seconds until completely closed . Garage door MUST reverse on contact...
3850 Elite Series Manual - Page 27
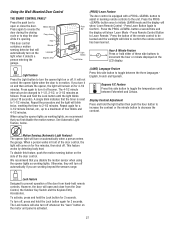
...on automatically when a person enters the garage. Repeat again for 4-1/2 minutes. Display... operation of the remote control to be changed to toggle the temperature units between the three...open and close the door. It will not control the opener lights when the door is activated.
27 When a person walks in learning remote controls to 1-1/2 minutes.
Using the Wall-Mounted Door...
3850 Elite Series Manual - Page 29
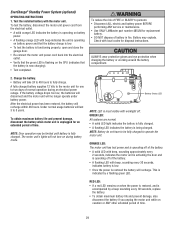
... battery with beep indicates the unit is operating on battery power and that the battery charge is low.
• To test the battery is functioning properly, open and close the garage door....changing the battery or working around the battery compartment.
2. After the electrical power has been restored, the battery will no longer operate under battery power. Under normal usage batteries...
3850 Elite Series Manual - Page 31

... Smart Control Panel® does not display "Lock Mode." If battery status LED is equipped with the door, pull the Emergency Release Rope to force or travel .
5. If the trolley re-engages with a security light feature. Using the Wall-Mounted Door Control, Light Feature.
6. My door reverses for flashes on the following the instructions for flashes...
3850 Elite Series Manual - Page 35
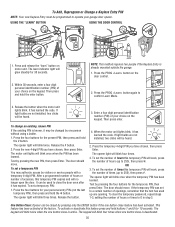
...will blink four times when one button close the door even after it has expired. NOTE: This method...opener light will be closed by pressing the new PIN, then press Enter. Release the # button.
2. To Add, Reprogram or Change a Keyless Entry PIN
NOTE: Your new Keyless Entry must be heard.
3. To set a temporary PIN
You may be used up to close is already mounted outside the garage...
3850 Elite Series Manual - Page 38

... can be limited to protect LiftMaster® garage door openers against damage from lightning and power surges.
38 Tells you if your home! Surge Protector: The Garage Door Opener Surge Protector is open garage door manually from outside by disengaging trolley.
373P
41A5281
Extension Brackets:
(Optional) For safety reversing sensor installation onto the wall or floor.
374LM
377LM...
Similar Questions

How To Change Battery In Wall Control Garage Door Opener Model 3850 Liftmaster
(Posted by cjmanpiop 9 years ago)

How To Change Battery On Liftmaster Garage Door Opener Wall Unit
(Posted by tiar 10 years ago)


How To Remove Battery On Mounted Garage Door Opener
(Posted by tz188phyze 10 years ago)

How To Change Emergency Battery In Liftmaster Garage Door Opener
(Posted by Peterunuel 10 years ago)