LiftMaster 3850 Support Question
Find answers below for this question about LiftMaster 3850.Need a LiftMaster 3850 manual? We have 1 online manual for this item!
Question posted by tiar on March 11th, 2014
How To Change Battery On Liftmaster Garage Door Opener Wall Unit
The person who posted this question about this LiftMaster product did not include a detailed explanation. Please use the "Request More Information" button to the right if more details would help you to answer this question.
Current Answers
There are currently no answers that have been posted for this question.
Be the first to post an answer! Remember that you can earn up to 1,100 points for every answer you submit. The better the quality of your answer, the better chance it has to be accepted.
Be the first to post an answer! Remember that you can earn up to 1,100 points for every answer you submit. The better the quality of your answer, the better chance it has to be accepted.
Related LiftMaster 3850 Manual Pages
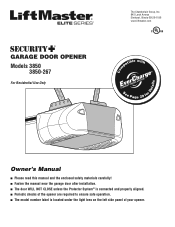
3850 Elite Series Manual - Page 1

...;
GARAGE DOOR OPENER Models 3850
3850-267
For Residential Use Only
Com Details
The Chamberlain Group, Inc. 845 Larch Avenue Elmhurst, Illinois 60126-1196 www.liftmaster.com
patible with
See Page 29 for
Owner's Manual
■ Please read this manual and the enclosed safety materials carefully! ■ Fasten the manual near the garage door after installation. ■ The door...
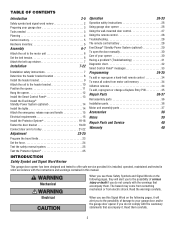
3850 Elite Series Manual - Page 2

...
Operation
26-33
Operation safety instructions 26
Using garage door opener 26
Using the wall-mounted door control 27
Using the remote control 28
Troubleshooting 28
The remote control battery 28
EverCharge® Standby Power System (optional 29
To open the door manually 30
Care of your garage door and/or the garage door opener if you do not comply with the warnings...
3850 Elite Series Manual - Page 3
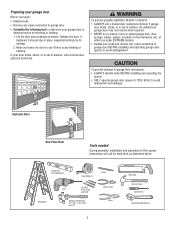

...; Disable ALL locks and remove ALL ropes connected to garage door BEFORE installing and operating garage door opener to avoid malfunction and damage. Sectional Door
One-Piece Door
Tools needed
During assembly, installation and adjustment of the opener, instructions will call a trained door systems technician. Raise and lower the door to see if there is out of balance.
Preparing your...
3850 Elite Series Manual - Page 5
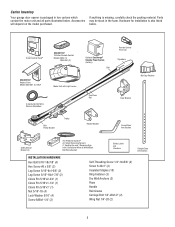

...garage door opener is missing, carefully check the packing material. If anything is packaged in the foam. Parts may be stuck in two cartons which contain the motor unit and all parts illustrated below .
LOCK
LIGHT
SLmCaDrtMCootniotrnolDPeatencetli®ng Door Control Console
SECURITY✚® 3-Button Remote Control
Models 3850 (1) 3850... Fastener (3) Dry Wall Anchors (2) Rope ...
3850 Elite Series Manual - Page 6

... End
Trolley
Threaded
Nut
Shaft
Ring
Nut Ring Slots
Figure 2
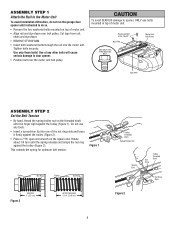
ASSEMBLY STEP 1 Attach the Rail to the Motor Unit
To avoid installation difficulties, do not run the garage door opener until it firmly against the trolley (Figure 2).
• Place a 7/16" open end wrench on top of motor unit. • Align rail and styrofoam over the motor...
3850 Elite Series Manual - Page 7
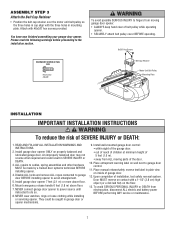

... assembling your garage door opener. Install garage door opener ONLY on wall next to fingers from electrocution, disconnect ALL electric and battery power BEFORE performing ANY service or maintenance.
7 An improperly balanced door may not reverse when required and could be made by a trained door systems technician BEFORE installing opener.
4. Install garage door opener 7 feet (2.1 m) or...
3850 Elite Series Manual - Page 11
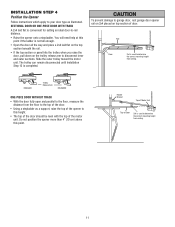

... the top of the motor unit.
Header Bracket
Top of Motor Unit
Top of the door.
• Using a stepladder as illustrated.
ENGAGED
Trolley Release Arm
RELEASED
ONE-PIECE DOOR WITHOUT TRACK
• With the door fully open and parallel to the floor, measure the distance from ceiling. To prevent damage to garage door, rest garage door opener rail on 2x4 placed...
3850 Elite Series Manual - Page 12
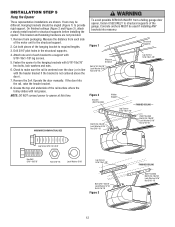

...This bracket and fastening hardware are shown. Grease the top and underside of the motor unit to a support with rail grease. Concrete anchors MUST be different. Yours may be .... 5.
Operate the door manually. Hanging brackets should be angled (Figure 1) to structural supports before installing the opener. Measure the distance from a falling garage door opener, fasten it SECURELY...
3850 Elite Series Manual - Page 13
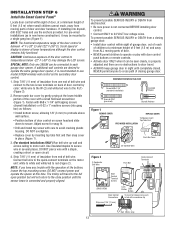

...door control remains fully functional. If additional wall controls are no obstructions to door travel to avoid cracking plastic housing. Fasten with care to the full open circuit.
4. NOTE: If you have any trouble with a staple, creating a short or open position but will travel . • ALWAYS keep garage door... motor unit. If installing into gang box) as the secondary door control....
3850 Elite Series Manual - Page 14
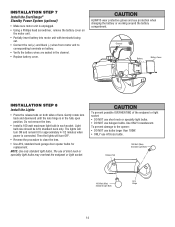

... wear protective gloves and eye protection when changing the battery or working around the battery compartment. Gently rotate lens back and downward until the lens hinge is connected. Then the lights will turn OFF.
• Reverse the procedure to close the lens.
• Use A19, standard neck garage door opener bulbs for approximately 4-1/2 minutes when power...
3850 Elite Series Manual - Page 15
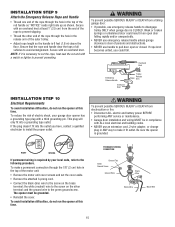

...a permanent connection through the hole in the top of the motor unit:
• Remove the motor unit cover screws and set the cover aside.
• Remove the ...door open or closed.
NOTE: If it fit outlet. To prevent possible SERIOUS INJURY or DEATH from electrocution or fire:
• Disconnect ALL electric and battery power BEFORE performing ANY service or maintenance.
• Garage door...
3850 Elite Series Manual - Page 16
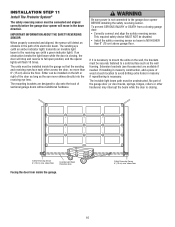

...Protector System®
The safety reversing sensor must be connected and aligned correctly before the garage door opener will move in the path of its electronic beam. The sending eye (with a ... units on the left or right of the door as long as the wall framing. The invisible light beam path must be installed on the wall, the brackets must be securely fastened to the garage door opener BEFORE...
3850 Elite Series Manual - Page 24
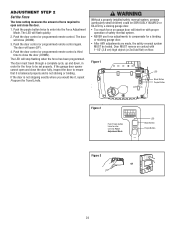

... or programmed remote control a third time to close (DOWN).
3. The door will open and close the door.
1. Push the door control or programmed remote control again. Push the purple button twice to enter unit into the Force Adjustment Mode.
If the garage door opener cannot open (UP).
4. If the door is not stopping exactly where you would like it is...
3850 Elite Series Manual - Page 25
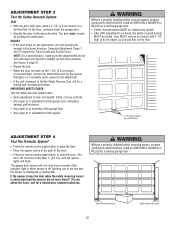

... the garage floor.
• Any repair to the fact that the sensor is not traveling far enough in the down direction.
ADJUST
• If the door stops on the 1-1/2" (3.8 cm) board (or 2x4 laid flat), remove the obstruction and run the opener through 3 or 4 complete travel cycles to test adjustment.
• If the unit...
3850 Elite Series Manual - Page 26
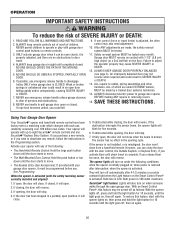

..., causing SEVERE INJURY or DEATH.
7. Safety reversal system MUST be tested.
11. Failure to pull garage door open .
2. ALL repairs to a matching code which are made by a trained door systems technician.
14. ALWAYS disconnect electric power to move.
• The Wall-Mounted Door Control: Hold the push button or bar down travel .
4.
See Programming. When the...
3850 Elite Series Manual - Page 31
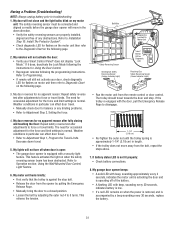

... the light on the following page.
2. Using the Wall-Mounted Door Control, Light Feature.
6. If battery status LED is normal. My garage door opener beeps: • A solid LED with beep, sounding approximately every 2 seconds, indicates the motor unit is activating the door and is operating off when door is open: • The garage door opener is equipped with beep, sounding every 30 seconds...
3850 Elite Series Manual - Page 32
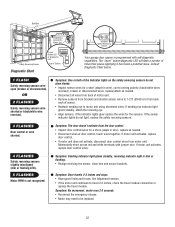

...Safety Reversing Sensor
Diagnostic Chart
Diagnostics Located On Motor Unit
"Learn" Button LED or Diagnostic LED "Learn" Button
Installed Safety Reversing
Sensor
Your garage door opener is programmed with jumper wire. Symptom: The door doesn't activate from motor unit. If motor unit activates, replace door control wires.
Symptom: Door travels 2-3 inches and stops. • Reprogram limits and...
3850 Elite Series Manual - Page 34
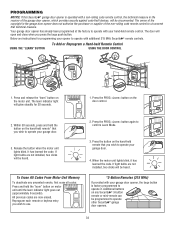

... has learned the code. When the motor unit lights blink, it .
Release the button when the motor unit lights blink. Press the button on the hand-held remote control.
Below are not installed, two clicks will open and close when you wish to use.
1.
Your garage door opener has already been programmed at the factory to...
3850 Elite Series Manual - Page 35
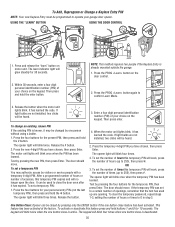

... garage door opener.
Press the four buttons for your choice on the door control.
2. The opener light will blink once when the PIN has been learned. The motor unit lights will blink twice. The door should... blink four times when one opening. To set a temporary PIN
You may be changed by visitors or service people with a temporary 4-digit PIN.
The opener light will blink twice when ...
3850 Elite Series Manual - Page 38
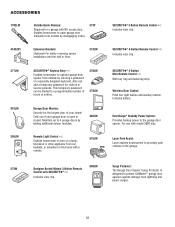

....
38
Surge Protector: The Garage Door Opener Surge Protector is open garage door manually from outside by disengaging trolley.
373P
41A5281
Extension Brackets:
(Optional) For safety reversing sensor installation onto the wall or floor.
374LM
377LM
SECURITY✚® Keyless Entry :
Enables homeowner to protect LiftMaster® garage door openers against damage from car...
Similar Questions
How To Change Battery In Wall Control Garage Door Opener Model 3850 Liftmaster
(Posted by cjmanpiop 9 years ago)
How To Remove Backup Battery In Liftmaster Backup Battery Garage Door Opener
manual
manual
(Posted by Albdunca 10 years ago)
Is There A Battery On Wall Unit Of Liftmaster Garage Door Opener
(Posted by amarnie 10 years ago)
How To Change Battery On Liftmaster Elite Series Garage Door Opener
(Posted by Parissil 10 years ago)

