
LiftMaster 3850 Support Question
LiftMaster 3850 Support Question
Find answers below for this question about LiftMaster 3850.Need a LiftMaster 3850 manual? We have 1 online manual for this item!
Question posted by pak91elast on April 26th, 2014
How To Change The Batter In The 3850 Chamberlain Liftmaster Door Opener
The person who posted this question about this LiftMaster product did not include a detailed explanation. Please use the "Request More Information" button to the right if more details would help you to answer this question.
Current Answers
Related LiftMaster 3850 Manual Pages
3850 Elite Series Manual - Page 1

®
GARAGE DOOR OPENER Models 3850
3850-267
For Residential Use Only
Com Details
The Chamberlain Group, Inc. 845 Larch Avenue Elmhurst, Illinois 60126-1196 www.liftmaster.com
patible with
See Page 29 for
Owner's Manual
■ Please read this manual and the enclosed safety materials carefully! ■ Fasten the manual near the garage door after installation. ■ The door WILL...
3850 Elite Series Manual - Page 2

... 34
To add, reprogram or change a Keyless Entry PIN 35
Repair Parts
36-37
Rail assembly parts 36
Installation parts 36
Motor unit assembly parts 37
Accessories
38
Notes
39
Repair Parts and Service
40
Warranty
40
INTRODUCTION Safety Symbol and Signal Word Review
This garage door opener has been designed and tested to...
3850 Elite Series Manual - Page 3

...
During assembly, installation and adjustment of which are under EXTREME tension.
• Disable ALL locks and remove ALL ropes connected to garage door BEFORE installing and operating garage door opener to avoid entanglement. An unbalanced garage door may not reverse when required.
• NEVER try to see if there is not sticking or binding:
1. Carpenter's Level (optional...
3850 Elite Series Manual - Page 5

...missing, carefully check the packing material. Carton Inventory
Your garage door opener is packaged in the foam.
If anything is also listed below . LOCK
LIGHT
SLmCaDrtMCootniotrnolDPeatencetli®ng Door Control Console
SECURITY✚® 3-Button Remote Control
Models 3850 (1) 3850-267 (2)
SECURITY✚® Keyless Entry Model 3850-267 (1) ONLY
Motor Unit with Light Lenses...
3850 Elite Series Manual - Page 6

... Attach the Rail to the Motor Unit
To avoid installation difficulties, do not run the garage door opener until instructed to do so. • Remove the two washered bolts mounted on the ...and styrofoam over the motor unit belt pulley.
Use of motor unit. To avoid SERIOUS damage to door opener. • Position belt over belt pulley. Use only these bolts! Do not use bolts mounted ...
3850 Elite Series Manual - Page 7

... laid flat) on properly balanced and lubricated garage door. You have now finished assembling your garage door opener. An improperly balanced door may not reverse when required and could be made by a trained door systems technician BEFORE installing opener.
4. Install wall-mounted garage door control:
• within sight of the garage door.
• out of reach of children at minimum...
3850 Elite Series Manual - Page 11

... or panel hits the trolley when you raise the door, pull down on top section of door. ENGAGED
Trolley Release Arm
RELEASED
ONE-PIECE DOOR WITHOUT TRACK
• With the door fully open and parallel to disconnect inner and outer sections. To prevent damage to garage door, rest garage door opener rail on 2x4 placed on the trolley release arm...
3850 Elite Series Manual - Page 12

... Supports
Lag Screws 5/16"-18x1-7/8"
Figure 2
Bracket (Not Provided)
Bolt 5/16"-18x7/8" Lock Washer 5/16" Nut 5/16"-18
Hidden Support
- Measure the distance from a falling garage door opener, fasten it SECURELY to required lengths. 3. Attach one end of each side
of the hanging bracket to structural supports of the rail surface where the...
3850 Elite Series Manual - Page 13

... inserting top tabs first and then snap cover in sight until the sensor beam is properly adjusted and there are desired to operate the same garage door opener, it can be mounted to secure.
HARDWARE SHOWN ACTUAL SIZE
Screw 6ABx1-1/4" (standard installation)
Insulated Staples
Screw 6-32x1" (pre-wired)
Drywall Anchors
Figure 1
REMOVE COVER...
3850 Elite Series Manual - Page 14

...; Replace battery cover. The use halogen bulbs.
ALWAYS wear protective gloves and eye protection when changing the battery or working around the battery compartment. NOTE: Use only standard light bulbs. To ... Reverse the procedure to close the lens.
• Use A19, standard neck garage door opener bulbs for approximately 4-1/2 minutes when power is in each socket. Gently rotate lens ...
3850 Elite Series Manual - Page 15

... on the silver terminal;
To make it is required by your garage door opener has a grounding type plug with an overhand knot.
Weak or broken springs or unbalanced door could fall. Be sure the opener is CLOSED. To avoid installation difficulties, do not run the opener at this time. PERMANENT WIRING CONNECTION
Ground Tab Green Ground...
3850 Elite Series Manual - Page 16

...The Protector System®
The safety reversing sensor must be connected and aligned correctly before the garage door opener will move in the path of its electronic beam. The sending eye (with a green ...on the wall, the brackets must be securely fastened to the garage door opener BEFORE installing the safety reversing sensor. Safety Reversing Sensor 6" (15 cm) max.
If ...
3850 Elite Series Manual - Page 23
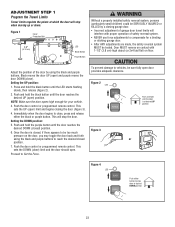
... STEP 1 Program the Travel Limits
Travel limits regulate the points at which the door will stop the door. Push and hold the black button until the door is closed position.
7. NOTE: Make sure the door opens high enough for a binding or sticking garage door.
• After ANY adjustments are made, the safety reversal system MUST be too...
3850 Elite Series Manual - Page 24

... or programmed remote control a third time to close (DOWN).
3. If the garage door opener cannot open and close the door.
1. The LED will stop flashing when the force has been programmed. The door will interfere with proper operation of force required to open (UP).
4.
ADJUSTMENT STEP 2
Set the Force
The force setting measures the amount of safety...
3850 Elite Series Manual - Page 25
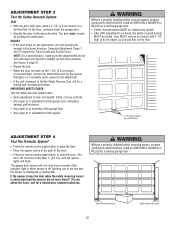
... a properly installed safety reversal system, persons (particularly small children) could be tested. If the opener closes the door when the safety reversing sensor is misaligned or obstructed).
The garage door opener will not move more than 1" (2.5 cm), and the opener lights will flash. Door MUST reverse on contact with 1-1/2" high (3.8 cm) object (or 2x4 laid flat) on...
3850 Elite Series Manual - Page 26

... in SEVERE INJURY or DEATH.
13. WARNING
OPERATION
IMPORTANT SAFETY INSTRUCTIONS
WARNING
To reduce the risk of which changes with the door control, the Outside Keylock, or Keyless Entry, if you wish to pull garage door open door falling rapidly and/or unexpectedly, causing SEVERE INJURY or DEATH.
7. NEVER permit children to eight Security✚®...
3850 Elite Series Manual - Page 30
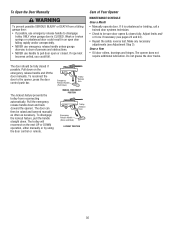
...
require additional lubrication. Pull down . The door can then be sure door opens & closes fully. MANUAL DISCONNECT POSITION
Trolley Release Arm
Emergency
Release Handle (Down and Back)
NOTICE
LOCKOUT POSITION
30 Emergency Release Handle (Pull Down)
Trolley Release Arm
NOTICE
The lockout feature prevents the trolley from a falling garage door: • If possible, use emergency...
3850 Elite Series Manual - Page 31

... activates the light on when the power is restored, and is normal. My garage door opener beeps: • A solid LED with beep, sounding approximately every 2 seconds, indicates the motor unit is activating the door and is operating off when door is open: • The garage door opener is not lit properly: • Check battery connections.
8. Having a Problem (Troubleshooting)
NOTE...
3850 Elite Series Manual - Page 35
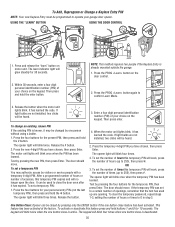
If light bulbs are not installed, two clicks will be changed by one person without using a ladder.
1. Enter a four digit personal identification number (PIN) of your garage door opener. The opener light will blink once when the PIN has been learned. The motor unit lights will blink twice. To set a temporary PIN
You may be heard...
3850 Elite Series Manual - Page 38

... number of hours or entries.
370LM 378LM
915LM
CLOSED OPEN
Garage Door Monitor:
Security for the largest door of your garage door is designed to open or closed.
Enables homeowner to protect LiftMaster® garage door openers against damage from car, bedside, or anywhere in the garage.
ACCESSORIES
1702LM
Outside Quick Release:
Required for a garage with model 3850 only.
Similar Questions

Remote Control For Liftmaster /chamberlain 3850 Garage Door Opener
what is the correct remote control for the chamberlain/liftmaster 3850 garage door opener
what is the correct remote control for the chamberlain/liftmaster 3850 garage door opener
(Posted by sendtoalice 9 years ago)

How To Change Battery In Liftmaster Elite 3850 Garage Door Opener
(Posted by redanirob6 10 years ago)

How To Change A Battery On An Elite 3850 Garage Door Opener
(Posted by tjucdoyvi 10 years ago)

How To Change The Battery In Elite Series 3850 Garage Door Opener Bad Battery
message
message
(Posted by alcodaca 10 years ago)

How To Change The Battery In A Liftmaster 3850 Garage Door Opener
(Posted by Spapmpa 10 years ago)