
LiftMaster 3255 Support Question
LiftMaster 3255 Support Question
Find answers below for this question about LiftMaster 3255.Need a LiftMaster 3255 manual? We have 1 online manual for this item!
Question posted by ksteinocher on December 26th, 2012
Problem With Liftmaster Model 3255
Why does the opener open about 2 inches then stop?
Current Answers
Related LiftMaster 3255 Manual Pages
3255 Manual - Page 1
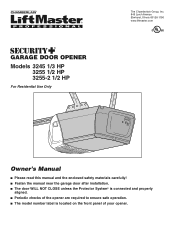
®
GARAGE DOOR OPENER
Models 3245 1/3 HP 3255 1/2 HP 3255-2 1/2 HP
For Residential Use Only
The Chamberlain Group, Inc. 845 Larch Avenue Elmhurst, Illinois 60126-1196
www.liftmaster.com
Owner's Manual
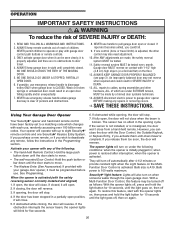
■ Please read this manual and the enclosed safety materials carefully! ■ Fasten the manual near the garage door after installation. ■ The door WILL NOT CLOSE unless the ...
3255 Manual - Page 2

... . When you see these Safety Symbols and Signal Words on the following pages, they will alert you to the possibility of damage to your garage door opener 28
Having a problem 29
Diagnostic chart 30
Programming
31-32
To add or reprogram a hand-held remote control 31
To erase all codes 31
3-Button remotes 31...
3255 Manual - Page 3
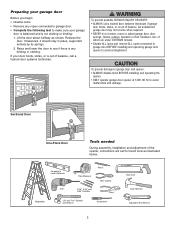
...; Disable ALL locks and remove ALL ropes connected to garage door BEFORE installing and operating garage door opener to loosen, move or adjust garage door, door springs, cables, pulleys, brackets or their hardware, ALL of balance. If your garage
door is balanced and is any binding or sticking.
Sectional Door
One-Piece Door
Tools needed
During assembly, installation and adjustment of...
3255 Manual - Page 4
... Gap between floor and bottom of Garage Door
Extension Spring OR Torsion Spring
Wallmounted Door Control
Access Door
--- --- --
Safety Reversing Sensor
Safety Reversing Sensor
Gap between floor Reversing Sensor and bottom of door must not exceed 1/4" (6 mm).
See page 12.
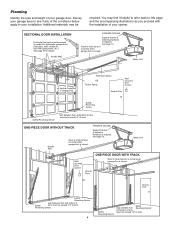
Planning
Identify the type and height of your opener.
FINISHED CEILING
Support bracket & fastening...
3255 Manual - Page 5

... White & White/Red? Hardware for installation
Accessories will depend on the model purchased. Carton Inventory
Your garage door opener is packaged in the foam. is also listed below .
contain the motor unit and all parts illustrated below .
3245 (1), 3255 (1), 3255-2 (2)
LOCK
LIGHT
Multi-Function Door Control Panel
: SECURITY ®
Single-Button Remote Control
Remote Control Visor...
3255 Manual - Page 6
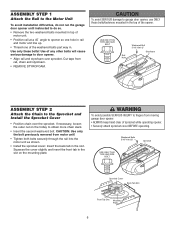
... removed from
rail, chain and styrofoam. • REMOVE STYROFOAM. To avoid possible SERIOUS INJURY to fingers from moving garage door opener: • ALWAYS keep hand clear of any other bolts will cause serious damage to garage door opener, use ONLY those bolts/fasteners mounted in the top of the washered bolts part way in the slot...
3255 Manual - Page 7

... release handle to disconnect trolley before proceeding to the position shown in garage door or opener mechanisms.
9.
If the chain returns to the installation section. Install garage door opener only on inside of garage door.
12. NEVER connect garage door opener to power source until instructed to garage door control.
11. This is normal.
Base of Rail Mid Length of installation...
3255 Manual - Page 11
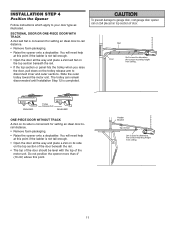
... apply to determine the correct mounting height from ceiling.
11 The trolley can remain disconnected until Installation Step 12 is used to your door type as illustrated.
To prevent damage to garage door, rest garage door opener rail on 2x4 placed on the trolley release arm to -rail distance. • Remove foam packaging. • Raise the...
3255 Manual - Page 12
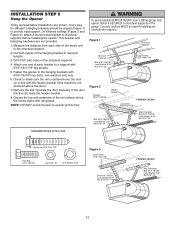
... ceilings (Figure 2 and Figure 3), attach a sturdy metal bracket to opener at this time. Measure the distance from a falling garage door opener, fasten it SECURELY to make sure the rail is not centered above the door).
7. Drill 3/16" pilot holes in line with rail grease. Operate the door manually. Yours may be used if installing any brackets...
3255 Manual - Page 14
... handle is necessary to cut the rope, heat seal the cut end with a match or lighter to close the lens.
• Use A19, standard neck garage door opener bulbs for approximately 4-1/2 minutes when power is clear of lens.
Do not remove the lens.
• Install up as shown. If rope knot becomes untied...
3255 Manual - Page 15
... wire to the screw on the silver terminal;
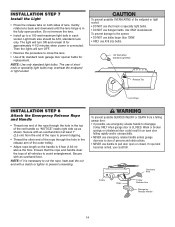
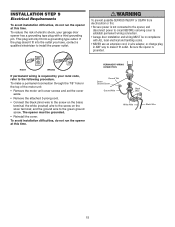
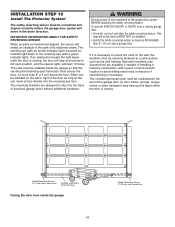
INSTALLATION STEP 9
Electrical Requirements
To avoid installation difficulties, do not run the opener at this time.
Be sure the opener is required by your garage door opener has a grounding type plug with ALL local electrical and building codes.
• NEVER use an extension cord, 2-wire adapter, or...
3255 Manual - Page 16
...the receiving eye (with an amber indicator light) transmits an invisible light beam to the garage door opener BEFORE installing the safety reversing sensor. Safety Reversing Sensor 6" (15 cm) max. This...aligned, the sensor will stop and reverse to avoid drilling extra holes in the path of the garage door (or door tracks, springs, hinges, rollers or other across the door, no more than ...
3255 Manual - Page 25
... a trained door systems technician. The garage door opener will flash. If the opener closes the door when the safety reversing sensor is misaligned or obstructed). Increase the DOWN limit by a closing garage door. • Safety reversal system MUST be SERIOUSLY INJURED or KILLED by turning the DOWN limit adjustment screw counterclockwise 1/4 turn.
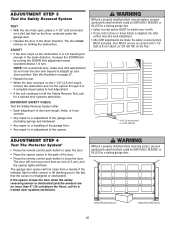
ADJUST • If the door stops on the...
3255 Manual - Page 26
... ANY adjustments are no effect in sight until the door starts to garage door opener BEFORE making any remote, follow the instructions in the Programming section. When the opener is CLOSED. If opening , the door will reverse. 3. If obstructed while closing , the door will stop .
4. If obstructed while opening , the door will operate with the safety reversing sensor correctly installed...
3255 Manual - Page 29
... move away from the remote control or door control. My door will not close and the light bulbs blink on my motor unit: The safety reversing sensor must be connected and aligned correctly before the garage door opener will not turn off when door is open: • The garage door opener is against the stop . This feature activates the light on...
3255 Manual - Page 30
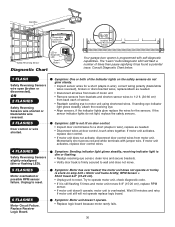
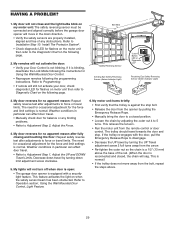
...
Diagnostics Located On Motor Unit
Safety Reversing Sensor
LED or Diagnostic LED
"Learn" Button
Diagnostic Chart
Installed Safety Reversing
Sensor
Your garage door opener is overheated. Symptom: LED is not lit on stop bolt = Motor unit hums briefly; If motor unit still will flash a number of sensor. • Reattach sending eye to wall and...
3255 Manual - Page 31
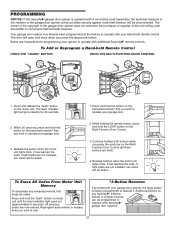
...your garage door opener, the large button is operated with a non-rolling code transmitter, the technical measure in the garage door opener does not authorize the purchaser or supplier of the garage door opener, ...remote* that technical measure. PROGRAMMING
NOTICE: If this Security✚® garage door opener is factory programmed to operate with your hand-held remote control. Press and ...
3255 Manual - Page 32
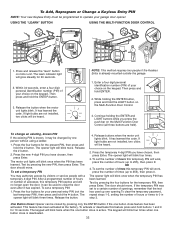
...change an existing, known PIN
If the existing PIN is already mounted outside the garage.
1.
The door should move . To set the number of hours this feature press and hold... be heard.
2. The opener light will blink once when the temporary PIN has been learned. Release the button.
4. The opener light will work , press the number of your garage door opener. To set a temporary ...
3255 Manual - Page 35

... clip. ACCESSORIES
1702LM 41A5281
Outside Quick Release:
Required for visitors or service persons. Monitors up to 4 garage doors by adding additional sensor modules.
975LM
Remote Light Control:
Enables homeowner to protect LiftMaster® garage door openers against damage from outside by disengaging trolley.
373P
Extension Brackets:
(Optional) For safety sensor installation onto the...
3255 Manual - Page 36
... PROBLEMS WITH, OR RELATING TO, THE GARAGE DOOR OR GARAGE DOOR HARDWARE, INCLUDING BUT NOT LIMITED TO THE DOOR SPRINGS, DOOR ROLLERS, DOOR ALIGNMENT OR HINGES. ANY SERVICE CALL THAT DETERMINES THE PROBLEM ...NAME • MODEL NUMBER ADDRESS ORDERS TO: THE CHAMBERLAIN GROUP, INC. Country Club Road
Tucson, Arizona 85706
SERVICE INFORMATION TOLL FREE NUMBER:
1-800-528-9131
LIFTMASTER ONE-YEAR LIMITED...
Similar Questions

Garage Door Opener Model
How do I know if I have a 3255 or 3255-2M garage door opener?
How do I know if I have a 3255 or 3255-2M garage door opener?
(Posted by ericoster1 3 years ago)

Where Is The Reset Button On Liftmaster Model 3265 Garage Door Opener
(Posted by cjaxlme 9 years ago)

Liftmaster 3255m Garage Door Opener
i cannot get the keypad programmed to the garage door opener.
i cannot get the keypad programmed to the garage door opener.
(Posted by bwerries 10 years ago)


Garage Door Opens Intermittently
Garage door is closed and opens periodically on it's own when nobody activates the interior wall swi...
Garage door is closed and opens periodically on it's own when nobody activates the interior wall swi...
(Posted by Anonymous-59422 11 years ago)