
LiftMaster 3255 Support Question
LiftMaster 3255 Support Question
Find answers below for this question about LiftMaster 3255.Need a LiftMaster 3255 manual? We have 1 online manual for this item!
Question posted by mccauley on August 5th, 2013
How Do You Change Battery In Opener?
how do you change battery in opener?
Current Answers
Related LiftMaster 3255 Manual Pages
3255 Manual - Page 1
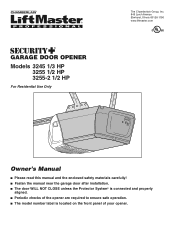
®
GARAGE DOOR OPENER
Models 3245 1/3 HP 3255 1/2 HP 3255-2 1/2 HP
For Residential Use Only
The Chamberlain Group, Inc. 845 Larch Avenue Elmhurst, Illinois 60126-1196
www.liftmaster.com
Owner's Manual
■ Please read this manual and the enclosed safety materials carefully! ■ Fasten the manual near the garage door after installation. ■ The door WILL NOT CLOSE unless...
3255 Manual - Page 2

... remotes 31
To add, reprogram or change a Keyless Entry PIN 32
Repair Parts
33-34
Rail assembly parts 33
Installation parts 33
Motor unit assembly parts 34
Accessories
35
Repair Parts and Service
36
Warranty
36
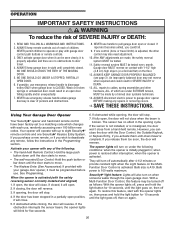
INTRODUCTION
Safety Symbol and Signal Word Review
This garage door opener has been designed and tested to offer...
3255 Manual - Page 3
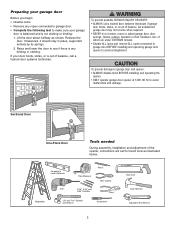
... are under EXTREME tension.
• Disable ALL locks and remove ALL ropes connected to garage door BEFORE installing and operating garage door opener to avoid malfunction and damage. An unbalanced garage door may not reverse when required.
• NEVER try to loosen, move or adjust garage door, door springs, cables, pulleys, brackets or their hardware, ALL of balance, call a trained...
3255 Manual - Page 4
... Sensor and bottom of your garage area to see if any of
Safety
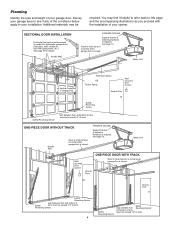
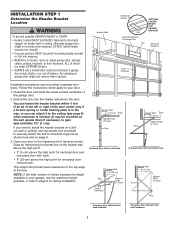
door must not exceed 1/4" (6 mm). SECTIONAL DOOR INSTALLATION
Horizontal and vertical reinforcement is closed .
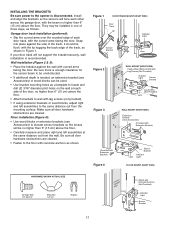
Survey your opener. Planning
Identify the type and height of Garage Door
Extension Spring OR Torsion Spring
Wallmounted Door Control
Access Door
--- --- -- Access Door
Safety Reversing Sensor
Gap between...
3255 Manual - Page 5

...packing material. Carton Inventory
Your garage door opener is packaged in the foam.
Trolley
One-Piece Rail
Curved Door Arm Section
Chain Pulley Bracket
Door Bracket
Safety Sensor Bracket (2)
The...contain the motor unit and all parts illustrated below .
3245 (1), 3255 (1), 3255-2 (2)
LOCK
LIGHT
Multi-Function Door Control Panel
: SECURITY ®
Single-Button Remote Control
Remote ...
3255 Manual - Page 6
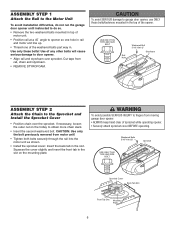
... STEP 1
Attach the Rail to the Motor Unit
To avoid installation difficulties, do not run the garage door opener until instructed to do so. • Remove the two washered bolts mounted in top of
motor unit...BOLT
Rail Hole
Washered Bolt 5/16"-18x1/2"
Styrofoam
ASSEMBLY STEP 2
Attach the Chain to garage door opener, use ONLY those bolts/fasteners mounted in the top of the washered bolts part way ...
3255 Manual - Page 7

... Mid Length of installation, test safety reversal system. Please read the following warnings before
adjusting chain. Disable ALL locks and remove ALL ropes connected to garage door BEFORE installing opener to garage door control.
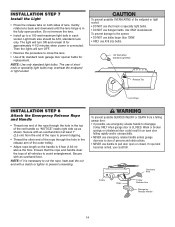
11. Mount emergency release handle 6 feet (1.83 m) above floor.
6. Upon completion of Rail
You have now finished assembling your...
3255 Manual - Page 8
... track.
• 8" (20 cm) above the door. Open your door.
1. DO NOT install header bracket over drywall. • Concrete anchors MUST be used if mounting header bracket or 2x4 into masonry. • NEVER try to your door to garage door types. Header Wall
Unfinished Ceiling
2x4 Vertical Centerline of Garage Door
2x4
OPTIONAL CEILING MOUNT FOR HEADER BRACKET...
3255 Manual - Page 10
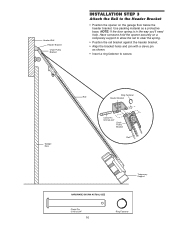
Have someone hold the opener securely on the garage floor below the header bracket.
Garage Door
Ring Fastener
Rail
Header Bracket
Clevis Pin 5/16"x2-3/4"
Chain Pulley Bracket
Rail
Temporary Support
HARDWARE SHOWN ACTUAL SIZE
Clevis Pin 5/16"x2-3/4"
10
Ring Fastener NOTE: If the door spring is in the way you'll need help. Header...
3255 Manual - Page 11
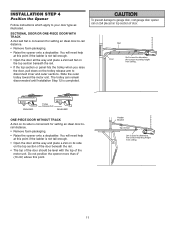
... than 4" (10 cm) above this point if the ladder is completed.
To prevent damage to garage door, rest garage door opener rail on 2x4 placed on the top section of the door beneath the rail.
• The top of the door should be level with the top of the motor unit. ENGAGED
Trolley Release Arm
RELEASED
ONE...
3255 Manual - Page 12
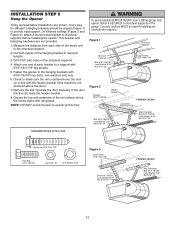
... underside of each side of the motor unit to required lengths.
3. Cut both pieces of the garage. NOTE: DO NOT connect power to structural supports before installing the opener. Yours may be different.
Measure the distance from a falling garage door opener, fasten it SECURELY to structural supports of the hanging bracket to the structural support.
2.
3255 Manual - Page 13
... location on screw head and slide down to secure. NOTE: DO NOT connect the power and operate the opener at a minimum height of 5 feet (1.5 m) where small children cannot reach, and away from a closing garage door.
To prevent possible SERIOUS INJURY or DEATH from end of bell wire. HARDWARE SHOWN ACTUAL SIZE
Screw 6ABx1...
3255 Manual - Page 14
... length so the handle is connected. Then the lights will turn OFF.
• Reverse the procedure to close the lens.
• Use A19, standard neck garage door opener bulbs for approximately 4-1/2 minutes when power is 6 feet (1.83 m) above the floor. Weak or broken springs or unbalanced...
3255 Manual - Page 15
... and wiring MUST be grounded.
• Reinstall the cover. Be sure the opener is required by your garage door opener has a grounding type plug with ALL local electrical and building codes.
• NEVER use an extension cord, 2-wire adapter, or change plug in the top of electric shock, your local code, refer to the screw...
3255 Manual - Page 16
... the safety reversing sensor. Either can be unobstructed. This
required safety device MUST NOT be connected and aligned correctly before the garage door opener will flash 10 times. No part of sectional garage doors without additional hardware.
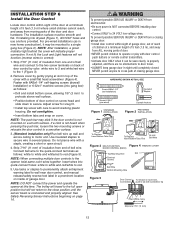
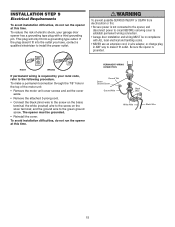
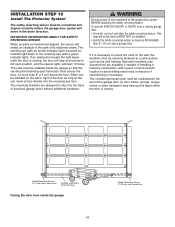
INSTALLATION STEP 10
Install The Protector System®
The safety reversing sensor must be disabled. • Install the...
3255 Manual - Page 17
...If using extension brackets or wood blocks, adjust right and left assemblies at each other across the garage door, with the beam no higher than 6" (15 cm) above the floor.
• Attach ...cm) above the floor.
• Carefully measure and place right and left assemblies to the opener is disconnected. Install and align the brackets so the sensors will not support the bracket securely...
3255 Manual - Page 26
... to move. • The Keyless Entry (See Accessories): If provided with
your opener with any of which changes with 1-1/2" high (3.8 cm) high object (or a 2x4 laid flat) on when someone walks through the open door falling rapidly and/or unexpectedly.
7. ALWAYS KEEP GARAGE DOOR PROPERLY BALANCED (see page 3). ALWAYS disconnect electric power to eight Security✚...
3255 Manual - Page 27
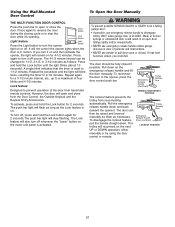
...the Light button to 1-1/2, 2-1/2, or 3-1/2 minutes as the Lock feature is activated. The door should be
changed to turn off whenever the "Learn" button on or off , press and hold the ... the door control or remote.
It will blink
twice, resetting the timer to the opener, press the door control push bar. Press
again to disengage trolley ONLY when garage door is in an open or ...
3255 Manual - Page 32
....
LOCK
LIGHT
LOCK
LIGHT
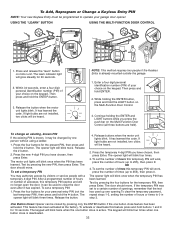
To change an existing, known PIN
If the existing PIN is already mounted outside the garage.
1. If light bulbs are held). Test by pressing the new PIN, then press Enter.
One Button Close: Opener can be heard. USING THE "LEARN" BUTTON
USING THE MULTI-FUNCTION DOOR CONTROL
LOCK
LIGHT
1. Then...
3255 Manual - Page 35

... to turn on a specially designed keyboard. Includes battery.
SECURITY✚® 3-Button Mini Remote Control: With key ring and fastening strip. Also can be limited to a programmable number of hours or entries.
370LM 378LM
Garage Door Monitor:
Security for the largest door of your garage door is designed to open or closed. Tells you if your home...
Similar Questions

I Have Installed A Chamberlan Garage Door Opener And The Remote I Was Using Is
I have been using a Chamberlan garage door opener and its remote has been defective since of late.Pl...
I have been using a Chamberlan garage door opener and its remote has been defective since of late.Pl...
(Posted by donweera42 7 months ago)

Garage Door Opener Model
How do I know if I have a 3255 or 3255-2M garage door opener?
How do I know if I have a 3255 or 3255-2M garage door opener?
(Posted by ericoster1 3 years ago)

Liftmaster 3255m Garage Door Opener
i cannot get the keypad programmed to the garage door opener.
i cannot get the keypad programmed to the garage door opener.
(Posted by bwerries 10 years ago)
Mh Liftmaster Garage Door Will Not Open Intermittently.
On the occasion when the garage door will not open, there is power to the opener. Both leds on the p...
On the occasion when the garage door will not open, there is power to the opener. Both leds on the p...
(Posted by kellhowarda 11 years ago)

Garage Door Opens Intermittently
Garage door is closed and opens periodically on it's own when nobody activates the interior wall swi...
Garage door is closed and opens periodically on it's own when nobody activates the interior wall swi...
(Posted by Anonymous-59422 11 years ago)