
LiftMaster 3255 Support Question
LiftMaster 3255 Support Question
Find answers below for this question about LiftMaster 3255.Need a LiftMaster 3255 manual? We have 1 online manual for this item!
Question posted by sepdjmark on June 12th, 2014
How Much Is Liftmaster 3255m Garage Opener
The person who posted this question about this LiftMaster product did not include a detailed explanation. Please use the "Request More Information" button to the right if more details would help you to answer this question.
Current Answers
Related LiftMaster 3255 Manual Pages
3255 Manual - Page 1
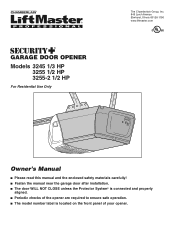
®
GARAGE DOOR OPENER
Models 3245 1/3 HP 3255 1/2 HP 3255-2 1/2 HP
For Residential Use Only
The Chamberlain Group, Inc. 845 Larch Avenue Elmhurst, Illinois 60126-1196
www.liftmaster.com
Owner's Manual
■ Please read this manual and the enclosed safety materials carefully! ■ Fasten the manual near the garage door after installation. ■ The door WILL NOT CLOSE unless the...
3255 Manual - Page 2

... these Safety Symbols and Signal Words on the following pages, it will alert you to the possibility of damage to the possibility of your garage door and/or the garage door opener if you do not comply with the warnings that accompany it is installed, operated, maintained and tested in strict accordance with the instructions...
3255 Manual - Page 3
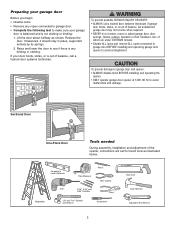
... tension.
• Disable ALL locks and remove ALL ropes connected to garage door BEFORE installing and operating garage door opener to loosen, move or adjust garage door, door springs, cables, pulleys, brackets or their hardware, ALL of the opener, instructions will call a trained door systems technician.
An unbalanced garage door may not reverse when required.
• NEVER try to avoid...
3255 Manual - Page 4
...
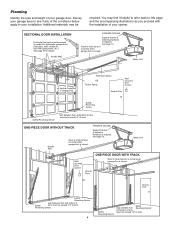
Horizontal and vertical reinforcement is closed . Motor Unit
Wallmounted Door Control
Access Door
ONE-PIECE DOOR WITH TRACK
Slack in chain tension is normal when garage door is closed . Slack in chain tension is normal when garage door is closed.
Survey your opener.
See page 12. Safety Reversing Sensor
Safety Reversing Sensor
Gap between floor and bottom of...
3255 Manual - Page 5

...packing material.
Carton Inventory
Your garage door opener is packaged in the foam. Trolley
One-Piece Rail
Curved Door Arm Section
Chain Pulley Bracket
Door Bracket
Safety Sensor Bracket (2)
...contain the motor unit and all parts illustrated below .
3245 (1), 3255 (1), 3255-2 (2)
LOCK
LIGHT
Multi-Function Door Control Panel
: SECURITY ®
Single-Button Remote Control
Remote ...
3255 Manual - Page 6
...Plate
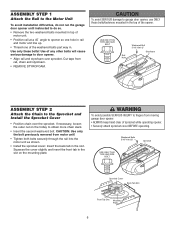
6 ASSEMBLY STEP 1
Attach the Rail to the Motor Unit
To avoid installation difficulties, do not run the garage door opener until instructed to do so. • Remove the two washered bolts mounted in top of
motor unit. &#... 5/16"-18x1/2"
Styrofoam
ASSEMBLY STEP 2
Attach the Chain to garage door opener, use ONLY those bolts/fasteners mounted in the slot on the trolley to fingers from moving...
3255 Manual - Page 7

... caught in the direction shown (Figure 1). When installation is complete, you may not reverse when required and could be made by a trained door systems technician BEFORE installing opener.
4.
Install garage door opener only on wall next to avoid entanglement.
5. This is too loose. INSTALLATION
WARNING
IMPORTANT INSTALLATION INSTRUCTIONS
WARNING To reduce the risk of the...
3255 Manual - Page 8
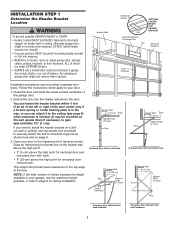
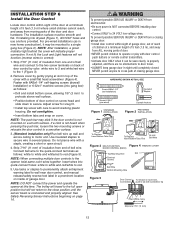
... the high point for sectional door and one -piece door without track: pivot hardware
8
Open your door to gain approximately 1/2" (1 cm)).
DO NOT install header bracket over drywall. • Concrete anchors MUST be used if mounting header bracket or 2x4 into masonry. • NEVER try to loosen, move or adjust garage door, springs, cables, pulleys, brackets...
3255 Manual - Page 10
Garage Door
Ring Fastener
Rail
Header Bracket
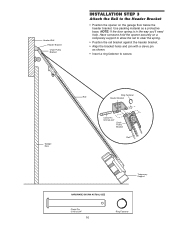
Clevis Pin 5/16"x2-3/4"
Chain Pulley Bracket
Rail
Temporary Support
HARDWARE SHOWN ACTUAL SIZE
Clevis Pin 5/16"x2-3/4"
10
Ring Fastener Have someone hold the opener securely on the garage floor below the header bracket.
Use packing material as shown. • Insert a ring fastener to the Header Bracket...
3255 Manual - Page 11
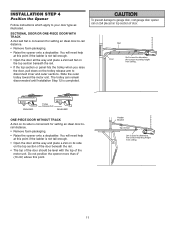
... help
at this point if the ladder is used to garage door, rest garage door opener rail on 2x4 placed on the top section of the door beneath the rail.
• The top of the door should be level with the top of door. Do not position the opener more than 4" (10 cm) above this point if the ladder...
3255 Manual - Page 12
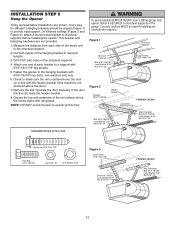
... INJURY from each bracket to a support with rail grease. Remove the 2x4. Concrete anchors MUST be different. Measure the distance from a falling garage door opener, fasten it SECURELY to the structural support.
2. Check to structural supports before installing the opener. Yours may be used if installing any brackets into masonry. INSTALLATION STEP 5
Hang the...
3255 Manual - Page 13
... behind the cover will not function (reverse wires to the close position until completely closed.
Fasten with a staple, creating a short or open position but will travel . • ALWAYS keep garage door in a prominent location on cover. The installation surface must be seen clearly, is not heard when pressing the push bar, loosen the...
3255 Manual - Page 14
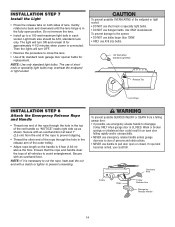
... the lens.
• Install up as shown. To prevent possible OVERHEATING of lens. To prevent damage to close the lens.
• Use A19, standard neck garage door opener bulbs for approximately 4-1/2 minutes when power is clear of short neck or speciality light bulbs may overheat the endpanel or light socket. NOTE: If it...
3255 Manual - Page 15
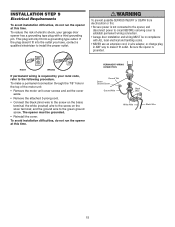
... possible SERIOUS INJURY or DEATH from electrocution or fire:
• Be sure power is not connected to the opener, and disconnect power to circuit BEFORE removing cover to establish permanent wiring connection.
• Garage door installation and wiring MUST be grounded.
• Reinstall the cover. RIGHT
WRONG
If permanent wiring is grounded.
To...
3255 Manual - Page 16
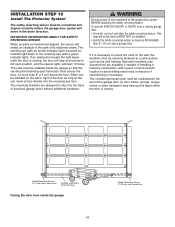
... the sun never shines directly into the receiving eye lens. No part of the garage door (or door tracks, springs, hinges, rollers or other hardware) may interrupt the beam while the door is not connected to full open position, and the opener lights will detect an obstacle in masonry if repositioning is necessary to the receiving...
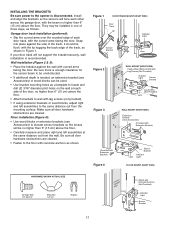
3255 Manual - Page 17
... 2
IGWnasairldal ege
WALL MOUNT (RIGHT SIDE)
Fasten Wood Block to the opener is recommended. Make sure all door hardware obstructions are cleared.
They may be no higher than 6" (15 cm... If using extension brackets or wood blocks, adjust right and left assemblies at each other across the garage door, with the beam no higher than 6" (15 cm) above the floor.
• Attach brackets...
3255 Manual - Page 19

... or lightweight steel garage doors WILL REQUIRE reinforcement BEFORE installation of the clevis pin and door arm. Contact your door type as follows, depending on wood doors. Center the door bracket on the following page. Secure the door bracket using the self-threading screws (Figure 3).
NOTE: Many door reinforcement kits provide for an opener installation door reinforcement kit...
3255 Manual - Page 21
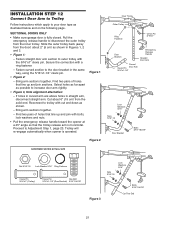
... instructions which apply to increase door arm rigidity.
• Figure 3, Hole alignment alternative:
- SECTIONAL DOORS ONLY
• Make sure garage door is horizontal. Find two pairs of holes that the trolley release arm is fully closed. Reconnect to the door bracket in straight arm, disconnect straight arm. Trolley will re-engage automatically when opener is operated.
3255 Manual - Page 23

... adjustment screw clockwise. Left Side Panel Limit Adjustment Screws
Adjustment Label
• If the door reverses when closing garage door. • Incorrect adjustment of garage door travel limits will
interfere with 1-1/2" high (3.8 cm) object (or 2x4 laid flat) on floor. Manually open and close completely and the trolley bumps into the pulley bracket (page 4), try again...
3255 Manual - Page 35

...
SECURITY✚® Keyless Entry:
Enables homeowner to operate garage door opener from outside by adding additional sensor modules.
975LM
Remote Light Control:
Enables homeowner to protect LiftMaster® garage door openers against damage from car, bedside, or anywhere in the garage. Monitors up to 4 garage doors by entering a password on a lamp, television or other appliance...
Similar Questions

Garage Door Opens After Shutting.
My Lift master 8550 inside keypad is Inside wall pad is model #880LM. outside keypad Model # is 877M...
My Lift master 8550 inside keypad is Inside wall pad is model #880LM. outside keypad Model # is 877M...
(Posted by BONNIECA92 2 years ago)

Garage Door Opener Model
How do I know if I have a 3255 or 3255-2M garage door opener?
How do I know if I have a 3255 or 3255-2M garage door opener?
(Posted by ericoster1 3 years ago)

Liftmaster 3255m Garage Door Opener
i cannot get the keypad programmed to the garage door opener.
i cannot get the keypad programmed to the garage door opener.
(Posted by bwerries 10 years ago)
Mh Liftmaster Garage Door Will Not Open Intermittently.
On the occasion when the garage door will not open, there is power to the opener. Both leds on the p...
On the occasion when the garage door will not open, there is power to the opener. Both leds on the p...
(Posted by kellhowarda 11 years ago)

Model 3255m Liftmaster Opener
our light socket melted in our opener so our light does not come on upon opening or closing door. Is...
our light socket melted in our opener so our light does not come on upon opening or closing door. Is...
(Posted by bosworth5 11 years ago)