LiftMaster 3245 Support Question
LiftMaster 3245 Support Question
Find answers below for this question about LiftMaster 3245.Need a LiftMaster 3245 manual? We have 1 online manual for this item!
Question posted by 6nova7 on April 5th, 2014
Liftmaster 3245 Trouble Shooting
My garage door doesn't come down all the way. I have adjusted the down force screw and the door still stops about 4" to 10" from the bottom. Also, when the door stops short at the bottom- it coasts and doesn't really seem to stop abruptly? Any ideas? Dan
Current Answers
Related LiftMaster 3245 Manual Pages
3255 Manual - Page 1
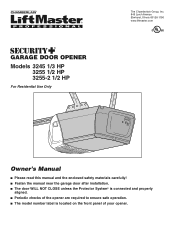
®
GARAGE DOOR OPENER
Models 3245 1/3 HP 3255 1/2 HP 3255-2 1/2 HP
For Residential Use Only
The Chamberlain Group, Inc. 845 Larch Avenue Elmhurst, Illinois 60126-1196
www.liftmaster.com
Owner's Manual
■ Please read this manual and the enclosed safety materials carefully! ■ Fasten the manual near the garage door after installation. ■ The door WILL NOT CLOSE unless...
3255 Manual - Page 2

... to the possibility of damage to the trolley 21-22
Adjustment
23-25
Adjust the travel limits 23
Adjust the force 24
Test the safety reversal system 25
Test the Protector System 25
Operation
26-30
Operation safety instructions 26
Using your garage door and/or the garage door opener if you do not comply with the instructions and...
3255 Manual - Page 3
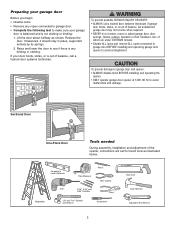
... remove ALL ropes connected to garage door BEFORE installing and operating garage door opener to avoid malfunction and damage.
Sectional Door
One-Piece Door
Tools needed
During assembly, installation and adjustment of the opener, instructions will call for hand tools as shown. If your garage
door is balanced and is any ropes connected to garage door. • Complete the following...
3255 Manual - Page 4
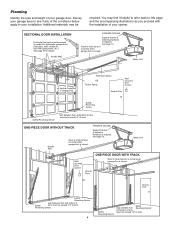
... when garage door is required. Reversing Sensor
4
Safety Reversing Sensor
Safety Gap between floor and bottom of Garage Door
Extension Spring OR Torsion Spring
Wallmounted Door Control
Access Door
--- --- -- Header Wall
FINISHED CEILING
Support bracket & fastening hardware is closed . See page 12.
Additional materials may find it helpful to refer back to your opener.
3255 Manual - Page 5

...garage door opener is packaged in the foam.
Parts may be stuck in two cartons which If anything is also listed below . Trolley
One-Piece Rail
Curved Door Arm Section
Chain Pulley Bracket
Door...
contain the motor unit and all parts illustrated below .
3245 (1), 3255 (1), 3255-2 (2)
LOCK
LIGHT
Multi-Function Door Control Panel
: SECURITY ®
Single-Button Remote Control
...
3255 Manual - Page 6
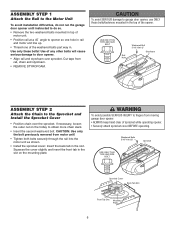
...to the Motor Unit
To avoid installation difficulties, do not run the garage door opener until instructed to do so. • Remove the two washered ...way in the top of sprocket while operating opener. • Securely attach sprocket cover BEFORE operating. USE ONLY THIS TYPE AND SIZE
BOLT
Rail Hole
Washered Bolt 5/16"-18x1/2"
Styrofoam
ASSEMBLY STEP 2
Attach the Chain to garage door opener...
3255 Manual - Page 7

... to garage door BEFORE installing opener to the installation section. NEVER connect garage door opener to power source until instructed to do not re-adjust the ...door.
10. If the chain returns to secure the adjustment.
An improperly balanced door may notice loosening of chain after
Adjustment Step 3 (Test the Safety Reversal System).
ALL repairs to garage door control.
11. Door...
3255 Manual - Page 8
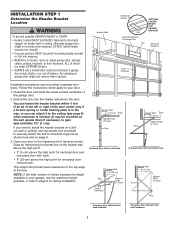
... into masonry. • NEVER try to loosen, move or adjust garage door, springs, cables, pulleys, brackets, or their hardware, ALL of which apply to the highest point of Travel
One-piece door with track.
• 8" (20 cm) above the door. Open your door to your garage, use lag screws (not provided) to securely fasten the 2x4 to page 9 for...
3255 Manual - Page 10
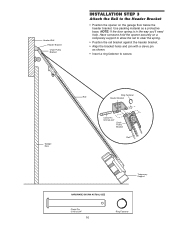
... hold the opener securely on the garage floor below the header bracket. Garage Door
Ring Fastener
Rail
Header Bracket
Clevis Pin 5/16"x2-3/4"
Chain Pulley Bracket
Rail
Temporary Support
HARDWARE SHOWN ACTUAL SIZE
Clevis Pin 5/16"x2-3/4"
10
Ring Fastener Header...bracket holes and join with a clevis pin
as a protective base. NOTE: If the door spring is in the way you'll need help.
3255 Manual - Page 11
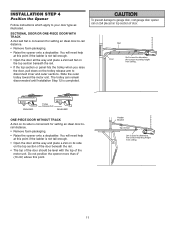
You will need help at this point.
Do not position the opener more than 4" (10 cm) above this point if the ladder is not tall enough. • Open the door all the way and place a 2x4 on its side on the trolley release arm to garage door, rest garage door opener rail on 2x4 placed on its side is not tall...
3255 Manual - Page 12
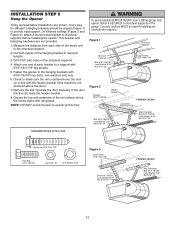
... from a falling garage door opener, fasten it SECURELY to opener at this time. Check to provide rigid support. NOTE: DO NOT connect power to structural supports of the motor unit to required lengths.
3.
Remove the 2x4. Figure 1
Structural Supports
Measure Distance
Bolt 5/16"-18x7/8" Lock Washer 5/16" Nut 5/16"-18
Lag Screws 5/16"-18x1-7/8"
Figure...
3255 Manual - Page 13
...on page 16. The trolley will travel . • ALWAYS keep garage door in a prominent location on screw head and slide down to correct).
1.
If not lit, the ...door and door hardware. Adjust screw for snug fit.
• Install top screw with a staple, creating a short or open position but will not return to the opener, twist same color wires together. NOTE: When connecting multiple door...
3255 Manual - Page 14
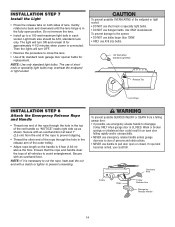
... socket: • DO NOT use short neck or specialty light bulbs. • DO NOT use halogen bulbs.
Weak or broken springs or unbalanced door could fall.
The light will turn ON... light bulb in an open door falling rapidly and/or unexpectedly. • NEVER use of lens. The use emergency release handle unless garage doorway is clear of the outer trolley.
• Adjust rope length so the...
3255 Manual - Page 15
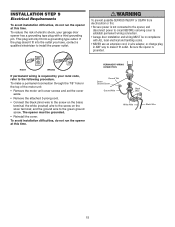
... disconnect power to circuit BEFORE removing cover to establish permanent wiring connection.
• Garage door installation and wiring MUST be grounded.
• Reinstall the cover.
The opener must be in ANY way to the screw on the silver terminal;
If the plug doesn't fit into a grounding type outlet. To reduce the risk of the motor...
3255 Manual - Page 16
... or DEATH from inside the garage so that the sending and receiving eyes face each location to full open position, and the opener lights will flash 10 times. If an obstruction breaks the light beam while the door is necessary. If installing in masonry if repositioning is closing, the door will stop and reverse to avoid drilling...
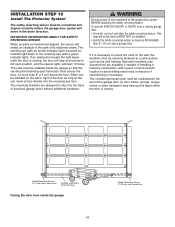
3255 Manual - Page 17
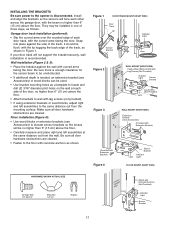
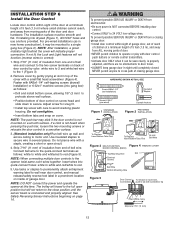
...should lie flush, with lag screws (not provided).
• If using extension brackets or wood blocks, adjust right and left assemblies at each side of the door, no higher than 6" (15...against the side of three ways, as a template to locate and drill (2) 3/16" diameter pilot holes on the wall at the same distance out from the mounting surface. Garage door track installation (preferred):
&#...
3255 Manual - Page 19

...8226; Drill 3/16" fastening holes.
HARDWARE SHOWN ACTUAL SIZE
Self-Threading Screw 1/4"-14x5/8"
Fiberglass, aluminum or lightweight steel garage doors WILL REQUIRE reinforcement BEFORE installation of Garage Door
UP
Figure 4
19 Center the door bracket on your garage door manufacturer for an opener installation door reinforcement kit. Mark, drill holes and install as the horizontal brace...
3255 Manual - Page 24
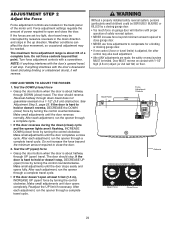
... reverses during the down (close) cycle and the opener lights aren't flashing, INCREASE DOWN (close) force by a closing garage door.
• Too much force on garage door will stop. Readjust the UP limit if necessary. Back Panel
Force Adjustment Controls
KG
KG
Antenna
FORCE ADJUSTMENT LABEL
9
1
7
3
5
KG Open Force
9
1
7
3
5
KG
Close Force
24 Weather conditions can affect the...
3255 Manual - Page 25
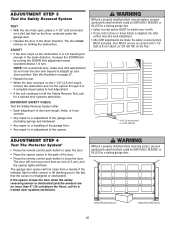
... door arm length, limits, or force
controls. • Any repair to or adjustment of the garage door
(including springs and hardware). • Any repair to or buckling of the garage floor. • Any repair to open , place a 1-1/2" (3.8 cm) board
(or a 2x4 laid flat) on the floor, centered under the garage door. • Operate the door in the down direction. The garage door opener...
3255 Manual - Page 35

....
975LM
Remote Light Control:
Enables homeowner to protect LiftMaster® garage door openers against damage from car, bedside, or anywhere in the garage.
SECURITY✚® 3-Button Mini Remote Control: With key ring and fastening strip. Includes battery.
Surge Protector: The Garage Door Opener Surge Protector is open garage door manually from outside by entering a password on...
Similar Questions

Trouble Shooting The 3900
I lost electricity for a day and pulled release to close door. How do I get it to unrelease. also no...
I lost electricity for a day and pulled release to close door. How do I get it to unrelease. also no...
(Posted by ramckahan 9 years ago)

Lift Master Trouble With Door Opening All The Way
My lift master only opens up to the sensors and that's it my sensor lights are not flickering or off...
My lift master only opens up to the sensors and that's it my sensor lights are not flickering or off...
(Posted by Anonymous-118903 10 years ago)


I Have A 3245m. My Neighbor's Remote Operates My Door, But My Remote Does Not Op
(Posted by nwebner 12 years ago)

Trouble Shoot
garage door closes and opens 2 inchs and will not fully open or stay closed
garage door closes and opens 2 inchs and will not fully open or stay closed
(Posted by wgbolt55 12 years ago)