LiftMaster 3240 Support Question
LiftMaster 3240 Support Question
Find answers below for this question about LiftMaster 3240.Need a LiftMaster 3240 manual? We have 1 online manual for this item!
Question posted by Msrock2000 on May 28th, 2012
Only One Light Works
one light does not work even with a new bulb. What whould cause this problem?
Current Answers
Related LiftMaster 3240 Manual Pages
3240 Manual - Page 1
®
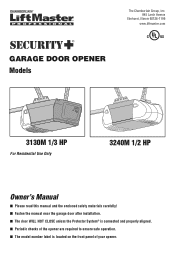
GARAGE DOOR OPENER Models
The Chamberlain Group, Inc. 845 Larch Avenue
Elmhurst, Illinois 60126-1196
www.liftmaster.com
3130M 1/3 HP
For Residential Use Only
3240M 1/2 HP
Owner's Manual
■ Please read this manual and the enclosed safety materials carefully! ■ Fasten the manual near the garage door after installation. ■ The door WILL NOT CLOSE unless...
3240 Manual - Page 2
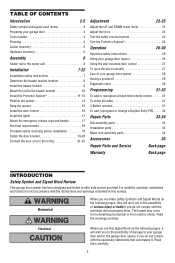
... Install the Protector System 11-13 Position the opener 14 Hang the opener 15 Install the door control 16 Install the lights 17 Attach the emergency release rope and handle...safety instructions 26
Using your garage door opener 26
Using the wall-mounted door control 27
To open the door manually 27
Care of your garage door opener 28
Having a problem 29
Diagnostic chart 30
...
3240 Manual - Page 3
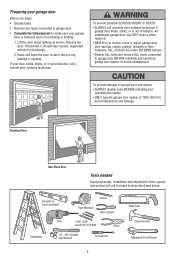
If balanced, it should stay in place, supported entirely by its springs.
2. To prevent damage to garage door and opener:
• ALWAYS disable locks BEFORE installing and operating the opener.
• ONLY operate garage door opener at 120V, 60 Hz to avoid entanglement. Carpenter's Level (optional)
12 Tape Measure
Pencil Wire Cutters
Drill
3/16", 5/16"
and 5/32" Drill...
3240 Manual - Page 5
...purchased.
Model 3240M
Model 3130M
Model 3240M (1)
Model 3130M (1)
Multi-Function Door Control Panel
Lighted Door Control Button
SECURITY✚® 3-Button Remote Control
2 Conductor Bell Wire
... Rope Handle
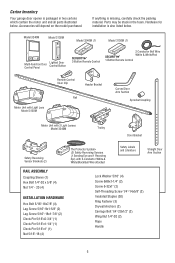
5 If anything is also listed below . Carton Inventory
Your garage door opener is packaged in the foam. Parts may be stuck in two cartons which contain the motor unit ...
3240 Manual - Page 6

...the Rail to the Motor Unit
To avoid installation difficulties, do not run the garage door opener until the coupling fits securely over the motor unit sprocket.
• Align the ...8226; Turn release arm down to do so. Be certain to install it after Installation Step 4.
• Working on a level surface, align the rail assembly with the motor unit, as shown.
• Slip the ...
3240 Manual - Page 7
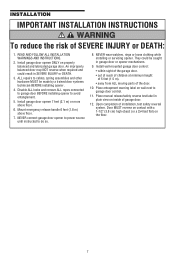
...could be made by a trained door systems technician BEFORE installing opener.
4. Install garage door opener 7 feet (2.1 m) or more above floor.
7. They could result in garage door or opener mechanisms.
9. Install garage door opener ONLY on inside of the door.
10. Disable ALL locks and remove ALL ropes connected to garage door BEFORE installing opener to cables, spring assemblies and...
3240 Manual - Page 11
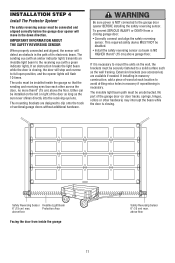
... if repositioning is necessary to avoid drilling extra holes in masonry construction, add a piece of the door as long as the wall framing. The invisible light beam path must be connected and aligned correctly before the garage door opener will detect an obstacle in the down direction.
This required safety device MUST NOT be securely...
3240 Manual - Page 12
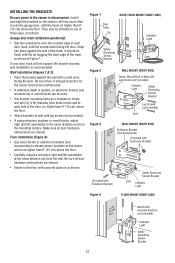
INSTALLING THE BRACKETS
Be sure power to the opener is needed, an extension bracket (see Accessories) to elevate ...64258;oor with concrete anchors as follows:
Garage door track installation (preferred):
• Slip the curved arms over the rounded edge of the track. Figure 1
Door Track
Lip
DOOR TRACK MOUNT (RIGHT SIDE)
Indicator Light
Safety
Reversing
Sensor
Lens
Bracket
Figure 2 ...
3240 Manual - Page 14
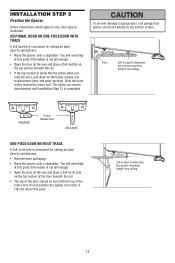
... Step 13 is convenient for setting an ideal door-to your door type as illustrated. To prevent damage to garage door, rest garage door opener rail on 2x4 placed on the top section of the door beneath the rail.
• The top of the door should be level with the top of Door
2x4 is convenient for setting an ideal...
3240 Manual - Page 15
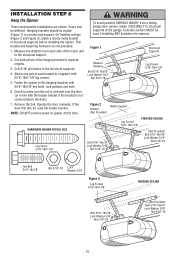
.../8" Lock Washer 5/16"
Nut 5/16"-18
FINISHED CEILING
(Not Provided) Bolt 5/16"-18x7/8" Lock Washer 5/16"
Nut 5/16"-18
15 Measure the distance from a falling garage door opener, fasten it SECURELY to structural supports of each side of the hanging bracket to the structural support.
2. Cut both pieces of the motor unit to...
3240 Manual - Page 16

...door controls to red. 6. See Step 11 on cover. INSTALLATION STEP 7
Install the Door Control
Locate door control within sight of garage door...door control push buttons or remote control transmitters.
• Activate door ONLY when it may stick if the door...garage door. NOTE: DO NOT connect the power and operate the opener
Lighted Door
Control
Multi-Function
Door Control
Door...the opener, ...
3240 Manual - Page 17
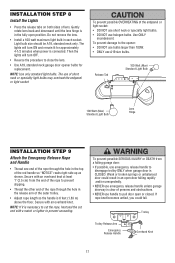
Light bulb size should be A19, standard neck only.
Use ONLY
incandescent. Secure with an overhand knot at least 1" (2.5 cm) from a falling garage door: • If possible, use emergency release handle to close the lens.
• Use A19, standard neck garage door opener bulbs for approximately 4-1/2 minutes when power is necessary to prevent unraveling. Secure with a match or lighter...
3240 Manual - Page 18
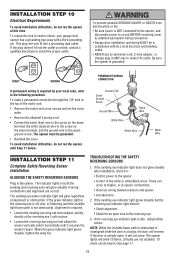
... connection.
• Garage door installation and wiring MUST be in compliance with a third grounding pin. To make a permanent connection through the 7/8" hole in place.
• Loosen the receiving eye wing nut and adjust the sensor vertically and/or horizontally until Step 11 below.
The opener lights will blink 10 times. (If bulbs are correct. RIGHT...
3240 Manual - Page 25
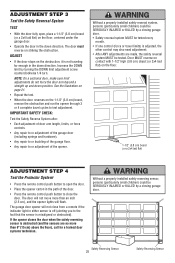
... one control (force or travel cycles to close from a remote if the indicator light in either sensor is not traveling far enough in the down direction. Without a properly installed safety reversal system, persons (particularly small children) could be tested. The garage door opener will flash. Safety Reversing Sensor 25
Safety Reversing Sensor The...
3240 Manual - Page 26
... closed , it will stop . someone walks through the open door falling rapidly and/or unexpectedly, causing SEVERE INJURY or DEATH.
7. Bulb size is clear of the following conditions: when the opener is activated (with each use emergency release handle unless garage doorway is A19. Security✚® light feature: Lights will reverse. 3. ALL repairs to a matching code...
3240 Manual - Page 29
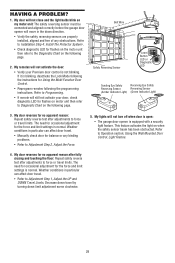
... installed, aligned and free of any binding problems.
• Refer to force or travel limits. My door will not close and the light bulbs blink on my motor unit: The safety reversing sensor must be connected and aligned correctly before the garage door opener will not activate the door:
• Verify your door, check diagnostic LED for flashes...
3240 Manual - Page 30
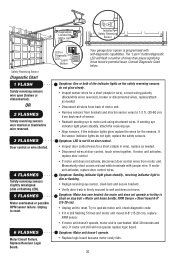
... Diagnostic LED "Learn"
Button
Your garage door opener is programmed with jumper wire.
Symptom: One or both of the indicator lights on the safety reversing sensors do not light, replace the safety sensors. If sending eye indicator light glows steadily, attach the receiving eye. • Align sensors, if the indicator lights glow replace the wires for a short...
3240 Manual - Page 31
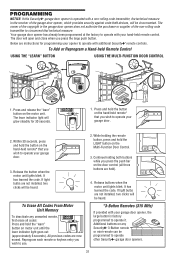
... when the motor unit lights blink. If light bulbs are now erased. All previous codes are not installed, two clicks will be heard.
*3-Button Remotes (315 MHz)
If provided with your garage door.
3. LOCK
LIGHT
LOCK
LIGHT
4. It has learned the code. Your garage door opener has already been programmed at the factory to operate your garage door opener, the large button is...
3240 Manual - Page 32
...
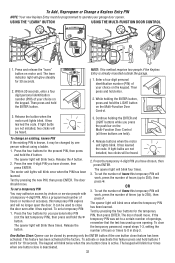
NOTE: Your new Keyless Entry must be programmed to 0 in step 3. The learn " button on the Multi-Function Door Control (all three buttons are held). Then press and hold enter.
2. Continue holding the ENTER button, press and hold buttons 1 and 9 for your garage door opener. Release buttons when the motor unit lights blink. If light bulbs are not...
3240 Manual - Page 35
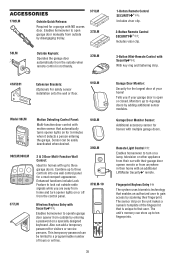
... a neat compact appearance. Also can be limited to gain access by scanning their home with their garage door opener remote or from the outside by adding additional sensor
CLOSED
modules. CLOSED OPEN
Remote Light Control : Enables homeowner to turn opener lights on or off from the control panel.
379LM-10
Wireless Keyless Entry with Security✚®...
Similar Questions

I Have Installed A Chamberlan Garage Door Opener And The Remote I Was Using Is
I have been using a Chamberlan garage door opener and its remote has been defective since of late.Pl...
I have been using a Chamberlan garage door opener and its remote has been defective since of late.Pl...
(Posted by donweera42 8 months ago)
Garage Door Opens After Shutting.
My Lift master 8550 inside keypad is Inside wall pad is model #880LM. outside keypad Model # is 877M...
My Lift master 8550 inside keypad is Inside wall pad is model #880LM. outside keypad Model # is 877M...
(Posted by BONNIECA92 2 years ago)

Liftmaster 3240 Has No Power
While trying to pair a new remote the unit stopped working like it has blown a fuse. No power
While trying to pair a new remote the unit stopped working like it has blown a fuse. No power
(Posted by steve9800 10 years ago)

How Do I Get Face Off The Multi Fuction Door Control Pannel
(Posted by mdf42 11 years ago)

Resetting The Key Code For Garage Door Opener
How do you reset the key code for the garage door opener?
How do you reset the key code for the garage door opener?
(Posted by khiggins69 12 years ago)